| Now how do you sew this all together? There are several
ways but I will show you one way and if you you have a favorite way...go
for it!
**A note on straight pins...I like to use the thinnest pins I can get instead of those giant things we have beem sold on buying. You can get thin, extra long silk or pleaters pins that are really nice. |
 |
| STEP
1:
In this method, you first sew together
two diamond sections.
You then sew the squares to the diamond sections. Then you sew the four diamond sections together matching in the center at the "O". Last you set in the triangles and you are done. |
 |
| STEP 2: I
use a ruler and mark the 1/4th inch seam allowance in all the corners of
my pieces. You will find this very important. If you want to you
can draw the seam allowance all the way around.
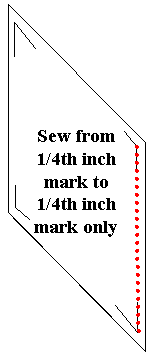
Sew two diamonds together: STEP 3: When you sew the pieces together in ANY set-in seam, it is very important that you only sew from the 1/4th inch mark to the 1/4th inch mark. Do not sew all the way to the end of the pieces. Do this to make four double diamond sections as in the diagram above. |
... |
| STEP
3: Next put the square under the bottom half of the diamond section,
right sides together..
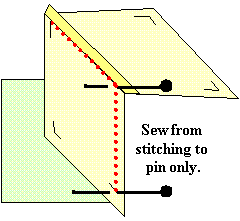
Line up the pieces. Put a pin exactly where the stitching stops on the diamond section, and put it through the marked 1/4th inch corner of the square underneath. Pull the fabrics tight against each other and flip pin to side, then pin in place. Be careful you don't shift your fabrics when you secure the straight pin. Do the same for the outside edge of the star, matching the 1/4th inch marks, and pin that in place. Depending on the size of your star, put as many pins in between as you feel you need to hold the pieces in place as you sew. Sew with an accurate 1/4 inch seam allowance. STEP 4: Start sewing exactly at the pin where the stitching stopped from the previous seam. I put the piece under the machine, then hold it in place and pull out the pin that is flipped on it's side. Don't catch the seams in the stitching! Now put your machine needle down into the exact hole where you took the pin out of. I don't backstitch here, but I set my stitch length to O (zero) and then stitch in place a few times to knot the thread, then I gradualy bring up my stitch length to normal while still sewing (lock knot) and continue to sew to the outer edge 1/4th inch mark. Do a "lock knot" in reverse (gradually shorten stitch until at nark then stitch in place) or backstitch at the outer edge.. |
.
.
. . .
|
| STEP 5: Now
you have to piviot this whole thing. You have to position your pieces
so you can sew the oposite side of the square to the opposite side of the
diamond.
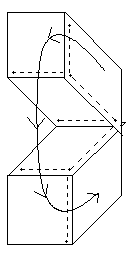
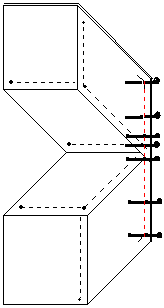
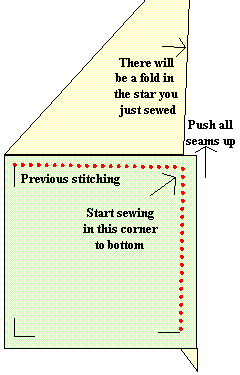
Flip the whole thing over then bring the corner of the square that is opposite of where you just sewed and pull it around so it lines up with the end of the opposite star point. You will now have the square on top and the diamond sections underneath. Push all the seams, top and underside of the piece, out of the way where indicated by the arrows. Push and shove a little to make the whole area lie flat. Don't catch the seams in the stitching! You won't need a pin this time in the top right of the square here. The other stitching all holds it in place. Smoth it all out and then start to sew where indicated in the diagram making a "lock knot" as before (start sewing exactly where the previous stitching stopped) and stitch to the bottom of the square. Sew the other three double-diamond sections you have left.
|
PRESS all the seams counterclockwise on all sections. |
| **Remember, you only sew
from the 1/4th inch mark to the 1/4th inch mark.
Do not sew all the way to the end of the pieces, as you will need the open
seams at the outside edge of the diamonds
to sew in the triangles.
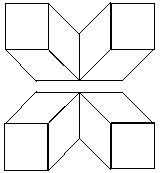
STEP 6: Now you will sew the two diamond sections together matching the center. Place pieces right side together. Pinning: Put one pin exactly through the seam allownace in the center of the star where all the diamonds come together, and put it through the center of the star piece underneath. Hold pin straight up and down tight to the fabric but don't secure the pin. Next, put one pin about 1/8" away from the center pin on both sides and secure those. Pull out the center pin as that will cause distortion. Take a few large basting stitches over the center seam and check to see if it all matches. It does match? Good...now pin from center to outer 1/4" marks and sew across the whole seam. It doesn't match? Well, you will just have to take it out and try again. Hey! It's better to take it out a few large basting stitches than to try to rip out that whole seam, egh? Anyway, try again until you are satisfied, then pat yourself on the back!
If you have a favorite way to sew the star centers together, use that. |
|
| You set in the triangle pieces the same way as the squares,
starting at that 1/4th inch mark and sew to the edges. Remember
to push the seams out of the way. Don't catch the
seams in the stitching! Sew from the stitching of the previous seam
to the edge.
Your star is complete! |
 |
| And there you have it! It's not magic, it's just takes knowing how to sew set- in seams. | If your length is 8 inches or 88 inches, this method will make your squares and triangles for your custom size 8 pointed star. |

