| STEP
1:
Draft a square on your graph
paper the size you want your finished 8 pointed
star to be.
A: Draw a line from top to bottom in
the center.
B: Draw a line from side to side in
the center.
C: Draw a line from corner to corner
on the diagonal.
D: Draw another line from corner to
corner on the diagonal. |
 |
| STEP
2:
Take your compass andopen it so that the pencil end is
in the very center of the star where all the lines cross and the pointy
end is in one of the corners.
Without moving the set opening, go to step 3. |
 |
| STEP
3: Put the pointy end of the compass in one of the corners
of the square and then swing around the pencil end until the lead crosses
the outside line at 1 and still keeping the
point in the corner, swing the lead around until it crosses at 2
Now put the pointy end in another corner, and swing around to make
a dash at 3 and then one at 4, etc. Do this for all four corners.
Please note in the next drawing that the measurement from the center
to the outside corner is the same measurement from the corner to where
the crossover marks from your compass are. |
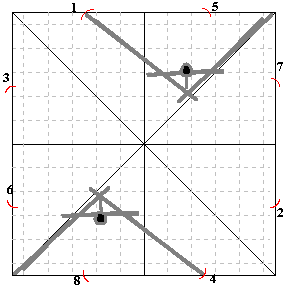
Also note what the measurement is (this is for an 8" square)...5
21/32. This is why it is so much easier to do this with a compass than
a ruler...the ruler fractions would scare you! |
| STEP 4: Okay,
now hang onto your thinking caps. This is easy but follow the directions!
Remember to cross your lines exactly where
the pencil marks from your compass touch the outside line..
Draw a line from A to F
Draw a line from B to E
Draw a line from C to H
Draw a line from D to G
Draw a line from A to D
Draw a line from H to E
Draw a line from B to G
Draw a line from C to F
And if you want a star with the corner triangle also divided in half
like the star on the left, draw a line from G
to F. Use
the original division lines on your drafting for
the star on the right. |

 .
. .
. 
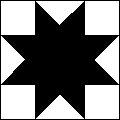
|
| STEP 5: The last
thing you have to do is to isolate the shapes you need for your pattern.
Each different shape will need a different template.
The blue 45 degree diamond shape
The pink corner square
The red triangle shape for the traditional
plain eight pointed star
The green triangle shape if you choose to divide
the corner Note
that the green and yellow division triangle are the same size, just turned
differently.. |
 |
| For the Stripped Pieced Lone Star
quilt in this project, you will use the blue 45 degree diamond shape. |
I will put up a page in the future on how
to make these shapes into templates or convert to quick piecing sizes? |
 It
is nice to know how to draft a traditional eight pointed star. You may
have a pattern for an average quilt block size like 8, 10, or 12 inches
in a book. However, you may want a *special* size block like 13 3/10" to
fit a border stripe or a corner square size that will fit a special motif
in the fabric. Knowing how to draft your own stars is a perfect way to
break loose from commercial patterns.
It
is nice to know how to draft a traditional eight pointed star. You may
have a pattern for an average quilt block size like 8, 10, or 12 inches
in a book. However, you may want a *special* size block like 13 3/10" to
fit a border stripe or a corner square size that will fit a special motif
in the fabric. Knowing how to draft your own stars is a perfect way to
break loose from commercial patterns.