There are many types of borders to add to quilts. Many times a quilt will dictate what type of border to add to it. |
The choices are strictly up to you understand, as it is your quilt, but there are some suggestions here to consider. |
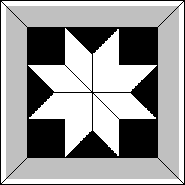
A quilt with a lot of miters in the blocks, will probably look better with mitered borders. but, there are many exceptions. -----> |
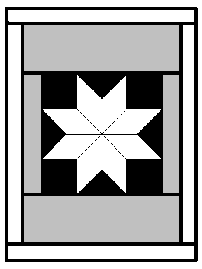
 In
this example miters won't work well if you have different
size borders on the sides than on the top and bottom. In
this example miters won't work well if you have different
size borders on the sides than on the top and bottom. |
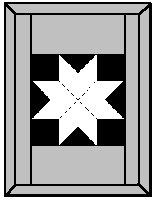
| If you want to enlarge a square central quilt
block such as a lone star to fit a bed, you will have to add borders
of different widths to make it a rectangle. In this example,
straight strips would look much better than the miters above.
To turn a square into rectangle for a bed, first add a narrow strip on each side of the center block, then a top and bottom strip that is wider. Add the second border in the same manner for a neat clean look. The size of the strips for the last outer border can be all equal top, bottom and sides, or unequal as in the inner border. EXCEPT: The only time you might want to put miters on the outside border with straight borders inside is if you had a border print or stripe that you wanted to curve around the outside corners nicely. |
Some info on common
bed sizes for help on determining the size you will have to make the
borders.
|
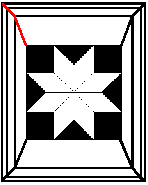
| Example of bad border additions.
Generally stick to one style of border throughout the quilt. Here is an example of adding borders that isn't quite as graceful and neat as the one above. The straight strips on the first border side are going lengthwise freom top to bottom, which isn't against the quilt police law, but it just doesn't look as neat as the example above. Then there are miters on the second border which don't flow with the first border. EXCEPT: The only time I would put miters on the outside border with straight borders inside is if I had a border print or stripe that I wanted to curve around the outside nicely. |
 Always, always, always measure for your borders through the center of your quilt... Never, never, never along the edges! Ease your quilt to fit if the quilt edges are longer than your borders or you will have ripples, ripples and more ripples. |
| Subsequently, a quilt with sashing and "cornerstones"
between the blocks will probably look best with borders of strips and cornerstones
also.
You could put border after border of strips and cornerstones on the outside and it looks really lovely with all the squares going out and out in the corners. |
 |
| Next is a Log Cabin center panel with two central borders
and a pieced outer border.
For the first plain black and white border on this quilt, you should piece the black and white fabric strips together first, then I would sew them on mitering the corners. ( upper left red line) It looks very neat and clean that way, plus it saves some measuring time as you only need to measure for these borders once as a stripped together piece of fabric instead of twice like you would have to do for two separate pieces of fabric to sew on. The inner border is also a good way to adjust the size of the quilt to accommodate the outer pieced borders. Make it as wide as you need to so you can easily just fit on the outer pieced border. It is easier to adjust the size of the plain strip than it is to plan and sew odd sized pieced blocks so the outer border will fit. The corner block of the outer pieced border on the quilt above is a solid piece of fabric so the miters will look fine. |
 |
| Oh yes, and then there is the "on-point" border
set. It is a little more work, but the results are lovely.
There is the central pieced panel and outside of the central panel you can add a narrow first border to do one or two things. First it can make the center panel blocks "float" Second, it can bring the center panel up to the size required to easily sew on your on-point blocks. Now notice that in this quilt, for this center panel to fit with the on-point border, the white middle border is wider at the top and bottom than at the sides. This may also be required to make the center panel fit the on-point border. (Don't actually cut two pieces of fabric for the top and bottom white strips, that is just to show you the difference in size.) |
 |