|
Images on the Web
It will be handy if you have access to a scanner or digital camera to add images to the web since we need to get the images into a digital file to display it on the web.All scanner interfaces are going to work in different but similar ways and it is important to know a little bit about file types before you dive right into manipulating your images. Image files can exist in alot of different file formats. Typically in a print medium people use files with extensions like .tiff, .eps, .pict, .jpg (or .jpeg), or .gif . Also in a print medium we usually have files that are created in CYMK mode (Cyan, Yellow, Magenta, Black) which is known as a 4 color process. However on the Web all images must be created or converted to RGB mode (Red, Green, Blue) which is how monitors display colors since it is light and not ink. Also the two File types which are most commonly used on the web are .jpg (or.jpeg) or .gif. Another file type .png is also supported but not as commonly used. One major thing to be aware of concerning .jpg's or .gif's is how they retain information about color. .Jpg's can display colors in millions of colors or thousands of colors whichever your program has set in its preferences. Gif's can only retain a maximum of 256 colors. Photographs will appear better quality if saved as .jpgs since they usually have a wider number of colors that are trying to be reproduced. Saving a photograph as a .gif will cause your photograph to look posterized as it tries to interpolate colors where it does not find a true match. Gifs work great for artwork that is created in a paint program and if the image is made up of fewer than 256 colors you can often times reduce the numbers of colors down to 16 or 32 or 128 colors and still get a quality image and tremendously reduce file size. Also Gifs come in a couple of basic forms Gif87's and Gif89's. Gif 89's can be created on a transparent background and retain its transparent qualities allowing background colors to come up through the image. Jpg's and gif87's however will display only solid color backgrounds. There are also various programs that can convert file types from jpg to gif or .eps to jpg and also allow you to reduce the number of colors or compress the image somewhat to reduce file size. The latest version of Photoshop does it all in one program with its save for web feature. Where as many older programs may be a two step process in order to reduce the file size to manageable levels. The big reason we're concerned with file size is that the big fat pipe exists in some areas but isn't everywhere. What may download lightning fast on a cable modem may take several minutes to download via phone modem connection. A good rule of thumb is to try to keep your image file size at 50K or less. Sometimes you can't but it's a good goal to shoot for. Smaller is better but try not to sacrifice to much photo quality for smaller file size. Find a compromise and live with it. So if you don't have an image program... go to one of the download sites mentioned in earlier and find a freebie or shareware program. If you have a scanner or digital camera check the software that came bundled with it - you might have a program that works and not even know it. Otherwise Photoshop really is a great investment and will probably be the Program you use the most once you have it and realize what a great program it is. Another major point about images on the web is that they will only dispaly at 72 pixels per inch. So don't save your files at 300 pixels per inch resolution -it's overkill. Also an image thats 1 inch by 1 inch square at 300 dpi when uploaded to the web will display at over 4 inches square. Quite a surprise when you're expecting a one inch square to show up. So if it is only going to be 72 dpi on the web it usually doesn't make sense to initially scan the image at a real high resolution since all it will do is take up space on your harddrive. A good rule of thumb is start at twice the resolution of your finished product which would allow you to double the size of the image (if needed) while reducing the resolution and you won't suffer in quality. If you are going to increase the size of the object most scanning software allows you to do this in the scanning process. Then by reducing size you will retain quality and in your final step reduce your resolution back to 72 dpi and apply the sharpen filter as needed( if you have one on your program) If your initial scan is 72 dpi and then you have to enlarge the image you will stretch your pixels and your image will become pixelated or appear to have blocks of colors instead of being smooth. 
The image above was initially scanned at 150dpi then reduced in size and changed to 72dpi. The image below was scanned at 72 dpi and enlarged . See how it pixelated the picture. This is a no-no... 
So first we need to go back into our Website Folder and we need to create a new folder called images which is located inside the Website folder just like your HTML document. 
Your images could live right inside the Website folder however in order to better manage our files we create sub-folders which contain things like images. You can really name this folder anything but remember no spaces or special symbols. For example I might create several sub-folders which contain different files such as a folder named sounds which includes all of my sound files, a folder called buttons which includes just buttons, a folder called Flash which includes just Flash movies, etc. This is done simple to better manage my files so I don't have to look through a hundred images to find a specific HTML document. It is purely to better organize your website structure so you know where to look if you want to delete or edit a file. The tricky thing now is that when a webpage calls an image it must show the relative file path to the image. Browsers can look forward into sub-folders to grab things like images but can't look backwards if a document is located inside a subfolder unless you specify the absolute file path which points the page back out to the web. The relative path simply points to the folder located in the same directory - in our case our Folder called Website. Confused ? Lets try it and see if it makes sense. Scan an image, set its size to the desired size and make sure its 72 dpi. Save it as either a .jpg or .gif , give it a name including the file extension ( ex image.jpg or image.gif) and make sure it is located inside the Folder called images. Then in the BODY section of your HTML document type <IMG SRC="nameofimage.jpg"> Notice the IMG SRC tag does not have an End Tag Also of course substitute whatever you named your image where I typed nameofimage.jpg (remember no spaces) If you save these changes and view your document in a web browser you will get the broken image icon showing that it cant find the specified file. Like this 
So why ? What you need to do is specify the relative path <IMG SRC="images/nameofimage.jpg"> This tells the browser while you're in this folder look inside the folder we named images and look for a file called nameofimage.jpg. We have simply defined the relative path to the file. Now if you save your changes you should see the file you created earlier and put inside your images folder displayed on your webpage. Your code should look something like the code below. <HTML> <HEAD> <TITLE> Hello World !!! 10 Days to HTML </TITLE> </HEAD> <BODY TEXT="#000000" BGCOLOR="#FFFFFF" LINK="#0000FF" VLINK="#5511CC" ALINK="#FF0000"> <IMG SRC="images/nameofimage.jpg"> </BODY> <HTML> resulting in something like
So now we've displayed an image on a webpage and you're saying to yourself..come on !! give us the goods !! There's got to be some variables we can declare which can help us move around the image or do other cool things with it. And right you are. The common variables that can be inserted inside the IMG SRC tag are:
<IMG SRC="images/nameofimage.jpg" ALT="name of image" WIDTH="144" HEIGHT="144" BORDER="1" HSPACE="50" VSPACE="50" ALIGN="left"> what happens with the variables is The ALT variable gives the image a text name which search engines can recognize as well as tells the viewer what the image is just in case they have their images switched off in their browsers -which keep in mind people do in order to surf faster if they have slow modems. Then they can turn images back on if there might be something they want to see. The WIDTH and HEIGHT variables allow you to specify what size ( in pixels) an image will display other than the size you originally created the images as. I recommend not using these variables unless you specifically know what size your images are which you can find out when you create your images in Photoshop or other Image/Paint programs.If you don't include WIDTH and HEIGHT variables it will simply display the original size of the image. BORDER variable allows you to set a Border in pixel widths which will display in the color you specified your TEXT variable in your BODY Tags. If your Image becomes a link to something else the Border will display in whatever color you told the LINK, VLINK and ALINK variables in the BODY Tags. If you wish to have an image be a link without a border so it is seamless in the webpage simply declare that the BORDER="0". The HSPACE and VSPACE variables tell the image that nothing can come a certain number of pixels from that image. So therefore if your HSPACE and VSPACE variables are both set at 50 and it is the first thing on your page it will display 50 pixels from the top and 50 pixels from the left edge of the page. H standing for Horizontal and V standing for Vertical. The ALIGN variable is a bit deceptive in what it does. It does align the image (like the P align tag does to Text) however the ALIGN variable in fact tells Picture how to align in relationship to the following TEXT. So if you type <IMG SRC="images/nameofimage.jpg" ALT="name of image" WIDTH="144" HEIGHT="144" BORDER="1" HSPACE="50" VSPACE="50" ALIGN="left"> and then a bunch of text like I have here. The image aligns left and the text aligns starting to the right of the Image. If you type <IMG SRC="images/nameofimage.jpg" ALT="name of image" WIDTH="144" HEIGHT="144" BORDER="1" HSPACE="50" VSPACE="50" ALIGN="right"> and then a bunch of text like I have here. the text starts left of the image You can also specify ALIGN="top", ALIGN="Middle", ALIGN="bottom" all which effect where the type displays relative to the image. You could also align images by surrounding the complete IMG Tag with Center or DIV align="center" tags. You can also capture images from the web although you need to be careful how you use them due to copyright issues. There are however many free clip art libraries where you can obtain public domain images and sites that give away artwork like backgrounds and buttons if you simply mention them and link to their websites somewhere on your website. To grab an image from the WWW with a Mac - find an image you want and then click and hold your mouse down on the image. A popup screen comes up. Choose Save this Image As and point to the appropriate folder you wish to store it in and voila... it is yours. Then if you need to convert it to another file type use your Image/Paint program to open it and save it back out as a .gif or .jpg whichever you wish to use. For Windows users Right click on an image choose Save Image as and again point it to the appropriate storage folder. A great place to get a variety of texture images is Textureland but you can do a search on any search engines for free images or pictures and you can find huge libraries of images free to use. Buttons, icons, clip art... it's all out there on the web. Just give credit where credit is due and link back when requested. There are also many CD-Roms that can be purchased with images. So what about images in the background ? If you've spent anytime surfing the web at all you will have noticed what appears to be images underneath Text or other images. How is this done you ask ? The easiest way is to Tile a square in the Background. This is done by creating an image or getting an image through a site like Textureland and converting it to a GIF. This only works with GIF's (not jpgs ). Simply make a one inch by one inch square with a pattern, color or texture.( or any size really - keep it small for file size reasons) Photoshop has some really interesting Filters with which you can create your own textures. and once again save it as a .gif and make sure it ends up in your images folder. Then in your BODY TAG add the Variable BACKGROUND="images/nameofbackgroundimage.gif". Make sure you correctly define the relative path to the image. It should look something like : <BODY TEXT="#000000" BACKGROUND="images/nameofbackgroundimage.gif" LINK="#0000FF" VLINK="#5511CC" ALINK="#FF0000"> What happens is then this small square Tiles itself in the Background and allows everything else to be displayed in the foreground. I will use this square as my background.gif 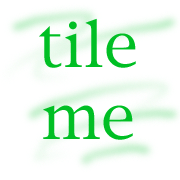
Click here for an example You may also have noticed webpages with a column of color or texture down the left side. This is accomplished by creating a very wide rectangle lets say a half inch High and 20 inches wide. Saved as a gif it should still be a relatively small File size and since it cant display beside itself except on very large monitors it is forced to Tile itself below itself which causes the strip to give the appearance that there is a column of color on the left hand side of the web page. I will use this image as my strip 
Click here for an example There are also many other great image programs which you can download via some of the download sites. Download a bunch and give them a tryout. JPEGview is a great viewer for Mac but it doesn't contain editing features. Other programs like GIFconverter or GraphicConverter do have image conversion or paint capabilities. All I can say is download a bunch and try them out. Hyperlinking an Image Either go back to your image/paint program and create a button or scan an image or download one from your digital camera and convert it to .jpg or .gif. If you scan an image make one large image at about 6 inches wide /72 dpi and another copy 2 inches wide /72 dpi. Name the large image Imagenamelg.jpg (or.gif). name the smaller image Imagenamesm.jpg(or .gif) and put them in your images folder. Of course substitute your name for Imagename. Most servers organize files alphabetically so this ensures the files will end up next to each other in your images folder making them easier to find. For you button makers .... ditto. Name the button... buttonname.gif(or.jpg) and either put it in your images folder or put it in a seperate folder called buttons which will contain of all things your buttons.( and call the button what ever you want not buttonname.gif)  For this simple button... I created a new photoshop image on a transparent background in RGB mode at 72dpi. Saved it as a gif below making sure to keep its transparent properties since I want background color to wrap around the oval. There are a great many number of ways to create buttons.Save a copy of the button before you add type to use as a template to make matching buttons.  If you scanned an image or grabbed one off the web somewhere... we can use it to also link to a page or to launch a larger version of the photo to create a detailed view of an object. So lets just say you created a new folder called buttons and put a button in there named buttonname.gif we can then link this button to a webpage instead of having text link to a page. So lets say this button is supposed to get me back to the Page1.html page I can write code that substitutes an IMG SRC Tag for where Text would normally be displayed in the link <A HREF="Page1.html"><IMG SRC="buttons/buttonname.gif"></A> instead of <A HREF="Page1.html">Link back to Page 1</A> resulting in 
The image will have a LINK Colored Border that surrounds it automatically. To get rid of the border add BORDER="0" inside the IMG SRC Tag such as <A HREF="Page1.html"><IMG SRC="buttons/buttonname.gif" BORDER="0"></A>
So now we've linked to a page with a button lets make an image call a larger version of itself. We'll use the Mountain picture that we did in lesson 2. If you remember the photo was initially scanned at 150dpi in RGB mode. I reduced a copy of it and saved it to 2 inches wide at 72dpi in Photoshop. I also made a second copy that I enlarged and saved at 72dpi. By starting at the higher resolution it allowed me to do this without getting the pixelation that I got in the Enlarged Mountain photo in Lesson 2. I named the small version mtnsm.jpg and the large one mtnlg.jpg and put them in my images folder. What I can now do is either link the small picture to a page that has the large picture embedded in it or I can also simply call the larger image file from the small image of the mountain. Instead of linking to a page you simply point to the large image in the images folder Remember to make the BORDER="0" to make the border go away on a linked image. <A HREF="images/mtnlg.jpg"><IMG SRC="images/mtnsm.jpg" BORDER="0"></A> click on the photo below to see a detailed view of the mountain. 
click on the image below and this one points to another webpage much like the button did. Which then has the larger image displayed. <A HREF="mountain.html"> <IMG SRC="images/mtnsm.jpg" BORDER="0"> </A>
2 ways to do almost the same thing. Another way is to use one large image... tell it to display smaller using width or height attributes inside the IMG SRC tag and link it to itself.
like <A HREF="images/mtnlg.jpg"><IMG SRC="images/mtnlg.jpg" BORDER="0" width="144"></A> |