
|
| Home / My Professional Website / Ask Question / About me / Contact me / Privacy / Immunisation schedule / Why immunise ?? / Healthy Child / Growth / Breast Feeding / Discipline / Newborn care / Teen's Health / Diseases in Parents / Prevention measures / Facts of Life / InternetSecurity_Dangers - Guide - All Links / First Aid / Learn CPR / Prevention of Accidents / PALS / NALS / Drug Addiction / Sex education / Health of Doctors / Search Tips / News |
| You have only 4 minutes to revive victim with cardiac and respiratory arrest. LEARN TO GIVE ARTIFICIAL BREATH !! CPR Video Watch video For Course LEARN PREVENTION OF ACCIDENTS : Prevention is more effective & rewarding. Save your child from Choking, Drowning, poisoning.....& more. .What you can do in this crucial minutes may make difference between a happy ending .......or tragedy . |
|
|


|
| U R Guest number |
| Learn CPR Course Learn CPR / Video / Online Learn / Resources / Test Learn First Aid Safekid / oupd / F.A. Accident prevention |
| Reference : Basic Life support manual by AMERICN HEART ASSOCIATION . |
| Page Updated on : Nov 10 , 2001 |
| Facts about CPR Sudden cardiac arrest is the leading cause of death in adults. Most arrests occur in persons with underlying heart disease. CPR doubles a person's chance of survival from sudden cardiac arrest. 75% of all cardiac arrests happen in people's homes. The typical victim of cardiac arrest is a man in his early 60's and a woman in her late 60's. Cardiac arrest occurs twice as frequently in men compared to women. CPR was invented in 1960 . There has never been a case of HIV transmitted by mouth-to-mouth CPR. In sudden cardiac arrest the heart goes from a normal heartbeat to a quivering rhythm called ventricular fibrillation (VF). This happens in approximately 2/3rds of all cardiac arrests. VF is fatal unless an electric shock, called defibrillation, can be given. CPR does not stop VF but CPR extends the window of time in which defibrillation can be effective. CPR provides a trickle of oxygenated blood to the brain and heart and keeps these organs alive until defibrillation can shock the heart into a normal rhythm. If CPR is started within 4 minutes of collapse and defibrillation provided within 10 minutes a person has a 40% chance of survival. HOW CPR SAVES LIVES Under normal conditions, the brain can survive 4-6 minutes without oxygen and ambulance response averages 6 minutes and up. CPR can delay brain death until help arrives. Let's review some basic anatomy. The air we breathe in our nose and mouth goes through our airway to our lungs. That air is picked up by our blood and pumped by the heart to our tissues and organs to keep us alive. In normal atmospheric conditions, which is around 70 degrees, the brain can survive for approximately 4-6 minutes without oxygen. Throughout the United States the average ambulance response time is six to eight minutes - in many instances, it�s longer than that. So in most situations, CPR can delay brain death long enough for help to arrive. SOME BASIC PRECAUTIONS Good Samaritan laws protect you from being sued for performing rescue procedures. Take precations against contracting diseases while in contact with a victim.In most instances these encourage persons to provide CPR the Heimlich Maneuver or rescue breathing These laws vary by locale but most protect the lay rescuer from liability as long as the rescuer doesn't act grossly negligent or with willful misconduct cannot be sued as long as you are acting in good faith. It is possible to contract diseases through contact with body fluids such as saliva, blood, urine or vomit. To decrease the likelihood of infection or disease, use protective devices, such as a CPR mask and gloves, especially when giving care to someone you do not know. ATTENTION!!!! Do not perform any of these procedures on anyone who is breathing and has a pulse!!!!!!! |
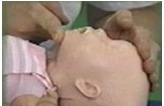
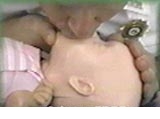
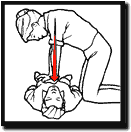
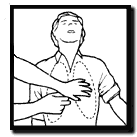
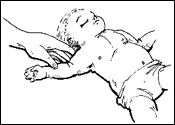
| SEQUENCE OF CPR ASSESS RESPONSIVENESS Firstly you have to assess the response of the victim. To differentiate dead and deep sleep you have to shake the victim or shout to see if he responds. IF THERE IS NO RESPONSE , The victim needs your help : Call for help ( Call 911 in usa or ambulance in india ) * Position the victim on back on hard firm surface. Once you have called for help go to victim and start A.B.C. ASSESSING RESPONSIVENESS IN CHILD AND INFANT : Try to get a response by patting the victim's feet or rocking your knuckles on his chest. THE ABCs OF CPR CPR is an ABC affair: A is airway; clear it; B is breathing; give two initially; C is circulation; check for a pulse in the neck and proceed accordingly. Let's review rescue procedures. Remember your ABCs: A is airway. Open the airway using the head tilt, chin lift. B is breathing. Look, listen and feel for breathing. If not breathing, pinch the nose and give two breaths. C is circulation. Check the pulse in the neck. If there is no pulse, give 15 compressions using the heel of one hand and compressing 2 inch deep. If you are alone dial 911 or call for help and ambulance. Reassess breathing and pulse every minute. STEP 1 : OPEN THE AIRWAY A' IS AIRWAY; OPEN IT Your first step is to open an air passage. Tilt the head and lift up on the chin to remove the tongue from the back of the throat. A is airway. Open the airway using the head tilt, chin lift. Pushing down on the head and lifting up on the chin removes the tongue from the back of the throat. The tongue is the most common airway obstruction in an unconscious person. If the person is going to breathe on his own, it should happen as soon as you clear the airway. If you do not hear, see or feel any breathing, you must give two breaths. OPENING AIRWAY IN CHILD & INFANT : Head Tilt & Chin Lift should be slight . Don't overextend the neck cos it will block the airway . OPENING AIRWAY IN INFANTS : Tilt the baby�s head to the �sniffer's position.� for children under the age of one. Unlike this step with adult and child victims, you will only push the infant's airway to the "sniffer's position" with the head tilt, chin lift. Simply tilt the head so that he looks like he is sniffing. If you go too far, this could close his tiny airway off. STEP 2 : GIVE RESCUE BREATHS 'B' IS BREATHING: 2 TO START Look, listen and feel for even a faint indication that your victim is drawing breath. If not, remember that everyone gets two breaths initially. B is breathing. Everyone gets two breaths initially. ASSESS BREATHING Look : Look to see if the chest rises and falls, Listen :putting our face close to the victim�s so that we can hear breathing Feel : Feel him breathing on your cheeks. If you do not hear or feel any breathing, give the victim two breaths. GIVE RESUCE BREATHS Pinch the person�s nose and put your lips over the other person's lips and blow until you see the chest rise. If you have a protective device, use it. Watch out of the corner of your eye to be sure you blow just enough to see the chest rise. If you are unable to give rescue breath . RETRY IT by repositioning the head and give two rescue breaths. RESCUE BREATHS IN CHILD : When ventilating a child, make sure to use small breaths. When ventilating, remember to use small breaths; blow just enough air to see his chest rise. JUST A PUFF FOR INFANTS : An infant�s tiny lungs can only take a small amount of air. When giving breaths put your mouth over the victim�s nose and mouth and give just a puff - from your cheeks, not from your lungs. STEP C : CHECK CIRCULATION After you have established breathing check circulation. ASSESS PULSE Find the carotid artery to the side of the Adam�s Apple area and feel for five or 10 seconds. Check the pulse at the carotid artery in the neck, which is easily found by locating the Adam's Apple and sliding your fingers just to the side. Feel around in this area. If there is no thumping under your fingers in a three-second time span. If there is no pulse, begin chest compressions. GIVE CHEST COMPRESSIONS Begin chest compressions by finding the proper placement for your hands. Locate the base of the sternum, the spot where all the ribs together in the center of the chest. Place two fingers on that point. Put the heel of the other hand beside those two fingers. Interlace your fingers, lock your elbows and compress the victim�s chest, using your body weight, to the necessary depth of 1 1/2 to 2 inches deep. Or remember this, two hands, two inches. Notice that compression time is equal to release time, and that I keep my hands firmly on the chest the entire time. The victim remains on a hard firm surface and your body is at the victim�s shoulder level.Remember to compress only to the necessary depth - in an adult, two hands, two inches. The compression process - even at the proper depth - could break the victim�s ribs. A broken rib could enter the lungs or heart causing even more damage. If you feel a crackle, or broken bones , do not compress as deep. Count aloud ( 1 AND 2 AND 3 AND 4 AND ..........) as you compress 15 times and follow by giving the victim two breaths. That's Cycle Number 1.Repeat for a total of four cycles - about one minute in elapsed time. Then check again for a pulse in the neck and watch for signs that the person is breathing. CHECK PULSE IN CHILD: Check the pulse in the neck in child same way as in adults. CHECK PULSE IN INFANTS IN UPPER ARM : Your looking for a brachial pulse in infants - in the upper arm between shoulder and elbow & inside of arm. CHEST COMPRESSIONS FOR CHILD compression should be done at same place as in adults but use only one hand and the depth should be one to one & a half inch . CHEST COMPRESSIONS FOR INFANTS : For babies, chest compressions are done with two fingers to a half- inch depth. Chest compressions for an infant victim start by putting three fingers in the center of the infant's chest. The top finger should be on an imaginary line between the nipples. Raise that top finger up and compress with the bottom two. Give an infant five compressions and one breath. This equals one cycle. Do 20 cycles and then reassess the infant�s breathing and his pulse. If your victim has a pulse, but is not breathing, Give one breath every five seconds, skipping only when he breathes on his own. These are called �rescue breaths.� If you feel a pulse, but the person is not breathing on his own, you must give rescue breaths .For an adult, we give one rescue breath every five seconds. If he does take a breath on his own, simply recount the five seconds. If he still doesn�t take a breath, then give one. IF You feel a pulse and the person is breathing on his own put him in the recovery position - rotating the victim up onto his side until help arrives. This helps keep the airway clear of any further obstructions. |
| SOME CHILD RESCUE ISSUES When ventilating a child, make sure to use small breaths. An adult�s lung capacity can force too much air into a child�s smaller lungs. Several specific issues may arise when working to rescue children: When ventilating, remember to use small breaths; blow just enough air to see his chest rise. Over-inflation of the lungs can cause air to enter the stomach and cause the victim to vomit, creating an airway obstruction. If this occurs, turn the victim towards you and sweep the obstruction out. Once you have cleared the airway, continue with your rescue efforts. It is not likely that you will break ribs on a child, however, it is possible. Remember, one hand, one inch. If you do feel broken ribs, do not press as hard. INFANT RESCUE ISSUES Be careful not to over-extend the head tilt; use the �sniffer�s position.� Make sure the breaths you give are small puffs, from your cheeks, not your lungs. There are a number of differences worth noting when giving an infant CPR Tilt the head only to the "sniffer position." Over-extension of an infant�s neck can close off the airway. When providing breaths to an infant use gentle puffs that come from your cheeks, not your lungs. Blow in just enough air to see the chest rise. When compressing an infant�s chest remember to go the necessary depth of one-half of one inch. You are using two fingers (approximately half the size of a hand), so: Half a hand, half an inch. It is unlikely that you will break an infant�s ribs, but it is possible that you will over- inflate the lungs. Over-inflation, you�ll recall, can cause gastric distension, which could lead to vomiting. If this occurs, rotate the infant toward you and sweep the obstruction out of the mouth, then continue your rescue efforts. If you resuscitate the victim, his pulse comes back and he is breathing on his own, roll him to the recovery position and wait for help to arrive. |
 |
 |
 |
 |
 |
 |
 |