
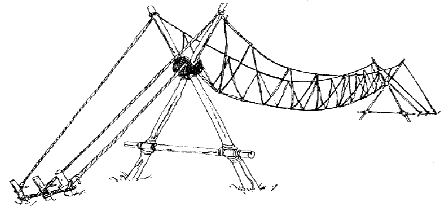
Monkey Bridge
A Monkey Bridge is one of those projects that looks easy, but is far from. It is project with many dangers if not build correctly. It also takes a long time to build safely. It is one of those projects that should be left for a troop camp, when you have the whole day to play around with it.
This project like, all should be started by building a small model of the project. The leader needs to cover all the angles involved with the building, especially with anything that could go wrong.
I personally find building the project in this order the easiest, but like everything in scouts fell free to try it your own way, as long as you follow the safety guidelines.
Step 1: Start by measuring the distance of the bridge you plan on building. Once you know this, you can sort out the equipment you will need. Never build the bridge longer than 14m, as it can become dangers.
Step 2: Divide the group into two teams. One team can start by building the sheer legs. While the other team can start to build the anchorages. The type of anchors you use will depend on the soil type. E.g., 3-2-1 is for thick stone free soil, like a clayey soil, while a ‘Dead Man’ is for soft soil and the Log and Picket is more secure than the 3-2-1 and is used in the same soil. The line of the bridge should be 100% straight. This is to stop the rope from bending and causing any danger. With the sheer legs always put some kind of fabric in between the joint of the legs to stop any friction from occurring on the rope. For more info on anchorages visit the South African web page: Pro-Plan Chart 11
Step 3: You would have measured the length of the bridge in step 1, so now you can start to make the rope part. This is done by laying the three ropes out in the distances you need. The distance between the rope you walk on and the hand rails should be about shoulder height for your smallest scout. Then tying the ropes in-between to bring the bridge together. You can replace the ropes in-between with staves to make it more secure. Put the in-between ropes or staves at least every 1m.
Step 4: Raise the sheer legs and secure them down. Digging them into the ground helps to secure them and stop them from jumping up. Never use the strain of the main rope to keep the sheer legs secure.
Step 5: Once the sheer legs are up and secure, you can start to tighten the main rope. This can be done by tying the one end to the anchor. Then straining the rope by means of a pulley system and tying it off to the other anchor with a round turn and two half hitches.
Step 6: Now you will tie the handrails to top of the sheer legs. Remember shoulder height! This is done by straining the rope by means of a handrail (a small pulley system) or a harvester’s hitch and then tying it to the sheer legs by means of a round turn and two half hitches. For more info on block and tackle download Pro-plan chart from the South Africa Webpage: Pro-plan chart 12
Step 7: Fix any slight problem with the project and put away any used equipment. Then stand back and admire your project, before playing on it.
Points: Remember when using a pioneering project to always have a spotter watching out for the safety of the users.
Time: Like I have said before, this project requires a lot of time. Don’t hurry, as this leads to injuries. For your first time, not less than 4 hours. For an experienced pioneer it can be done in about two and a half hours, but remember never rush anything where someone’s life can be in danger!