PIONEERING

| PIONEERING |
|

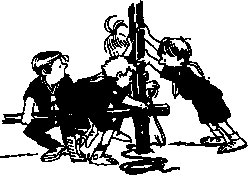
Over the years, pioneering has become somewhat of a lost art, leaving many scouts in the world unable to enjoy its wonders. With this page, we hope to change that and allow scouts to see what is possible. This page will cover a number of different projects, from the easier to some a little more challenging as well as the basics required to do any project. It will showcase some pictures of pioneering projects we have done, for those who like to see the really thing!
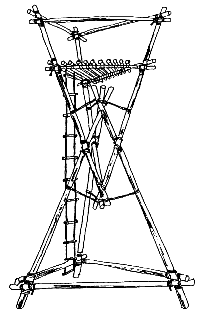 |
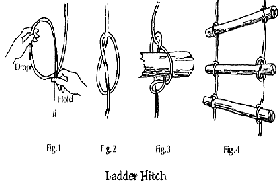
Commonly called the Hourglass Tower, this tower is widely built around the world. It is a tower that is not very difficult to build, but does offer something for the experienced pioneer. By following these steps, I have found it to be the easiest way to build the tower. You are welcome to try you own way, but remember to always keep in mind safety. Step 1: Build a model to scale of the tower you wish to build. Once you know how big you wish the tower to be, you can organize your equipment for the project. Step 2: Start by building two tripods; one tripod taller than the other. You will use the taller one as the base; this is to make life easier, as well as for engineering reasons. Step 3: Lash the cross bars to the bottom of the taller tripod. For more info on lashing visit the South African Scout webpage: Square and diagonal lashings and Step 4: Turn the taller tripod on its side. Mark on the tripods where you plan to lash them together. Remember the tripod poles need to be evening, so that when you lash the platform on, it will be even. Step 5: Lash the tripods together. Once you have pushed the smaller tripod through the taller one, you can mousse the bottom of the tripod lashing to each of the poles (like in the picture). Now you can lash the platform on, remember that it needs to be measured so that the platform will be even. Step 6: Raise the tower by using a long ropes and a pulley system. You will also need to keep the other side down as you pull one side up. It is a good idea to dig the legs in, to make it more secure. If the platform is not even, you have two chooses: Either measure the mistake, take it down and try and fix it or if it’s not to bad, you can leave it. A little mistake at the bottom will lead to a huge unevenness in the platform; so don’t be to hard on your self. Step 7: Finish off the platform and add handrails to the top. Points: It is a good idea to add the rope ladder before you raise the tower. Make sure all lashing are extremely tight (use a frapping mallet), to avoid any injury. Time Period: Depending on the age and skill level of the patrol it can take between 2 and 7 hours. Always allow a lot of time for a project you have not done before, this is to allow for any unforeseen problems that may occur. |
 |