
|
When I sew my strips, I hold the fabric on the bottom
between my index and middle finger, and I use my thumb on top to
align the fabrics.
I can put some pressure on the fabric on the bottom so the
feed dogs don't eat it up and it ripples underneath.
Aggressive feed dogs can mean you get more fabric underneath
than on top. It can be a big problem when sewing strips together
if you don't keep a little tension on the bottom fabric. |

|
I put a piece of graph paper under my needle with a
quarter inch grid extending to the right. Make sure the paper
is straight. You can use one of the lines on the sewing
machine as a guide to see if the paper is straight. You
can also use a ruler. Put the 1/4" mark from the ruler
under the needle. |
I put "check needle" on the tape. Why? If I put
my
needle in the center position on my Bernina, the feed
dogs stick out beyond the pressure foot and I can't put
tape on there because the tape will cover the feed
dogs. So, if I move my needle over on click to the
right, I am clear of the feed dogs with my tape. |
Then I put a big glob of masking tape on my sewing
machine at the 1/4" mark. Okay, now if I
turn off my sewing machine and come back later and turn
it back on, my needle will be in the center again not one click
to the right. I will start to sew and forget about moving the
needle... I will sew four strips before I realize that the needle
is in the wrong place and my seams are way too big! How
do I know... been there, don't that! I hate to rip,
so I remind myself to check the needle! |

|
Okay, now I can just place my fabric right up
to the tape and sew my little heart out and I know I
have a 1/4" seam all the time. No wobbly fabric going over and back,
over and back across the etched line on the machine.
See how nice the tape is to follow as a sewing guide?
Just keep the fabric against the tape and sew...
( I lay the tape on my cutting mat until I
get a stack of about 8 layers, then I use my rotary cutter and a ruler
to cut off a slice along one edges. That gives me a nice straight
edge) |
|
Sewing your strips together...
|
| 1)
I
chain sewed my strips together. It is much quicker.
That is you sew all the #1's to the #2's, press them all and then sew all
the #3's to the 1 and 2's, press them all... keep going till you do all
the strip sets.
 I changed all of my threads
to match each strip as I did this step. That is up to you! You can
use a neutral thread to sew all, as that is what you will have to do when
sew your blocks together away... I changed all of my threads
to match each strip as I did this step. That is up to you! You can
use a neutral thread to sew all, as that is what you will have to do when
sew your blocks together away...
Take strip #1 and strips #2 and put in two piles. |
2)
Lay
strips #1 on the machine right side up and put #2 wrong side up (right
ides of both fabrics touch). Match the selvage edge at the
beginning of the strips and sew to together. Keep a grip on
both fabrics so the bottom strip does not pucker from the feed dogs.
The opposite edge may not end up even as the fabrics are probably different
widths.
Sew all of the #1's to the #2's. |
| I
used the same selvage edge of each fabric at the beginning for each strip.
Well,
there is a reason for that! One selvage is usually fabric colored
and the other is wider with color dots and manufacturing information on
it which makes it a wider selvage. If you have a "tight" cut like
I did with the 14 inch strips, you will appreciate this little extra fabric!
Also some fabrics are like velvet and reflect light differently in the
opposite direction. It is just a little effort to
do this and can make happier end results. |
Also,
I had a "one way" design on one of my strips. The gold had
leaves all going in one direction. I wanted to make sure that the
leaves all pointed to the purple when I sewed them together... it just
looks better! So you might want to consider that if you have a "one
way" print on a fabric. |
| 3)
After
I sewed all the #1's to the #2's, I needed to press so the seams go in
one direction. For ease in remembering I just pressed
all to the #1 strip. |
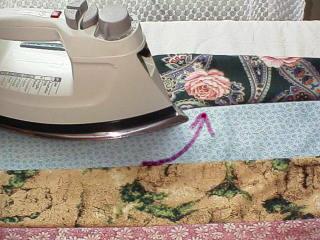
4)
PRESS!
Pressing is different from "IRONING". Ironing is something you do
to military clothes to get them to stand up by themselves. Pressing
is a gentle nudge with the iron to get the seams to go to one side. |

|
5)
My
rules for pressing are: Always press the seams
on wrong sides of seams first to "set" the stitching.
This also makes it easier to press to one side from the front. I
give it a good dose of spray starch here also.
Lay the strip you want to press toward on the
bottom... Our #1 strip in this lesson. Make the seam face
away from you. (your fabrics will be different than mine depending
on what you are using)
Press the top seam the length of the piece.
Don't attack it with the iron and push down the length of the seam.
All that will do is stretch the seam! Be gentle!
Down with the iron, press..... up with
the iron, and move down the strip further and press, up with the iron,
move the iron and press... |

|
6)
After
you press the seam from the back, lift up the top layer or layers of strips
(depending on where you are in your sewing) and
flip
the top strips over so right sides are showing.
Now you will press the from the top.
The seam will naturally want to go away from you since you folded the fabric
away from you while pressing the back.
Very important! Be sure there
aren't any little tucks or creases where the seams are pressed. You
want your seams to be all the way flat without any tucks. Little tucks
where the fabric isn't completely ironed over at the seam will really mess
up any quilt project! |

|
7)
If
you have to, get your fingers under there and push the seam away from you
and press.
Don't burn your fingers!
Stubborn spots can be re-sprayed with starch to make them co-operate. |
|
8)
Use
the tip of the iron and swing it over the seam to press the top.
Remember, press all the seams in the same direction. In this
case they will all be pressed to strip #1 or away from you.
NOTE: Karla presses some of her
seams away from the light on both edges so the dark would not show through
the light ... and she presses some of her narrow ones to the narrow to
give the finished quilt some bulk there so the strip would stand out.
I pressed them all in the same direction... You may what to experiment
with both ways when you press strip sets. |

|
9)
Turn
the strip set over to the back again and make sure the seams all go in
the same direction and that you don't have any stubborn ones going another
way. Fix them if you do!
(these strips are staggered in this picture but yours for this hidden
wells project will be even on one end and fairly even on the other
end. These pics are from another project we did called "Strip Tease" quilt.) |
| 10) Now
I just sew the #3 strips to the #1 and #2's.
Press the same way... put the #1's and #2s' on the ironing board,
then set the stitches of the just sewn on strips by pressing on the
line of stitching.
Flip #3 over and press from the front.
I just think it is easier to sew and press each row as it is sewn
on, but you can sew them all and then press. It is up to you... I am not
the quilt police!
Do the sew and press thing with each strip in the proper order until
you do the whole strip set.
PRESS! |
11) All
done! Now at this point I will give
it another good douse of spray starch from
the top and press it from the top from one edge to the other ** across
** the seams.
Just be very careful you don't stretch the
fabrics. If you do, you will have troubles!
That is advice for any quilt project.
The stiffer the fabric is, the easier it will
be to keep the bias edges under control.
you will have all bias edges on our quilt blocks when you cut the X blocks!
Be as careful as you can be not to stretch
those bias edges... |