|
Some people think of comets and meteors as being the same thing. They're not. For one thing, the length of time comets can be observed is measured in months. For meteors, it's measured in seconds. For photographic purposes, that is all that is necessary to know. The photo of the Hale-Bopp comet shown below was taken with Fuji 800 ISO film and a 50mm lens set at f2-2.8. The exposure was unrecorded, but since the stars are not trailing too badly, I would estimate it was exposed for about 15 or 20 seconds.
I have seen great, unguided shots of comets with recorded exposures from one second to several minutes. Again, the point is experiment. Photo opportunities can be priceless, but film is cheap. Try different exposures with different focal length lenses and shutter speeds. Record the settings and compare the results. Stick with whatever works best for your equipment and location. Don't feel badly if you are unsure of what you are doing; feel good that you can do things you may never have dreamed of doing with a simple, 35mm camera setup.
...and meteors
The technique for meteors is as good as it gets: call it "point-and-snooze." The stationary camera setup is the same as that for shooting satellites and comets: tripod, shutter speed at "B" (or "T" as the case might be) and a cable release. Using your widest lens set a half-stop down from its maximum aperture (that is, between f1.8 and f2.8 in the case of a f1.8 lens), point the camera toward the constellation from which the anticipated meteor shower will originate. Charts showing the dates and expected hourly rates of the major annual meteor showers are available from a number of sources. Use the cable release to lock open the shutter, then sit back and watch the show. Recommended shutter speeds vary from 15 seconds for light-polluted areas to as much as four hours under darker skies. Narrower (higher f-number) apertures and slower film may be required to prevent overexposing the film in urban areas and during long exposures.
As a rule, the best time for photographing meteors is after midnight when Earth's rotation provides a head-on view of the stream of comet debris which gives rise to meteors. Although meteor activity peaks within a certain period, some will be around for hours, so there is ample time to try a variety of exposures. A good starting point with 800 ISO film would be 10- and 15-minute exposures at f2.8-4. You may get lucky and have a sufficiently-bright meteor pass your lens on a suitably-exposed frame. If additional cameras and tripods are available, by all means use them to cover a larger area of the sky. TIPS: Testing your setup a few days in advance can help prevent squandering a perhaps unrepeatable shooting opportunity. Don't get greedy. End the exposure and reset the camera if a bright meteor is captured on film. Unless the meteors are really poppin' the potential for things going wrong by extending a perhaps already fruitful exposure, is too high. Whether shooting with a stationary or guided camera, opening and closing the shutter can sometimes jostle the camera and ruin the shot. To be safe, obstruct the lens with a dark card before the shutter is opened. Wait a few seconds for everything to settle before removing the card. To end the exposure, even before gripping the cable, obstruct the lens with the card before unlocking the cable release. Making a habit of recording the shooting data (film, aperture, exposure and any special circumstances) takes only minutes and can save many hours of trial and error. Always be sure the tripod adjustments are tight and that the camera is securely attached; a heavier camera with a longer lens can slowly slip out of position during a long exposure.
Cameras affixed to an equatorial mount or to an equatorially-mounted telescope move at a rate that negates the Earth's rotation. Equatorial mounts can cost hundreds or thousands of dollars, but allow for high magnifications and stunningly-detailed images of even the faintest celestial objects. Long exposures with cameras affixed to a stationary mount�the garden variety tripod�will record the apparent movement of the stars as streaks or trails of light. To photograph star trails, mount the camera on a tripod, focus on the chosen area of the sky and lock open the shutter with a cable release. With the lens set at f8 and with 400 ISO film, try a 45 minute exposure. For longer exposures, "stop down" to f11 or f16, especially if shooting from an urban area or if using faster film. The shot of the north celestial pole is something of a cliche, but is fun to shoot nonetheless.
With wide angle lenses, stars will begin to trail in 20 or 30 seconds; a 50mm lens will "hold" stars for about 15 seconds; stars trail with a moderate telephoto lens after about 6 or 8 seconds, and in half that time with lenses measuring 200mm or more.
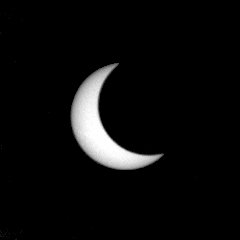
For the photos of that event below, a number of sheets of neutral density material were placed over the camera lens to reduce the sun's brightness. They were then removed one at a time. With eight or ten sheets remaining, a comfortable brightness level through the viewfinder was achieved. Note: Wratten-type ND gelatin photographic filters are not recommended. Some type of filtration to protect the eye (and the camera shutter) is. Observe the sun through a camera viewfinder only with a suitable filter over the lens. Do not attempt to filter over the eyepiece. A 400mm lens equipped with 2X teleconverter produced an image of the sun which measured about 7 millimeters on a 35mm negative (about a quarter inch). If a long lens is not available, a normal lens can still make an interesting photo if familiar objects are included in the frame. The lens used here was an inexpensive and lightweight f5.6 Sigma which cost about $250 second hand. The Vivitar teleconverter was about $50 brand new. The exposures were bracketed around f22 at 1/1000 second using 400 ISO film and a compact, tripod-mounted Nikon FM2 camera. The 400-speed film worked, but slower film is recommended. Compensate with wider apertures and longer shutter speeds depending on the eclipse type and phase. A solar eclipse offers ample time to experiment with a variety of exposures. Pack extra film.
|


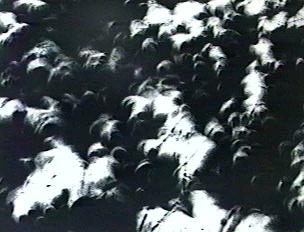 |
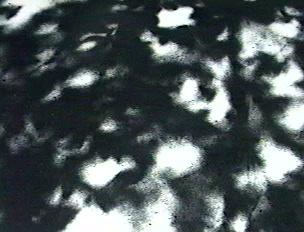
During the eclipse, sunlight filtering through tree leaves forms circular shadows on the pavement (left). Compare to same scene (right) photographed after the eclipse. |
 |


