Let me start off by saying.... YEAH YEAH I KNOW THERES NO DESIGN ON THIS PAGE.... BITE ME :) j/k heheh
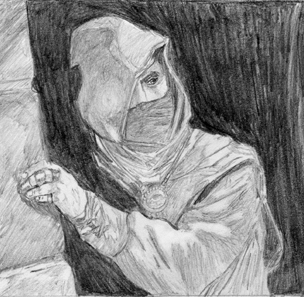
ok now that we have that out of the way. I have this picture everyone can use to practice on.. I cropped it down from its original version both to make it easier and so it doesnt take up so much space.. because theres gonna be alot of it flying around...

Ok lets begin. First open up photoshop and the picture above. you can either drag and drop the picture into photoshop or save it onto your harddrive then open it. Either way will work fine. Once open immediately go up to Image > Mode and change it from Indexed Color to RGP Color. This is because it was saved as a .gif.. some times you may need to also change it from Grayscale to RGB Color if it was scanned onto your computer using grayscale scanning. Next make a copy of the background by draging it to the new layer button located at the bottom of the layers tab. |
 |
|---|---|
First we need to set up all of our layers. With the image being that of alot of grey and pencil there will be no white which means no fill bucket can be used. So instead we make a layer for each thing we will need to color. we have the background picture now create new layers and rename them as followed Cloak Dark Wall Hand Face Eye Jewelry Jewelry Highlight Mask There is no necessary order in which they must be placed.. simply look at the drawing you wish to color and decide which parts will need to be seperate from others. There should never be 2 different colors on the same layer. |
 |
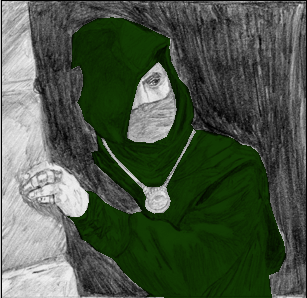
First the Cloak. This inludes everything he is wearing including hood but excluding mask. It will be a seperate color to give a contrast to his soon to be dull coloring of the Cloak. using the Polygonal Lasso Tool start from the hood and work your way down being careful to select as much as his cloak as possible while trying not to select the dark background he is in. By using the Ctrl + and Ctrl - Along with the space bar you should have no trouble selecting it. If need be make the screen bigger by clicking a corner and dragging.. or if you wish putting it in full view mode. Make sure not to include the hand in your selection. After a fashion you should get something simular to the right.
Now that you have the main selection you need to take out certain things that will not be colored. Mainly the face and mask region along with his pendant he has on his chest. Zoom in and deselect these... to do this hold down the Alt button while still using the Polygonal Lasso Tool. start with the pendant. Click on the upper left shoulder chain and work your way down out around and back up finishing the selection.. this will take the pendent out of the selection so it does not get colored. Next hold down Alt again and start selecting the upper face region working your way down along the hood around under the mask and back up to finish the selection make sure you do not include the shadow on the side of the face. this is part of the hood and not the face or mask. after a fashion your selection should look like this. |
|
Now we color the Cloak. Pick whatever color you wish.. I personally will stick to what he is.. since he is an assassin he will have darker tones.. feel free to have as bright of color as you want. to do this go to your forground and background color selectors located on the tool bar. and select the forground color selector and rummage around tell you find the color you want. Once you have the color you want select the cloak layer (make sure its selected) and press Alt + Backspace to fill the layer with the color you have chosen.. once complete it should look something like this. You can redue your colores over and over tell you get a color you like at this time. Once you are happy with your color Deselect the cloak (Ctrl+D).
With the Cloak layer selected go up to the top of the layers pallete were it will say Normal. Select Multiply and watch what happens. The color becomes transparent so it shows the picture underneath. |
|
Now its time to do the darkness behind him. Select the Cloak Layer by Ctrl+Click this is a much easier way to do it then having to reselect the outside of the cloak. Now using the Polygonal Lasso Tool we hold down Shift and Add the Pendant and the Face and Mask to our selection be careful not to go outside the allready selected Cloak. Once they have been selected Inverse the selection by pressing Ctrl+Shift+I this will select all of the picture except the Cloak. Now using the Pollygonal Lasso Tool once more we will Deselect the Wall and the Hand from the selection by holding down Alt and makeing the selection make sure to use Alt to Deselect the small selection on the wrist. Sounds Confusing but is quite simple.. what we are left with is the selection of the darkness behind him.. like so.
Using the same technique to color the Cloak we can color everything else including the darkness.. select a sutable color.. preferably a dark grey rather than black as black will not show the faint lines that give the depth in the color later. Making sure you are on the Dark Layer, Fill it with the color you chose. After you fill go back up to the Blending Mode and change it from Normal to Multiply Just like the Cloak. You should end up with something simular. |
|
Now we move right on to the wall.. we will save the skin and jewelry for later. get rid of the big parts first then the smaller lesser parts last. Select it with the Polygonal Lasso Tool making sure to go around the hand... but still getting the shadow of the hand in the selection. Remember to use the add and subtract methods if you mess up and over select or under select a portion of anything. Once selected make sure you are on the right layer and fill it with any old color... we will use the Hue/Saturation menu to define the color.. of course if you want you can make it any color you wish.. but if you wish to stick to the tutorial then proceed as followed. Image>Adjustments>Hue/Saturation. Clicking colorize plug in the numbers Hue: 41. Saturation: 36. Lightness: 43. and click ok.. this should give it a light tan look sutiable for an adobe/sandstone wall. Once complete turn the Blending Mode to Multiply and you should be done for now. |
 |
Time for the Mask. I felt it should be a different color then the main Cloak but if you want it all to be the same.. then just select the mask and color it the same as the cloak.. on the other hand if you want the mask to be a different color.. then well.. select it and make it a different color.. Make sure you are on the mask layer. Once done set the Blending Mode to Multiply and start in on the Face.
|
 |
Now its time for the face select the face with the Pollygonal Lasso Tool making sure to use the Alt key to deselect the eyeball.. not the eyelid whoever.. (Zoom in if you cant see it well theres a difference :-) ). once it is deselected make sure you are on the Face layer and color it a nice skin color.
A good skin color for the assassin would be a paller skin then someone who walked around without a hood on.. even so we will add more shadow and skin color in the more advance section of the tutorial. A good skin color would be #FAD6B1 for example.. there are plenty to choose from.. Set the Blend Mode to Multiply when done. |
|
| The hand will use the same skin tone as the face did.. select the hand being careful to deselect (using Alt) the 4 rings.. 3 on the middle finger the last on the pinky. 1 being that incases the front of his middle finger.. once selected make sure your on the hand layer and color it the same as the face making sure to set the Blend Mode to Multiply. Also we will not worry about the finger nails at the moment.. we can add the subtle highlight and the gleam using the techniques in the advance part of this tutorial. |  |
| Now the Jewelry select the 4 rings on the hand using the Shift key to add to your selection as you go. Then jump over to the pendant and using the Shift key select that. Making sure to be on the right layer (Jewelry) and that all is selected, the color is up to you.. a nice gold or maybe you wanna go for a silver or platinum look.. I will not go into detail on how to select the specific color you want.. Remember to turn the Blend Mode to Multiply. |  |
Im doing this highlight part for future refrence.. normaly you can use the dodge tool to bring out the hightlights but for this i will add a small amount of highlight using the Soft Light Blend Mode this is just to teach how to do this incase it needs to be done on your own graphic. Now for the highlight on the jewelry namley the pendant as the rings seem to have enough shine to them for now. The pendant on the other hand has absolutely no shine to it. for this we will use the Pollygonal Lasso Tool to select small inconsevable parts around the main pendent .. see picture...
Then pick a color that is lighter then the original color.. and fill in the selection making sure you are on the Jewelry Highlight layer. Next change the Blend Mode to Soft Light which will give it a nice soft shine.. we will add more using the advance techniques later in this tutorial. |
|
Last but defenetly not least for the second part of this tutorial is the pupal select your eye layer zoom waaaaay in and select the mostly black area that is represents the pupil and you can either A. if you want it a solid look use the Hue/Saturation to turn it the color you want.. (Mind you, you must fill it with a color first.) or do like i did and just give it a subtle color. I chose blue filled it in and turned the layer to Multiply.. you can barely see it but its there.. if you want it more pronounced go with the Hue/Saturation method.
This concludes the second part of the three part tutorial. |
 |
Next Page | 1 2 3 | Previous Page


