| Craft
Log Page 2 |
|
|
|
|
|
|
| |
|
|
|
|
|
|
|
|
|
|
|
10/14/04
Fancy Matte - I took a regular matte and covered it in small squares cut
from photographs. Everyone has pictures that don't turn out with the intended
subject. I had a stack of them, So I cut them in strips, roughly 1/4 inch.
Then I cut them the other way to make "squares," and glued them
on. Its neat, useless pictures become useful decorations. |
|
| |
|
|
|
|
|
|
|
|
|
|
|
|
|
|
|
|
|
|
 |
10/14/04
Nagel Shirt - My friend Dana and I screenprinted this image on the shirt
using Speedball screenprinting emulsion kit, which I got at a craft store.
It comes with instructions on how to burn an image. We took a picture from
a Nagel book, and made 3 black and white transparencies at Kinko's. Align
the transparencies and tape them together. The reason for the multiple copies
is because you want to make the black really black, and not penetrable by
the photo flood bulb used to burn the image, especially when using an image
that has fine lines. Once the screen is burned and rinsed and dried, (fans
really come in handy, just be careful if you use them to dry ink, sometimes
they blow over on themselves and get ruined, errrr,) your screen is ready
to make an image onto whatever you want, clothes, cavases, etc. It is helpful
to have someone hold down the screen and help with removal and stuff. After
you use white, you can go over it with another color like hot pink. We went
over some of the images with magenta. Dana's sister made hers into a purse,
with studs, Nifty! |
|
| |
|
|
|
| |
|
|
|
|
|
|
|
|
|
|
|
10/14/04 Collage
Cards and Magazine Envelopes - I have a huge collection of collected magazine
pictures and scraps. I figured it was time to clean out my craft bureau
and get rid of some stuff, but I love these pictures, so I collaged them
onto card stock. One of the best ones, on the left, was created using the
ripped off scraps that I was going to throw away. The Thriller card, on
the right, has a transparency sewn on top of the picture, it is the outline
of the peacock. That turned out rather well. I also added some glitter glue
to some of the cards. You can't go wrong with glitter glue. For the envelopes
I ripped out whole magazine pages and folded them in half, trimmed them
to the right size, then sewed the side and bottom. The good thing about
folding the page in half is that you don't have to sew that side. Sewing
paper is fun! |
|
| |
|
|
|
|
|
|
|
|
|
|
|
1/24/05
Elvis Dolls. To make these, I made a color copy transfer using Plaid's Picture
this. It worked pretty well, you just have to be careful when you are rubbing
off the paper that you don't rub to hard or the color will come off too.
For the body, I cut a shirt shape, and pants, then sewed them together at
the waist. The back piece is a solid piece of fabric. The belt is a piece
of faux leather, aka vinyl or pleather with rhinestones sewn on. Its sewn
like a fancy pillow, inside out, leave a small hole. (I left a hole in the
neck.) Turn right side out, be careful turning the head the right way, the
color can crack. Stuff, and sew up hole. ROck N rOll. |
|
| |
|
|
|
|
|
|
|
| |
|
|
|
|
|
|
|
|
|
|
|
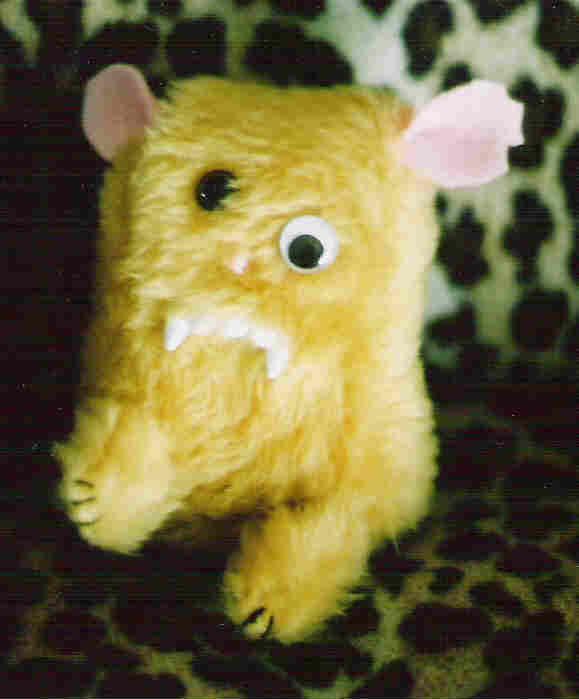
1/24/05
Stuffed hamster animal. Ahh, the crazy monster hamster. To do this I sort
of made a pattern from paper. I drew a box shape with rounded corners, and
sewed in the ears. I left a hole in the bottom for stuffing, but then I
realized I needed to attatch the face. The eyes are buttons, that you can
get at any craft store. The nose is embroidery thread, and for the mouth
I cut a hole and used a glue gun to glue in the vampire fangs. Then I stuffed
the little bugger and hand sewed him up. Then for the paws, I sewed two
pieces together inside out on the sewing machine. Used embroidery thread
for the black, then sewed it on with thread. Voila, crazy hamster. I really
like the chopped up ear. |
|
| |
|
|
|
|
|
|
|
| |
|
|
|
|
|
|
|
|
|
|
|
1/24/05
Pug towels. I made these for my mom for xmas. That is her crazy dog Nelly.
I took a picture of the dog and opened it in paint, then made the star and
put the dog on it. Printed it onto iron on transfer paper made by avery.
Then I followed the instructions. This is super easy, and quick. |
|
| |
|
|
|
|
|
|
|
|
|
|
|
|
|
|
|
|
|
|
|
|
|
|
|
|
|
|
|