|
GiSMO USER MANUAL ver. AW30001A4 |
|
Congratulations on
purchasing The GiSMO®
Communicator AW30001 Recommended System
Requirements 2. Host PC Requirements |

|
|
What is in the Box
|

|
|
Hardware Features1. SIM cardholder
Charging
|
|
|
SIM Card InstallationRemove plastic SIM cover,
open the SIM cardholder, |


GiSMO Communicator LED descriptionFunction GSM LED
WLAN LED
Charging LED
|
|
After successful software installation: |
||
|
|
|
|
|
Picture 1 |
Picture 2 |
Picture 3 |
|
|
|
|


|
At start up, the GiSMOPhone application is launched. The Keypad is the first screen that is displayed. |
||
|
Yes/NoDisplayMenuKeypad |
|
|

|
|
|
|
|


|
The GiSMO user interacts with the application by using the stylus or the scrollbar. Yes/NoAt the top of the keypad screen to the left you will find a green (Yes) and to the right a red (No) telephone button. The function of these buttons is to accept and reject a phone call. |
|
|
DisplayThe display area is found
just below the Yes/No buttons. The display will show updated information
concerning the application: |
|
|
MenuBelow the display is the Menu
button. With the exception of the
Keypad and About, all of the main menus, consist of a main display
accompanied by sub menus that are always visible and located on the bottom
half of the display. |
|
|
Making a phone callTo make a phone call type
the number on the keypad To hang up tap the red
phone button (No). |
||
|
|
|
|
|
Typing |
Dialling |
Talking |
|
A phone call can also be
made from Phonebook. |
||
|
|
|
|
|
Menu/Phonebook/SIM |
Selecting |
Dialling |
|
|
|
|
|
|
Pending |
|
|
The pictures above show pending as well. To switch between two calls tap the green phone button (Yes). The active call is shown in bold.
|
||
Phone BookThe second heading under
the main menu is the Phonebook. Here a user has the option to
access the SIM-card phone book SIM, or the default iPAQ phone book Contacts
(Picture 13). The static part consists of
four sub menus: |
|
|
SearchWhen the SIM phone book is chosen, the search engine in the upper part of the display is started (Picture 14). The list is scrollable and the built-in keyboard can be used as a shortcut to find an entry By pressing 'N' on the keyboard, the phone book will quickly scroll to the first four entries beginning with the letter 'N'. To call an entry, select a
name and press the Details button. To return to the Keypad,
just click the No button (red phone). |
|
|
Add EntryThe second sub menu under
the Phonebook is Add Entry (Picture 15). Here a user can add
new names and telephone numbers to the phone book. Press the Save
button to save the new information. When sub menu Add Entry is chosen, the built-in keyboard appears automatically. Erase/EditUse Erase and Edit
to edit an entry. When these sub menus are loaded, the built-in keyboard is
started as well. |
|
|
|
|
||
MessagesThe third heading under the main menu is Messages (Picture 16). Messages has three
sub menus: When Messages has
been selected, the sub menu Write new is started and the built-in
keyboard is shown. A maximum of 160 characters can be used when writing a
message. |
|
|
Inbox / OutboxThe Inbox / Outbox displays the 10 most recently received/unsent SMS messages. If the user click and hold on a specific message entry in the inbox or outbox display area a first sub menu (Picture 17) will be displayed. Here the user can choose to Forward, Read, Delete or Reply the specific message entry. The user can also choose to write a new message. |
|
|
|
|
||
Call RegisterThe fourth menu item is the
Call Register (Picture 18). Missed Calls, Received
Calls and Dialled Calls menus do almost look the same. The last 10 of the missed
calls, received calls, and called numbers are shown in the list portion of
the display. Erase ListsErase List contain
only three entries: |
|
|
|
|
||
SettingsSettings is the fifth menu item. After choosing settings either the Phone or Application settings can be selected. |
|
|
Phone SettingsAfter Menu/Settings/Phone
has been selected, the phone settings display screen (Picture 21) is
displayed. In the lower left corner of the display there are four
alternatives: By tapping the screen either one of these four alternatives can be chosen, appropriate selection for the chosen alternatives are then shown in the upper mid part of the screen. To save the changes, the Save button in the mid-lower screen has to be tapped. To return to the main menu without making any changes, either tap the red hang-up icon or tap on the Menu icon and select Keypad. |
||
NetworkThe GiSMO Communicator searches for available networks and if there is more than one available, it is possible to select a preferred network. |
|
|
Change PinThe pin code can be changed here, the old one has to be known. |
|
|
Activate PinTapping the Activate Pin Code check box activates or deactivates the requirement for a user to enter a Pin code before being able to use the phone. |
|
|
GSM On/OffTapping the GSM On check box activates or deactivates the GiSMO GSM telephone. |
|
|
Application SettingsAfter Menu/Settings/Application
has been selected, the application settings display screen (Picture 24) is
displayed. By tapping the screen either one of these four alternatives can be chosen, appropriate selection for the chosen alternatives are then shown in the upper mid part of the screen. To save the changes, the Save button in the mid lower screen has to be tapped. To return to the main menu without making any changes, either tap the red hang-up icon or tap on the Menu icon and select Keypad. |
||
Language
|
|
|
SkinsBy selecting a skin-file (.skn) in the roll down menu, the GiSMO Phone visual appearance can be changed. More information about
skins can be found on skins |
|
|
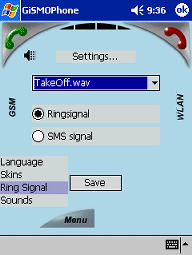
Ring SignalsBy selecting a sound file (.wav) in the roll down menu, the sound played when a call or SMS message is received can be changed. |
|
|
SoundsTwo check boxes are available to enable or disable the sound played during start of the GiSMOPhone application and when keys are tapped. |
|
|
|
|
|
|


|
|
WLANSelect Monitoring to
access WLAN configuration utility |
|
||||||||||||||||||
|
|
|
||||||||||||||||||
|
Operating Mode: Ad-Hoc mode allows PC-to-PC, peer-to-peer communication. Tap Change, change settings and then tap Submit. Channel: (Picture
30) *Please note the restrictions regarding WLAN in France. See chapter Restrictive WLAN use in France for details.
SSID: Service Set Identifier, a 32-character unique identifier attached to the header of packets sent over a WLAN that acts as a password when a mobile device tries to connect to the BSS. The SSID differentiates one WLAN from another, so all access points and all devices attempting to connect to a specific WLAN must use the same SSID. A device will not be permitted to join the BSS unless it can provide the unique SSID. Because an SSID can be sniffed in plain text from a packet it does not supply any security to the network. An SSID is also referred to as a Network Name because essentially it is a name that identifies a wireless network. When one AP (Access Point) is connected to a wired network and a set of wireless stations it is referred to as a Basic Service Set (BSS). Tx Rate: Power Mgmt: MAC Address is assigned to the device by the network. Encryption (Picture
31) WEP: Wired Equivalent Privacy, a security protocol for wireless local area networks (WLANs) defined in the 802.11b standard. WEP is designed to provide the same level of security as that of a wired LAN. Advanced settings (Picture 32) Long preamble Short preamble If you don't know whether the access point use long or short preamble start to test with long preamble. This is the most probable and common setting. |
|
||||||||||||||||||
|
|
|||||||||||||||||||
AboutInformation about your GiSMO Phone software. |
|
||||||||||||||||||


|
© 2002 Wireless House in Sweden AB. All information in this document is subject to change without notice.
|
|
|