
Adding Text
The most asked question is "How do I add the text to my buttons?" This page will give complete instructions with images to help guide you through it. I am using Paint Shop Pro 5.x (which can be downloaded at Jasc's website.)
 The first thing you need to do is open your button graphic into Paint Shop Pro. Use the "open" button located under the word "edit" in the top left corner of your screen. The first thing you need to do is open your button graphic into Paint Shop Pro. Use the "open" button located under the word "edit" in the top left corner of your screen.
 Once your graphic is opened, you need to increase the color depth to 16 million colors. This will keep the jagged edges from forming on your text and allow you to use more colors than the ones used to create the button. Once your graphic is opened, you need to increase the color depth to 16 million colors. This will keep the jagged edges from forming on your text and allow you to use more colors than the ones used to create the button.
 Next, we need to choose the color that you want your text to be. Click on the "foreground" color box to the right of your screen and a color chart will appear. Click on the color you want (in either the circle chart or the block chart) and press the "OK" button. Next, we need to choose the color that you want your text to be. Click on the "foreground" color box to the right of your screen and a color chart will appear. Click on the color you want (in either the circle chart or the block chart) and press the "OK" button.
 Now you need to choose your font. Do this by clicking on the "font" button located near the bottom (3rd button up) of the toolbar on the left of your screen. Once you have clicked the font button, place your cursor over your button and click once. This brings up a window that allows you to choose your font style and size. Click "OK" once you have made your selections. This has put text on your button - but probably not exactly where you want it to be. Now you need to choose your font. Do this by clicking on the "font" button located near the bottom (3rd button up) of the toolbar on the left of your screen. Once you have clicked the font button, place your cursor over your button and click once. This brings up a window that allows you to choose your font style and size. Click "OK" once you have made your selections. This has put text on your button - but probably not exactly where you want it to be.
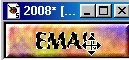 You will notice that there is a blinking line moving along your text. This means that your text is "selected." To move your text, place your cursor over it and hold down your left mouse button while moving it around. Once you have the text exactly where you want it - release your left mouse button. Your text will still be "selected." You will notice that there is a blinking line moving along your text. This means that your text is "selected." To move your text, place your cursor over it and hold down your left mouse button while moving it around. Once you have the text exactly where you want it - release your left mouse button. Your text will still be "selected."
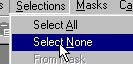 If you are sure your text is in place, click on the word SELECTIONS, SELECT NONE. Your text will no longer be highlighted with the blinking lines any longer. The only thing left to do now is to save your image. Do this by clicking on the word FILE, SAVE AS from the top left corner. Type in a filename and save the type as either a compuserve (.gif) or jpeg (.jpg) graphic for web use. If you are sure your text is in place, click on the word SELECTIONS, SELECT NONE. Your text will no longer be highlighted with the blinking lines any longer. The only thing left to do now is to save your image. Do this by clicking on the word FILE, SAVE AS from the top left corner. Type in a filename and save the type as either a compuserve (.gif) or jpeg (.jpg) graphic for web use.
Updated June 5, 1999
All graphics © Copyright 1997, 1998, 1999 by Leslie Kamm
This page has been viewed  times since June 5, 1999. times since June 5, 1999.
This page hosted by
 Get your own Free Home Page
|