Simple inexpensive tabletop camera support
David M. Delaney
August 20, 2008
Revised September 15, 2008 to add chock reference
 When
I started doing table-top photography, vertical, or nearly
vertical, shots required putting my tripod on the tabletop and
mounting the camera on the bottom of the riser column.. I used
the tripod this way for a couple of years, but always found it
inconvenient. It was sometimes almost impossible to get the feet
of the tripod out of the shot. The tripod occupied space on the
tabletop, and was always at risk of being knocked over. The feet
surrounded the subject and were always in the way.
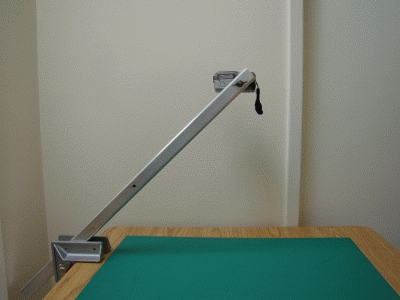
I had been looking for a commercial camera support system that would
work well for me on the tabletop when I thought of building the one
shown here. It works extremely well, and you won't beat the
price. It allows virtually any camera attitude in the space
anywhere above my small table from nearly zero inches to about
twenty inches (500 mm)..
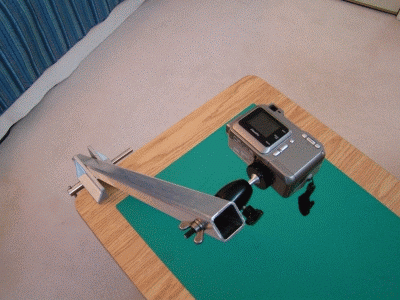
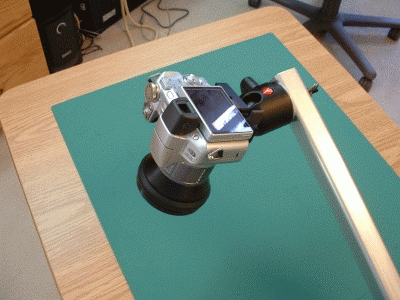
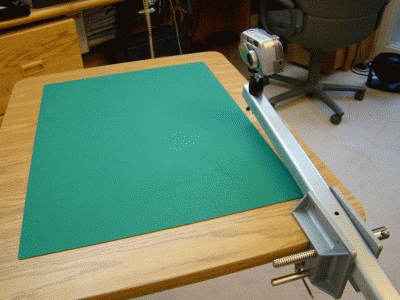
To replicate my camera support system, get a thirty inch piece of
square aluminum tubing, 1-1/4 inch (32 mm) on a side, wall thickness
1/8 inch (3 mm) with rounded edges, drill a 1/4 inch hole through
one end of the tubing, bolt a ballhead to it via the hole, and clamp
the tube in a portable vise that clamps to the edge of the table.
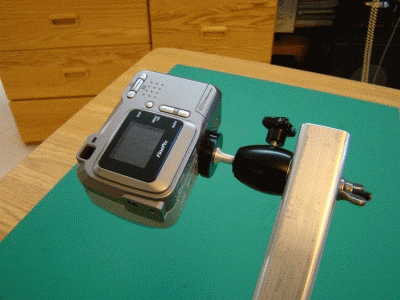
That's all there is to it. The system holds a small
point-and-shoot camera with a cheap ballhead very rigidly, but is
strong and rigid enough for a significantly heavier camera-ballhead
combination . See the Sony H50 with the Manfrotto 486RC2 pictured
below. (This is the combination I now do most of my tabletop
photography with.)
 I
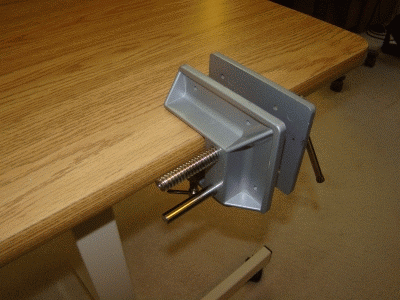
bought the tubing at a Metals Supermarket store. The vise
is a Lee Valley Tools In-Line Vise that I've had kicking around the
house for 10 years. (They still sell it. See http://tinyurl.com/6d9csz.)
I also bought some 1/4-20 threaded rod and a wing-nut from their Jig
Fixtures department. I cut the threaded rod to length with a
hacksaw and dressed the cut end with a file. I washed the tubing
with detergent to remove grunge from the store, and dressed it
well with a flat file and a rat-tail file file to remove rough
edges.
I
bought the tubing at a Metals Supermarket store. The vise
is a Lee Valley Tools In-Line Vise that I've had kicking around the
house for 10 years. (They still sell it. See http://tinyurl.com/6d9csz.)
I also bought some 1/4-20 threaded rod and a wing-nut from their Jig
Fixtures department. I cut the threaded rod to length with a
hacksaw and dressed the cut end with a file. I washed the tubing
with detergent to remove grunge from the store, and dressed it
well with a flat file and a rat-tail file file to remove rough
edges.
Note added September 15, 2008: Experience
has shown that the vise must be tightened inconveniently
hard. Also there is a risk of the beam (and camera!) falling when
the vise is loosened to adjust the beam angle. These problems
were solved by adding a chock to support the beam in the vise. With the
chock in use, the beam cannot fall, and the vise needs to be tightened
only sufficiently to eliminate
wiggling of the beam. See Adding a chock to the camera support system
David Delaney home


 When
I started doing table-top photography, vertical, or nearly
vertical, shots required putting my tripod on the tabletop and
mounting the camera on the bottom of the riser column.. I used
the tripod this way for a couple of years, but always found it
inconvenient. It was sometimes almost impossible to get the feet
of the tripod out of the shot. The tripod occupied space on the
tabletop, and was always at risk of being knocked over. The feet
surrounded the subject and were always in the way.
  I
bought the tubing at a Metals Supermarket store. The vise
is a Lee Valley Tools In-Line Vise that I've had kicking around the
house for 10 years. (They still sell it. See http://tinyurl.com/6d9csz.)
I also bought some 1/4-20 threaded rod and a wing-nut from their Jig
Fixtures department. I cut the threaded rod to length with a
hacksaw and dressed the cut end with a file. I washed the tubing
with detergent to remove grunge from the store, and dressed it
well with a flat file and a rat-tail file file to remove rough
edges.
I
bought the tubing at a Metals Supermarket store. The vise
is a Lee Valley Tools In-Line Vise that I've had kicking around the
house for 10 years. (They still sell it. See http://tinyurl.com/6d9csz.)
I also bought some 1/4-20 threaded rod and a wing-nut from their Jig
Fixtures department. I cut the threaded rod to length with a
hacksaw and dressed the cut end with a file. I washed the tubing
with detergent to remove grunge from the store, and dressed it
well with a flat file and a rat-tail file file to remove rough
edges. 


