
By Zrantheus
Having recently encountered this error for the first
time, I managed to find numerous sites with information online regarding
the cause and solution. I also found many people posting with questions
on how to execute the solution. So, I figured I'd create a simple page
outlining the details. Click on the thumbnails for larger views. |
This "How To" assumes that you either: a. Have an ISO image file of the Windows XP Install Disk. b. Have a burned CD/R or Original CD of the Windows XP Install Disk. c. Have a CD/RW Drive or access to one. |
Now for the record, this "should" be a legal ISO image or burned CD of Windows XP...if not, that's between you, God and Bill Gates. You are going to need a CD with the Windows XP Install files on it, so if you only have the ISO image file, now is the time to either open the ISO image file with an ISO image file reader (ie: WinImage), or use your CD/R software to burn a Windows XP Install CD from the ISO image file. |
 |
If you used WinImage to extract the files
from the ISO image file, then simply extract the files to a temporary
directory...process for creating directory shown below. If not, and you
burned a CD then you will need to copy the contents of the Windows XP
Install CD to your hard drive. You will need at least 491MB of free space
to do this. Create a temporary folder on your hard drive like C:\Temp. |
 |
Select the CDROM drive with the Windows XP Install
CD and right click for the menu, then select Copy. |
 |
Now, right click on the C:\Temp directory for the
menu and select Paste. |
 |
The contents of the Windows XP Install CD will now
be copied to the hard drive. This will take a few minutes. |
 |
Now, open the C:\Temp directory and browse to the following folder: C:\Temp\WXPVOL_EN\I386\ASMS\6000\MSFT\Windows\Common\Controls. |
 |
Now, right click on the file CONTROLS.MAN for the
menu and select Open With... |
 |
In the menu that opens you will want to Select the
program from a list and hit OK. |
 |
In the Open With menu, find and select Notepad...it
may be in the Recommended Programs list or in the Other Programs list.
Either way, find and select it. Make sure the box for "Always use
the selected program to open this kind of file" is UNCHECKED. Now
hit OK. |
 |
The notepad editor will open along with the contents
of the file...which should be nothing if you are having this problem to
begin with. IMPORTANT: The file will indeed appear to be empty, but is
filled with blank space. Be sure to use the Select All command from the
Edit menu to select the blank data or spaces and then hit the Delete key
BEFORE you Paste the new data whereas I believe the size of the file is
important and the extra blank space will alter the size. |
 |
Now, copy the following text EXACTLY as shown and paste it into the notepad window. Simply select the text from below, right click on the text for the menu, and select copy. Then right click in the empty notepad editor for the menu and select Paste. To copy the text below, position the mouse arrow at the beginning of the text, press and hold the left mouse button and drag the mouse to the end of the text...now release the left mouse button. The text should now be highlighted. Right click anywhere INSIDE the highlighted text for the menu and select copy. If you mess up and the text is no longer highlighted, simply repeat the selection process and try again. Remember, whatever is highlighted is what will be copied, so if all of the text is not highlighted, then you will not be copying all the text! |
| <?xml version="1.0" encoding="UTF-8"
standalone="yes"?> <assembly xmlns="urn:schemas-microsoft-com:asm.v1" manifestVersion="1.0"> <assemblyIdentity type="win32" name="Microsoft.Windows.Common-Controls" version="6.0.0.0" processorArchitecture="x86" publicKeyToken="6595b64144ccf1df"/> <file name="comctl32.dll" hash="4f02ff771050b8657e289d75f19163fe2ab02600" hashalg="SHA1"> <windowClass>ToolbarWindow32</windowClass> <windowClass>ComboBoxEx32</windowClass> <windowClass>msctls_trackbar32</windowClass> <windowClass>msctls_updown32</windowClass> <windowClass>msctls_progress32</windowClass> <windowClass>msctls_hotkey32</windowClass> <windowClass>msctls_statusbar32</windowClass> <windowClass>SysHeader32</windowClass> <windowClass>SysListView32</windowClass> <windowClass>SysTreeView32</windowClass> <windowClass>SysTabControl32</windowClass> <windowClass>SysIPAddress32</windowClass> <windowClass>SysPager</windowClass> <windowClass>NativeFontCtl</windowClass> <windowClass>Button</windowClass> <windowClass>Static</windowClass> <windowClass>Listbox</windowClass> <windowClass>ScrollBar</windowClass> <windowClass>SysLink</windowClass> <windowClass>tooltips_class32</windowClass> <windowClass>ButtonListBox</windowClass> <windowClass>SysAnimate32</windowClass> <windowClass>SysMonthCal32</windowClass> <windowClass>SysDateTimePick32</windowClass> <windowClass>ReBarWindow32</windowClass> <windowClass>Edit</windowClass> <windowClass>Combobox</windowClass> <windowClass>ComboLBox</windowClass> </file> </assembly> |
If you notice that after the paste some of the text
runs off the window to the right, this is nothing to worry about. It
only means that notepad does not have word wrap enabled and you will
have to use the scroll bar at the bottom of the window to view all of
the text. This is not important to the process, but you can enable word
wrap from the Format menu of notepad. |
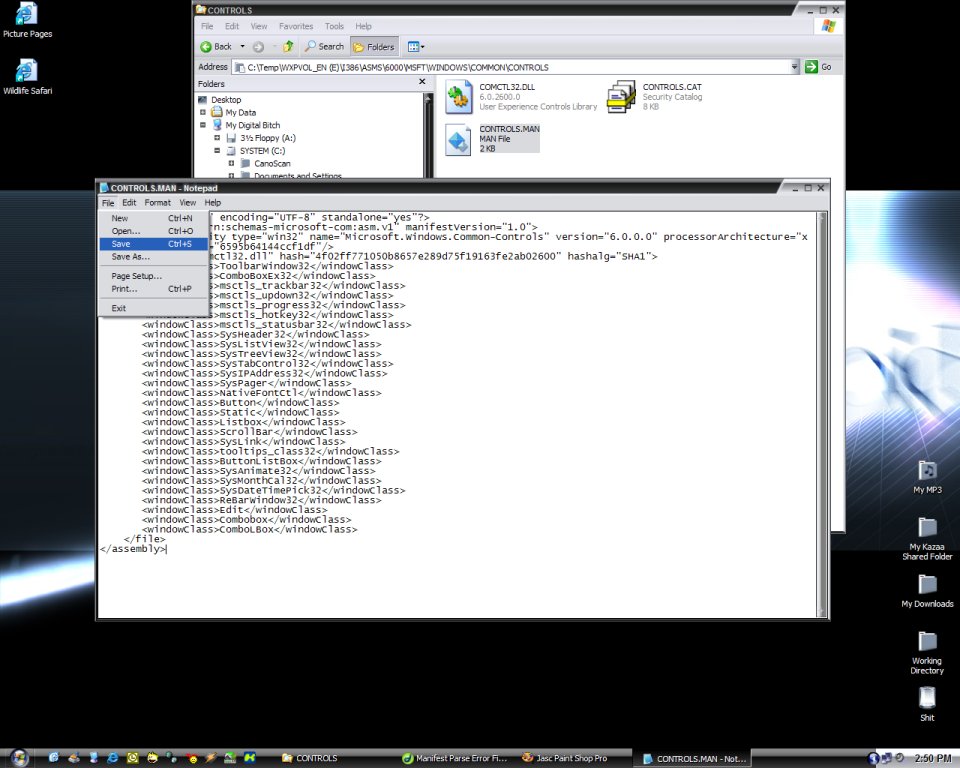 |
Now, in the menu of the notepad editor,
click on File then Save. |
Close the notepad editor. If you are having trouble altering the CONTROLS.MAN file, I have provided a copy of it here to download. The file is fixed. Now you need only burn a new Windows XP Install CD from the files on the hard drive. This process will vary depending on what software you use with you burner. I use NERO personally simply because it came with my burner. If you need help burning a CD, refer to the help section of your burner software. Since there are so many variations of burner software, I will not be able to go into specifics on how to burn a CD for every application. Whatever software you use to burn a CD, you will need to keep a few things in mind. First off, you can set the volume name for any CD you burn. Make sure this is: WXPVOL_EN Also make sure you select everything in the C:\Temp\WXPVOL_EN directory to be burned to the new CD. DO NOT include the C:\Temp\WXPVOL_EN folders in the burn! IMPORTANT You will also want to make sure your new XP Windows XP Install CD is "bootable". To do this you will need to transfer the Microsoft .img file from the original Windows XP Install CD to the new CD being burned which is what the computer uses to boot. If you cannot find this with an ISO editor on the old CD I have included a copy of it here. Again, depending on what software you are using the process will vary for including this boot.img file in the CD burn. Thanks to popular request, I have created a step-by-step guide for this procedure. It is geared towards NERO Burning ROM whereas that is the only burning application I have. This guide can be found here. And lastly, I have heard claims that it is necessary to set the options "Disk at once" and "Finalize CD Session." I personally used these options on my attempt, but did not experiment to see if it worked without these options enabled. Others have indicated that various slower speeds used in burning the CD helped in some instances. I burned my CD at the maximum speed of my drive with no problems. However, it is true that hardware and software vary, and if you are having problems it may be a good idea to to take these suggestions into account. |
 |
Your newly burned CD should look just
like this. |
That's it.
Enjoy XP.
Thanks to Richard D. LeCour for providing the correct data for the CONTROLS.MAN file!
I have had many inquiries about the XP Theme I was using in
the screen shots. Here is a link to the author's site. ![]()
Page updated: 06.29.05