Hello and welcome to my first ever drawing tutorial. I hope to help those that would like to learn how to draw a human figure to have some form of an understanding on how to draw a human figure. This tutorial will be using my drawing of the comic book character Killian from Micheal Turner's Fathom. The images have been darkend from it's original version to show more details and depth into the image. Please take that into consideration when you do your own character.
My prefered tools to draw with.
- Stadtler Mars Lumograph HB, 2B, and 4B pencils (i like this brand because of the softness in the lead)
- Design Needed Eraser (i use needed erasers because of the flexablity i have with them)
- Blue Line Comic Book Board (i don't recommend this type of paper until you feel comfortable drawing first. this is expensive paper. another type i like is smooth bristol board)
- small hand pencil sharpener (i perfer this type over a automatic pencil sharpener because they are easier to clean and they sharpen better for me)
Step One: The Basic Shapes
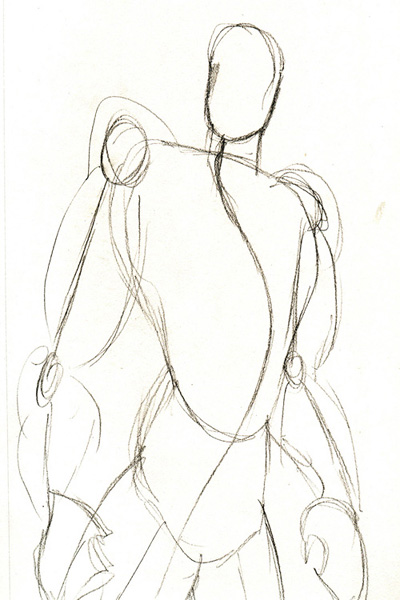
One of the first things I do when creating a character is that I have to come up with a pose and what or who the character is going to be. For this image I was asked to draw Killian by one of my neighbors. So, I had already knew what the character will look like. For the pose I did a few thumnail sketches of different poses that I thought would look good for the character. This is the one that I decided to draw. I also found an image of the character in a similar pose , so, I used that image as my photo reference to get some of the anatomy and shading for later steps.
The first thing I do when drawing out the basic shapes is I do an oval for the head. Then from the oval I draw what is called a s-curve. The s-curve is the basis for the way the body will shape out and is also the line I use as a reference for the spine. One thing you have to remember about the human body is that the spine is always in a "s" shape. It is never straight.
Next what I do is I draw an odd shaped oval for the placement of the body. If you notice the shape of it, it has a large top and a small bottom. The reason for this is because of the stomach and waste areas are smaller than the shoulders and chest. Also, if you notice the shape of the body is based around the s-curve. Notice how the chest goes forward and then when you come closer to the bottom of the s-curve the body starts to move back.
I then proceed to drawing the pelvic area of the body. Depending on the angle of the body that your drawing will always determin the shape of this area (this includeds most areas of the body as well). If you notice I have it going straight in the front and I curved it back on the back side. The way I set the shape is determined by how I had ended my s-curve.
Because I have a hardtime drawing arms and hands I decided to start them off with a stickfigure aproach. If you notice with the s-curve the oval head and the stick arms I do have a stick figure in many ways. When drawing the arms I draw circles for the elbows and shoulders. One thing to remember when drawing arms is how long they are. Hold out your arms down the side of your body and see how far they go. If you don't have any true abnormality your tips of your fingers should be about midway down your thigh. Also check out photos of other people to see how far you should draw your arms on your body (photo refernces are very important when your learning to draw). With the hands I like to just draw out those nice odd shapes you see there. I never create my fingers at this stage I do more of placement of how the hand will shaped. After getting the sticks of the arms I then draw ovals around them to create the muscle mass areas. Depending on how muscular your character is will determin how large of an oval you will draw.
For the legs I normaly repeat what I do with the arms. Just the legs are longer and the muscle mass is thicker than the arms.
Step Two: Building apon your Shapes

In this step I kinda screwed up and started into step three before I realized what I had done. So, you'll have to try to ignore the darker lines in this image.
For step two what I do is I start to define the shape of the body and anything else that I might add to the image. What I do here is I grab a light pencil (normaly my 2B) and I just start to doodle over the original shapes. I start placing lines in areas that I feel I might need, such as the abs, arm muscles, clothing or armor, and placement of the facial features. If you ignore the dark lines you'll see that all I really have done is just started sketching out the look of the image. The hair and the armor that is coming off the body is nothing but sketch lines. Also, in this stage you have to think about how the overall look of your character will be. What type of clothing the hair and detailed ideas you might have. What I did was I just started sketching ideas of where I want to place these things. His armor is coral/bone based so I try to give it an organic look to it.
The most important thing I do in this stage is just giving an overall placement of everything by just lightly sketching where I want things to go. I use the original shapes that I had drawn out as my guides of how I'll draw out the body. Never worry about any final lines in this stage. This is all just giving you ideas for placement.
Step Three: Defining your Shapes
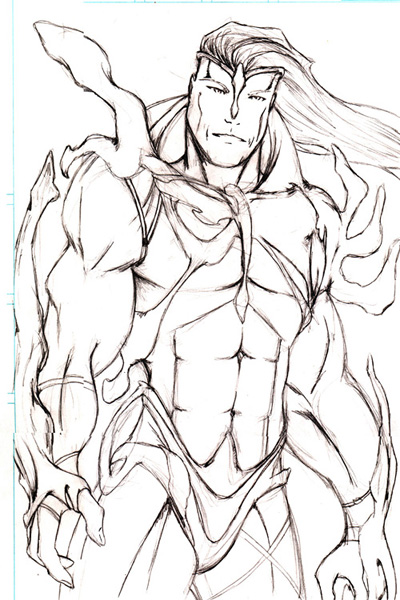
After sketching out where you want everything to be this is the step where you start defining those sketches and shapes that you have created. What I like to do is I start just lightly going over certain areas of the body that I know will become the main look of those shapes. Which you saw that I had started doing that in the step two image. In this step I really pay attention to any photo references that I am using to make sure that the placement of muscle lines and things are in about the correct areas. All I really do in this step is just start defining my sketches to give me more of the final look of the image.
One major thing in this step is that you'll notice how I might have changed the placement of something on the drawing. This is the reason I like to draw with my lighter penicls. Now remember the images have been darken from their original lines so that you can see the image better. Also I have erased most of the lines that I had sketched out. This is also the stage where I have erased the s-curve and some of the other basic shapes that I had originaly created.
Step Four: Final lines and Shading
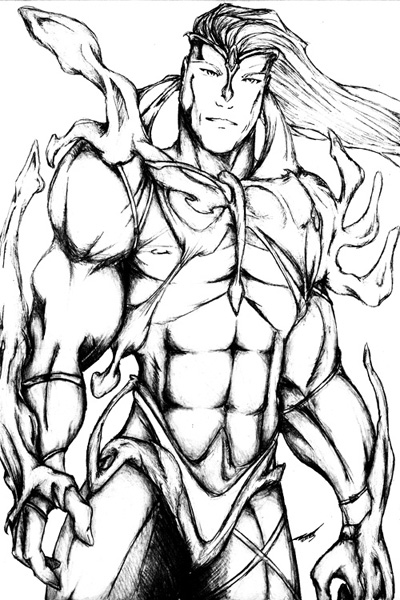
Here we are in the final steps of the project. After defining all the lines that I would like to keep for the finished project I start to darken in those lines to give them "life." This step for me is the longest step. This is where I do my detailed work on the drawing. I place in more lining and put in more details. If you have good photo references defently take advantage of them to see where some small details you can place into the image.
For most comic book artist they like to stop before the shading steps, they normaly leave that to the colorest. For me I like to shade in even more details into my drawing. Plus this drawing wasn't designed to be inked and computer colored. I wanted to keep it black and white with nice detailed shading. When you are shading you want to create a light source(s). In this image I gave the light source more of a from the viewers point of view (straight on). Because of the pose I felt like the lighting should be more of like someone taking a photograph of him. This is where I decided what areas will be th darkest. I choose more of the cracks and indetions and then shade out into the light areas. When I shade I normaly use a 4B and I don't press hard. I like to shade lightly and just shade over and over until I get my desired effect. Another tool I use when shading is I use a paper pencil blend tool. It looks like a double sided pencil. Using this I can give a smoother look to the shading so it doesn't look so rough.
After I have finished putting in my details and shading I then sign the image. I have my own signature that I use for all my drawings. You can see it in almost every image on the site. To me signing the image should always be the last thing you do. It gives more of a final touch to it.
Questions?
If you have any questions feel free to email me at zeus2o0o@yahoo.com. I know I might have left something out of the tutorial or you might want me to go into more detail on something, so don't be shy, go ahead and email me. I'll try to answer your question to the best of my knowledge. Thanks for checking out my tutorial and I hope to have more to come.