The beginning of any software rasterization you might want to do on the GBA starts with the simplest primitive of all, the pixel. If you don't know how to set a pixel and the 'formula' involved here's an extremely quick blurb.
Assuming you have a linear block of memory to serve as a framebuffer (unsigned char *FrameBuffer[640 * 480], a framebuffer for a 640x480 screen, with 1 byte per pixel, 307,200 bytes total), we know that FrameBuffer[0] = 1; will make the first pixel on the screen (at (0,0), the top left pixel) take the value of 1. We also know that FrameBuffer[639] = 1; will do the same for the top right pixel (at (639,0) since the screen horizontal res is 640 pixels. Now, FrameBuffer[640] should then wrap around from the far right back to the left, and down one line and point to the pixel at (0, 1). It's obvious that every time we want to move 1 pixel down the screen we skip 640 bytes in the frame buffer. If we want to move 10 down the screen we do 10 * 640 and so on. The simple formula is as follows:
void PutPixel(unsigned char *FrameBuffer, unsigned int x, unsigned int y, unsigned int Pitch, unsigned int Colour)
{
	FrameBuffer[(y * Pitch) + x] = Colour;
	return;
}
The correct term for the number of pixels we need to skip in a linear block of memory to logically move down one unit is called the pitch of the memory surface. The pitch for a 640x480 screen is 640, and for the GBA screen in modes 3 and 4 (where the screen is 240x160) is 240. For mode 5 its obviously 160.
Armed with the ability to draw points anywhere on the GBA screen we can now move onto something a little more complicated: the over-used and under-appreciated line. Drawing lines involves drawing pixels from point A to point B. Drawing horizontal lines, vertical lines, and lines with a slope of 1 (lines angled at 45 degrees) is a simple enough excercise. Where the difficulty comes from is in drawing slanted lines, lines with fractional slopes. The standard formula for a 2D line is y = mx + b, where b is the Y-intercept and m is the slope of the line. For simplicity imagine that b = 0, so the line goes through the origin. Thus, y = mx where the slope is 3/4 tells us that for every 4 units along the x axis we move 3 along the y axis, (in other words for every 1 X we have 0.75 Y. It seems easy enough to draw lines of any sort then, just have a loop that loops from the start point to the end point and for every X adds 0.75 to Y and rounds Y to the nearest whole number, then draws a point at (X,Y). This however entails using floats (and a divide where the slope is concerned), which is just not going to cut it on hardware that has no dedicated FPU. We might try fixed point numbers, but then we have innacurracies that creep in, and we still need to use that divide. These little errors might not be noticable when using scaling and rotation of bitmaps where there too many pixels to care if 1 or 2 is out of place, but for lines you certainly will tell when 1 or 2 pixels jump out at you because they just arent where they should be. Enter Bresenham's line drawing algorithm, a quick method for approximating lines on a low res display. Bresenham doesn't use floats or fixed point numbers, and doesn't use any divisions either, so it's perfectly suited for the GBA. At this point I must suggest Michael Abrash's excellent Bresenham implementation, found in his Graphics Programming Black Book. Below is a version of that implementation, modified for my own purposes.
void PutLine16(unsigned short *pDest, unsigned int x1, unsigned int y1, unsigned int x2, unsigned int y2, unsigned int dest_pitch, unsigned int c)
{
	unsigned char	DeltaX = abs(x2 - x1), DeltaY = (y2 - y1);		// Total movement of the line on the X and Y axes
	unsigned char	DeltaMinor_2x;
	signed char	DeltaMinor_2x_Minus_DeltaMajor_2x;
	signed char	Error;
	signed char	XIncrement = 1, YIncrement = 1;

	if (x1 > x2)								// If the points given move from right to left then we subtract 1 from X each time, otherwise we add 1
		XIncrement = -1;
	if (y1 > y2)								// Likewise for Y
		YIncrement = -1;

	PutPixel16(pDest, x1, y1, dest_pitch, c);

	if (DeltaX > DeltaY)
	{
		DeltaMinor_2x = DeltaY + DeltaY;
		DeltaMinor_2x_Minus_DeltaMajor_2x = DeltaMinor_2x - (DeltaX + DeltaX);

		Error = DeltaMinor_2x - DeltaX;

		while (DeltaX--)
		{
			if (Error >= 0)
			{
				y1 += YIncrement;
				Error += DeltaMinor_2x_Minus_DeltaMajor_2x;
			}
			else
				Error += DeltaMinor_2x;

			x1 += XIncrement;
			PutPixel16(pDest, x1, y1, dest_pitch, c);
		}
	}
	else
	{
		DeltaMinor_2x = DeltaX + DeltaX;
		DeltaMinor_2x_Minus_DeltaMajor_2x = DeltaMinor_2x - (DeltaY + DeltaY);

		Error = DeltaMinor_2x - DeltaY;

		while (DeltaY--)
		{
			if (Error >= 0)
			{
				x1 += XIncrement;
				Error += DeltaMinor_2x_Minus_DeltaMajor_2x;
			}
			else
				Error += DeltaMinor_2x;

			y1 += YIncrement;
			PutPixel16(pDest, x1, y1, dest_pitch, c);
		}
	}

	return;
}
To understand how this function draws lines let us take an example line with the starting point (3,5) and the end point (41,32). The total movement of this line on the X axis will be the absolute value of the difference between 3 and 41, and likewise the difference between 5 and 32 will be the movement (we can use the term 'delta' to refer to the change or movement) on the Y axis. In this case DeltaX = abs(41 - 3) or abs(3 - 41), the order doesn't matter, the result is 38. Similarly, DeltaY is 27. So the slope of this line (the slope being DeltaY/DeltaX, as discussed above) is 27/38; when all is said and done the line will have advanced 38 units on the X axis and 27 on the Y axis. Next we must figure out in which direction the line is travelling on these axes. For this example it's easy to see that the line moves from least to greatest from the start to the end on both axes, and therefore we increment by 1 for both the X and Y values.

The first point of the line we have to draw is the start point, since it will always be on the line. After that however we must use the information we have to figure out when to advance the line on the X and Y axes and where the pixels will end up. As you can see above, the pixels we have to work with on a low res display won't ever satisfy the true path of a line unless its horizontal, vertical, or has a slope of 1. The best we can do is approximate the true position of the line by drawing a pixel at the closest point on our display. To do this we first determine what the major axis of the line is, the major axis being the axis on which the line has the greatest absolute delta. In this case since DeltaX > DeltaY, the X axis is the major axis and the Y axis is the minor axis. Since the slope of the line is 27/38, we know that for every 1 step on the X axis we move ~0.71 units on the Y axis, for every 1 step on the Y axis we need to move ~1.407 units on the X axis. The catch however is that if we want this routine to be fast we really can't afford to waste cycles on division, especially because the ARM7dtmi has no hardware division instruction. Instead, we run a loop and increment the X coord every time through the loop. Since the Y coord is the minor coord we don't update it every time through the loop, but instead use an Error value to figure out when to increment it and when not to.
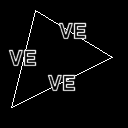
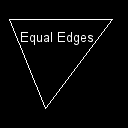
Finally, we get to rasterizing triangles. This is somewhat of a tricky process, but we can rely on the process above to aid us. At first thought, you might think drawing a triangle involves drawing 3 lines between 3 vertices. This is adequate for wireframe drawing, but what about filled triangles? Thr process for drawing filled triangles involves drawing a series of horizontal lines between the edges of the triangle. The edges of a triangle can be horizontal (top and bottom edges), or vertical (for our purposes, any edge that is not completely horizontal). The figures below illustrate some possible triangle orientations, with the horizontal and vertical edges pointed out.


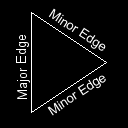
As is evident, we need to move down each scanline and draw horizontal lines between the vertical edges. This process is known as scanline conversion. You might note that even edges that are almost horizontal are considered vertical. This is because we still need to move down them and draw at least 2 horizontal lines (usually more) where each scanline intersects the edge. True horizontal edges can be processed with a single scanline conversion. To begin with, we need to identify which of the 3 vertices that make up the triangle is the top vertex, which is the bottom, and which is in the middle. The highest vertex will be the one with the smallest Y component, the lowest will be the one with the highest Y component, and the middle will be the remaining vertex. Note that at this point we are dealing with vertices in screen space, that is to say, they've already been transformed and projected onto the screen. Next we need to identify which lines we need to form from these vertices. For triangles with 3 vertical edges we need 3 lines to traverse. Of these 3 lines, one line will be traversed the entire height of the triangle (we will call this the major edge), the other two lines will be traversed in sequence starting with the higher line and moving to the lower (we will call these two the minor edges). Note that this is the case for ALL triangles with 3 vertical edges. Triangles with 2 vertical edges just need their horizontal edge drawn, then the two remaining edges can be traversed without concern for which is longer and which is shorter. The next figure presents the major and minor edges for the 4 triangles presented above.


From these images we can see how to find the coordinates for our edges. The major edge will run from the highest vertex to the lowest. The upper minor edge will run from the highest vertex to the middle vertex. The lower minor edge will run from the middle vertex to the lowest vertex. Now, how do you scan down the edges of the triange? Well, the standard Bresenham algorithm above will do the job nicely, but in this case we do it for two lines simultaneously, and instead of drawing each point on each line, we draw a line between the two points. Remember that we need our loop to move us from the top of the triangle downward, that is to say, we need to increment the Y axis every step through the loop. This is no problem if the edge's major axis is the Y axis, since this is the case anyway. But it wont usually be the case that all 3 of your edges have the Y axis as the major axis. In cases where the X axis is the major axis we need to loop until the error term is greater than or equal to zero. The steps involved and a sample loop follows: