|
Happy New Year
23


Jeanette's original
Dutch tutorial can
be viewed
here.
Click on the image
to view the working
script
Download the
supplies
here.
The tubes were made
by Monique and Alejandra
Rosales.
Save the object in
the PSP - basic
shapes folder.
The clock belongs
there.
FILTER NEEDED:
Greg's
Factory Output II
and
I.C.Net Software's
Filters Unlimited.
This is a long
tutorial.
You will need some
patience :)
We will start with
the clock.
Make sure you do it
precisely otherwise
it won't look so
good.
The Color palette.:
Foreground color: #000000.
Background color: #834424.
1. Open a new
transparent canvas,
size 450x450 pixels.
2. Activate the
Preset Shapes Tool
and find the clock.
Draw a shape from
the top left to the
bottom right
as seen below.
3. Use the Eraser
tool to remove the
hands.
Don't remove the
black dot in the
center.

4. Click with the
Magic want in the
black border.
5. Selections -
Modify - Select
Similar:

6. Add a new layer
and fill with the
background color.
7. Note!! Each dot
and number has to be
filled seperately!!
8. Effects - Filter
Effects - Greg's
Factory II-
Poolshadow
- with the standard
settings.
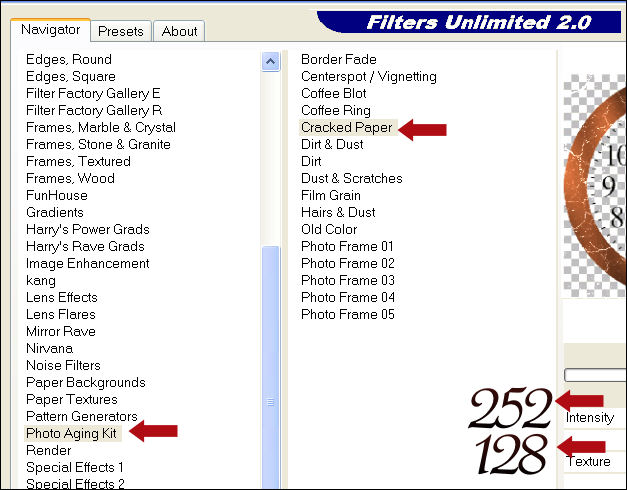
9. Effects - Filter
Effects -
Filters Unlimited
Photo Aging Kit -
Cracked Paper:
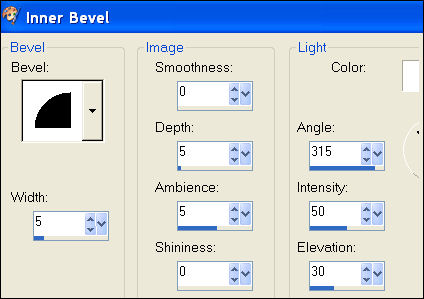
10. Effects - 3D
Effects - Inner
Bevel:
11. Deselect.
Merge layers
visible.
12. Add a new raster
layer.
Fill with black.
Drag the clock layer
to the top in the
Layers palette.
13. Merge layers.
14. Click with the
Magic Wand in the
outer black area
and click on delete.
15. Selections -
Select None.
Copy and paste as a
new image.
16. It should look
like this now :)

17. Open the
'wijzer_jeannette.pspimage'.
18. Copy and paste
it onto the canvas.
Position it as in
the example tag.
Merge layers
visible.
19. Duplicate this
layer 11x in the
Layers paltte.
20. Lock all layers
except the bottom
layer.
21. Click on the
bottom layer to
activate it.
22. Go back to the
'wijzer'image.
Copy and paste onto
the clock.
Move it to the top
so that it is
nestled right
against the 12.
23. Layers - Merge -
Merge Down.
24. Lock this layer.
25. Unlock the layer
above this one now.
26. Paste the
'wijzer' again.
27. Image - Rotate -
Free Rotate: 30 /
Right.
(only this layer)

28. Move it a little
to the outside so
that
the end of the
clockhand is right
in the center of the
black dot.
29. Layers - Merge -
Merge Down.
30. Lock this layer.
Unlock the layer
above it.
31. Paste the clock
hand again
and rotate 60
degrees.
32. Repeat steps 28
to 30.
33. Keep repeating
steps 24 to 30
and increase the
rotation degree each
time with 30 for
each new layer: in
other words:
30 60 90 120
150 180, etc.
34. If you have
finished filling
each layer
with a clock hand on
a different degree,
you can unlock all
the layers.
35. Image - Resize:
160 wide and 120
high: 'Retain aspect
Ratio' should be
unchecked.
36. Save as a
PSP-image.
37. Open
Animation Shop.
38. Open the folder
where you have saved
your PSP-image.
39. Edit - Select
All.
40. Go to Animation
- Frame Properties:
and fill in '50' as
the Display Time'.
41. Save your clock
as a GIF
and choose the best
quality.
Okay, the clock is
finished and looks
great, hopefully :)
The New Year's tag
is a lot easier :-))
42. Open the
fireworks image.
43. Open the tube
'Tomas Crown'.
Remove the watermark
and background
layers.
Copy the image with
SHIFT D and close
the original.
Image - Mirror.
44. Layers -
Load/Save Mask /
Load Mask From Disk.
Find the 20-20 maks
and apply.
45. Layers - Merge -
merge Group.
46. Copy and paste
onto your fireworks
image.
Move it to the top
right.
47. Change the layer
opacity to 65% in
the Layers palette.
48. Open the
champagne flute
tube.
Remove the
background and
watermark layers.
49. Copy and paste
it onto the bigger
fireworks image
and move it to the
right.
50. Merge layers
visible.
51. Lock the
foreground color.
Add some text of
your choice in a
nice font.
52. Filter:
Greg's Factory
Poolshadow with the
standard settings.
53. Effects - 3D
Effects - Drop
Shadow:
1 1 70 2,00.
54. Merge all layers
visible.
Deselect.
55. Change the
foreground color to #3A110B,
background to black
and make a gradient
with these settings:

56. Add a 5 pixel
white border.
Select with the
Magic Wand and fill
with the gradient.
57. Deselect.
Your tag is finished
!! :-)
You need an
additional 2
backgrounds
if you want to use
the script.
You will also need
the goldbeads
which is included in
the zip.
Have fun with your
longggg tutorials's
results! :-))
And Happy New Year
to you!
Download the empty
script
here
BACK

If you enjoyed
Jeanette's tutorial
please be so kind
and write
a message in her
guestbook.

Translated on 18th
August 2007

The graphic design
of this page is
copyrighted to
Magstags.
Home |
Filter Links |
Email|Terms
of Use |