
Creating a Web Page
Using FrontPage Editor 98 for Windows 95
Created: June 14, 1998
Starting FrontPage 98
In this tutorial we’ll create a single web page using Microsoft FrontPage 98 Editor. If you later desire to create a web site, you’ll need to use the Explorer.
Double click on the FrontPage 98 Editor icon, or click-on Start in the lower left corner of the screen, then click-on Programs, and then on Microsoft FrontPage. Frequently, this option only shows a single icon: Microsoft FrontPage 98 (Explorer). It’s OK to load the Explorer, however, for this tutorial we will stay in the Editor. If the Explorer appears, you can open the Editor form the Button Bar. The Editor button has a small red feather as a part of the button. It will also indicate Editor when you move the cursor arrow over the button. If, both the Explorer and Editor are open, it would be wise to close the Explorer so that you don’t become confused later. To close the Explorer, click-on Front Page Explorer in the status bar at the bottom of the screen. Then click-on File in the Menu bar and then click-on Exit. You can also click-on the "X" in the upper right hand corner of the screen.
You should now be in the Editor. If your are in the Editor, you will see the "red feather" icon and FrontPage Editor. Click-on all of the items in the Menu bar and familiarize yourself with what they do. Also, run the cursor over the buttons in the button bars and read the text help’s that appear.
We’ll start this tutorial by placing a title on the web page. Your cursor should be flashing on the left-hand side of the white area. If it is not, click-in the area until you see the flashing bar.
Text
Type something like: Your first name (‘s) Home Page (e.g. Susan’s Home Page).
Now click to the left of your name and hold down the left mouse button and drag across all that you have typed, and release the button. This will highlight your title.
With the text highlighted, click-on Format in the Menu bar and then click-on Font. The following Menu screen will appear.
There are several unique things that occur when you are working in web pages. If you are familiar with word processing, then you know that you can make your font size just about as big as you desire. However, when working in web pages, you are limited in the number of font sizes that you are allowed. In web terminology these are called headers. We are going to "snazz-up" our title font a bit. First, you will notice that a Sample of how the font currently appears is located at the lower right of the menu screen. As we alter the appearance of the font, each change will appear, as we make it, in the Sample area.
First, click-on several of the fonts in the font area. Notice that, as you click, the fonts appear in the Sample area. Click-around until you discover one you like.
Next, click-on Bold. Watch the Sample.
Now, click-on one of the Sizes. Notice that, when you do, the Sample changes to that size. Notice in front of the normal font sizes that there is a 1, 2, 3, etc. In web pages this is the size of the header. Move down and choose the largest size: 7 (36).
Finally, click-on the down triangle to the right of Color. A list of colors appears. Click-on Custom. The following Menu screen appears.

Click-on one of the Basic Colors (on the left). Notice that, when you do, a small marker appears in the color pattern (to the right). Notice that a small triangle appears on the right of the pattern. You can click-on the triangle, hold down the left mouse button, and drag the triangle up and down. As you do, you will see changes in the color. Try this. For now choose a favorite dark color. If, you want to use it again later, click-on Add to Custom Colors. You will see your choice appear in Custom colors on the left. When you are satisfied, click-on OK.
You will notice that when you return to your web page that the area you highlighted is still highlighted. You will need to point away somewhere in the white area of the page and click the left mouse button. This will remove the highlight and show you the color of your text. If you don’t like it, try again.
Saving your web page
It’s wise to save your web page periodically so that you don’t loose your efforts. There are several ways to do this. First, click-on File in the Menu Bar and then click-on Save.
The following Menu Screen will appear.

We will be saving this web page on a floppy disk in the A Drive. So, insert a formatted High-Density disk in the A Drive. When the disk is in place, click-on the small triangle to the right of the Save in: box. A "drop down" menu will appear. Click-on the 3 ½ Floppy [A:]. If you don’t have a floppy disk, you can click-on the C Drive and save on it, or in one of the folders on the C Drive.
The drive you choose will now appear in the Save in: area. You will now need to give your web page a File name under which it will be saved. FrontPage will try to guess one for you. Be careful here. FrontPage will try to use your title for the name. If it is more than 8 characters long, some older computer systems and servers might not work well with the name. Also, the name should not have an apostrophe (‘) as this is a reserved character and could cause later problems as well. So, create a logical name for your web page like the one above.
Inserting a Photograph
At this point we’d normally insert your picture in the web page. If you know how to use a scanner, scan a picture of yourself. If at all possible, scan the picture as a GIF or JPEG. These will load faster in your page. If you don’t know how to do this, have someone who does, scan a photo for you. Or, if you have access to a digital camera, have someone take a digital picture of you. Photograph your picture directly to your disk, or transfer the image to a disk.
Something really important in web pages. You need to have all of the "parts" of the web page in the "same place". In order for the page to load correctly, the text, pictures, photos, etc., all need to be on the A drive (for a small web page) or in a folder on the hard drive. If the web "page" can’t find the various items, you will not be able to see them in your page.
Before you insert your picture, make sure that your cursor is flashing a couple of spaces below the title. Then click-on Insert in the Menu bar and then click-on image. The following Menu screen will appear.
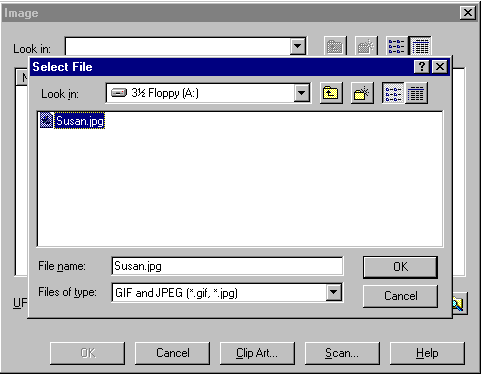
In the Look in: area of the Menu screen, click-on the small triangle and select the disk drive where your photograph is located. It is assumed that the location is the A drive. Again, make sure that all of the "items" we do are in a single location (like the A drive or a folder on the C drive) so that the web page can locate them. Next click-on the file name for your photograph in the area below the Look in: area. When you do, it will appear in the File name: area. When it does, click-on OK.
Your web page should look something like the sample below.
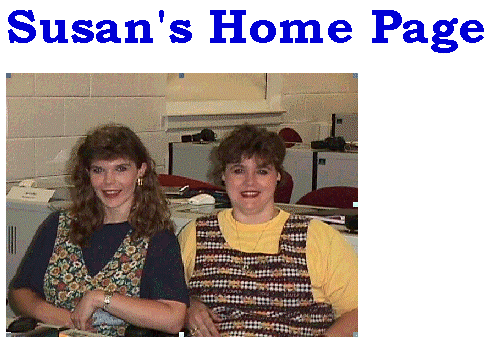
Your picture might be larger or smaller than the one above. To "size" the picture, point to the picture and click the left mouse button. This will "activate" the picture. You will see small "squares" at each of the corners and in the middle of the top, bottom, and side edges. If, you move the mouse over one of the corner "squares", a small two-headed arrow will appear. When this occurs, click and hold down the left mouse button, and drag the corner in or out to make your photograph larger or smaller. If you click-on one of the top, bottom or side square’s and do this you will get a "fat" or "thin" picture. By clicking-on the corners, the picture holds its perspective.
After something this significant, it’s a good idea to Save again.
You may want text to "wrap" around your photograph. And, you may also want your photograph to be somewhere other than on the left side where it "defaulted" when you inserted it.
If the flashing I-bar cursor is not below your picture, click-below your picture and it should appear. If it doesn’t, point with the mouse, to the right of your photograph and click the left mouse button. Then, tap the Enter key and the cursor I-bar should be just below your photograph.
Now type the following: This is where the text appears for this option.
To observe where the text appears, we’ll illustrate each of these "appearances" below.
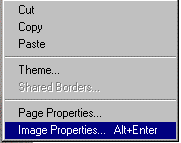
To do this, point in the picture and click the right mouse button. The following Menu will appear. Click-on Image Properties.
The following Menu screen will appear. Click-on the Appearance "tab" at the top and then click-on the small triangle to the right of Alignment:.

Notice the choices that appear below. We’ll now illustrate each of these choices.
Click-on left, and then click-on OK. You will see a new display similar to the one below. If you desire to duplicate the below illustrations, repeat the above process for each of the choices. If you do not, simply observe the illustrations.
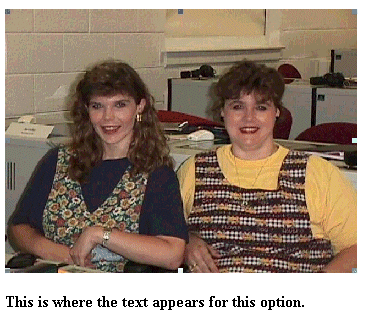
This is the Default.


Let’s set the picture back to the Default. The text you typed should be just below the picture.
Now is a good time to save again.
Background
Our web page looks a bit drab at this point, so let’s add a colorful background, an annimation, a sound and a link to a really wonderful college.
So far we have been working only in the Microsoft Editor. We have not really seen how the web page will look to the "world" in a browser. In the button bar, below the Menu bar, there is a button that will load our web page in the browser.

Click-on this button now.
Microsoft Explorer browser will load in your computer and your web page will appear as it will look if you place it on-line.
 We’ll use the Microsoft Explorer to find a background, animation and link. To do this we’ll use a couple of handy sites on the world wide web.
 Notice that an interntet "address" has been typed-in the Address: area above. Click-in the Address area.of the Microsoft Explorer on your screen and type the following: http://www.wdvl.com. This will link you to a web site that contains a lot of neat things. When you have completed typing, simply tap the Enter key and Microsoft Explorer will load this site.
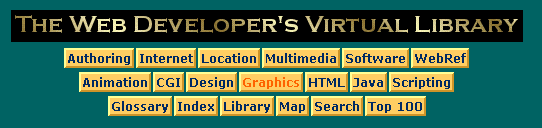
We want to add a background, and an annimation. To do this we’ll start by clicking-on the Graphics button. When your cursor "hovers" over the button it will look like a "small pointing hand". This indicates that the button is "active" and will link you to another web page. So, if you haven’t already, click-on the Graphics Button. Microsoft Explorer will now load the next web page.

Use the "elevator bar" on the right side to move down slowly until you see a link to a backgrounds web page.

When you move your cursor over the word Backgrounds above you will see the "little hand". When you do, click the left mouse button. Microsoft Explorer will now take you to the next web page.

 Again, use the elevator bar on the right to move down until you see the following:
We’ll use the Netscape Background Sampler to select our first background. Click-on this and you will go to a web page with a nice number of basic bacgrounds.

The above title will appear at the top of this web page. Again use the elevator bar on the right side of the page to run down until you see some backgrounds. Earlier, it was suggested that you use a dark color for your title. It is now suggested that you use a light color for your background. This is to assist you in "seeing" your text against the background. As you become more proficient in text and backgrounds, you can experiment and attain some really "interesting" combinations. The below background was chosen for this exercise:

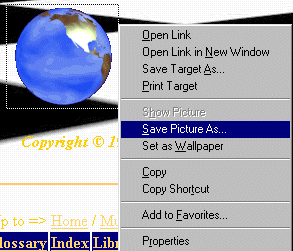
This is a good background as it is light enough to show your text, but also has some color to it. You choose a light background that you like. When you have chosen your background, point in the middle of the background with your mouse and click the RIGHT mouse button. A tailored menu screen will appear. This is a technique that we’ll use from now on to "capture" any "object" that we’d like to use on the internet.

Now click-on the Save PictureAs… item in this menu screen. This will take you to the menu below.
 It is assumed that for this exercise we will contiue to use the A drive. So, click-on the 31/2 Floppy [A:] in the Save in: area. Notice that the name of the background appears in the File name: area. When you see the correct drive and file name, click-on Save.
You now have this background in your "folder" and available when we return to Microsoft Editor to insert into your web page.
Animation
Next we’ll "capture" a famous annimation by Dan Austin. In the upper left corner of Microsoft Explorer is an arrow that indicates "Back" when you move the cursor over it. Click-on the back arrow two times. This will take you back to the graphics page. It has a black background. Run down the page a bit more until you see:
The next web page we’ll visit is GIF Anmimation. Move your mouse over GIF Animation and when you see the "little hand" click-on GIF Animation. This will take you to:

As we have done before, use the elevator bar on the right side of this page to run down until you see:
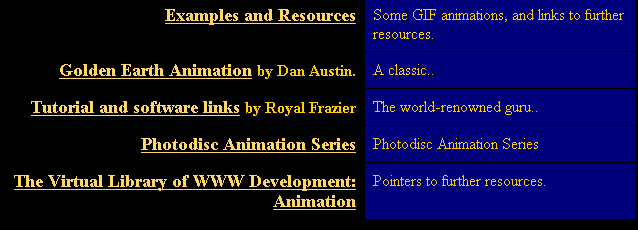
We’re, as indicated, going to select an animation by Dan Austin. So, Move the cursor over Golden Earth Animation, and when you see the "little hand" click the left mouse button. This will take you to a web page with a rotating earth. Move down the page a bit until you see the rotating earth.
You need to be careful here. When you run the mouse over the earth you will notice the "little hand." This indicates that there is a web page link associated with the earth. If you accidentally click-on the earth and go to another page, click the back arrow to return to this page.
 Carefully move the cursor over the earth and click the right mouse button. The save screen will again appear.
Click-on the Save Picture As.., just like you did before. A Save as menu screeen will appear and you can again save this picture to the A drive. The AuEarth will appear in
the File name and you can click-on Save.

You now have a background and and animation to add to your web page. Now let’s "capture" a sound.
Sound
If you don’t have a sound card and speakers or earphones, you will not be able to hear the sound and may get an error message when you do the below procedure. You may not want to attempt "capturing" the sound until you have these peripherals.
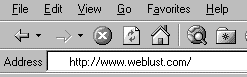 Now we’re going to go to an entirely new site. So type-in: http://www.weblust.com in the Address area of Microsoft Explorer. Then tap Enter. You will now proceed to a marvelous "sound" site.

Click-on Fred’s Digital Universe and you will be "surfed" to:

Run down this page utilizing the elevator bar on the right until you see:

You will want to visit many of "Fred’s" areas. However, we’ll visit the MIDI FILES to "capture"a sound. So click-on the small square to the left of MIDI FILES.

Once again, run down the page until you see:

Let’s get some "class" and click-on Classical Music. You can choose one of the other groups if you desire. However, when you, again, run down the Classiscal Music page you will see a number of selctions.

I’ll choose the bluedann.mid for the sound file I’ll insert into my web page. When I click-on bluedann.mid a sound "player" screen will appear. The screen you see will vary in appearance depending on what "player" you have installed. Mine looks like the one below. When the player has "loaded" the sound you will hear it over your speakers or earphones.
Yep, you guessed it, we’re going to right click on the player that appears. When you do you will see your normal save as screen and proceed as you did before. Save your sound to the A drive. You will notice that the sound has a .MID on the end. This indicates that it is a MIDI sound file.
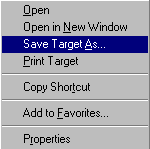
 Note: If you are using Micorsoft Media Player the right click won’t work! It is just that; a player. So, carefully move the cursor over the song you want to save until you see the "little hand". When you do, carefully click the right mouse button and a menu will appear.
Click-on Save Target As… and you will see a normal Save As screen appear. Save this sound as you did your animation and background.
Inserting Background in Web Page
In the status bar at the bottom of the view screen you will see the Microsoft Editor (red feather) displayed. We will now return to the Microsoft Editor to insert the background, animation and sound we just captured and saved. So click-on the Micorsoft Editor button.
When the Microsoft Editor screen returns, make sure that your flashing cursor is below the text you typed in earlier. If you do not see it there, run down the screen and click below the text. If the cursor appears to the right of the text, tap Enter to move the cursor down below the text.
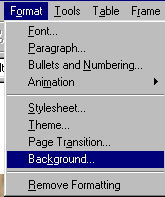
Now it’s time for our background. Click-on Format in the Menu bar and then click-on Background.
 The follwing screen will appear:
Make sure you are on the A drive. or the folder where you have saved all of your "things." For the background, click-on the background you chose earlier. When you click, the file name will appear in the File name area. Now click-on OK. You will go to a screen from Page Properties (under File in the Menu bar).
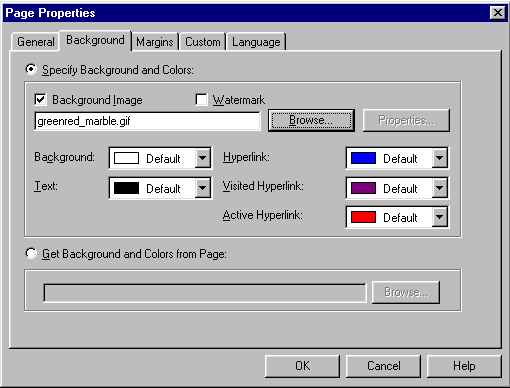
Notice that the background you chose is now indicated in the Background Image area. Click-on OK again.
WOW! What a difference!
Inserting an animation in a web page
Now we’ll insert the earth! Sounds rather awsome.
Make sure that you can see your cursor below the text. Inserting the animation is exactly the same as inserting your photograph. Click-on Insert in the Menu Bar and then click-on Image. When the following screen menu appears, click-on AuEarth and then click-on OK. The earth will appear below the text in your web page!

Something seems to be wrong! The earth’s not rotating! There really is no problem, you just don’t see the animation effects in the Microsoft Editor. You have to go to the Microsoft Explorer to see these effects.
So….. Save your file and then click-on the Browser button in the button bar and you will go back to the Explorer. Now you see your background and the rotating earth.
Now back to the Editor to insert the sound. Click-on the Editor button at the bottom of the screen.
Inserting sound into the web page
The cursor should be flashing to the right of the earth. Tap Enter once to move the cursor below the earth.
Sound is a bit unique. We could put the sound in the "background" to the page and it would begin playing when the page was opened if we were using only Microsoft Explorer. However, other browsers can’t "hear" the sound when you do this. So we’ll put the sound in with a "link." This is what web pages are all about: links.
Type-in something that would indicate that if you clicked on it, you would hear a sound. I’m going to type in: Listen to the Blue Danube. Then tap Enter one time to move the cursor down for the next item.
Click in front of the text, and, holding down the left mouse button, drag the cursor over the text to high light it (just like you did when you started the web page title).
 Now, with the text high lighted, click-on the link button below the menu bar.
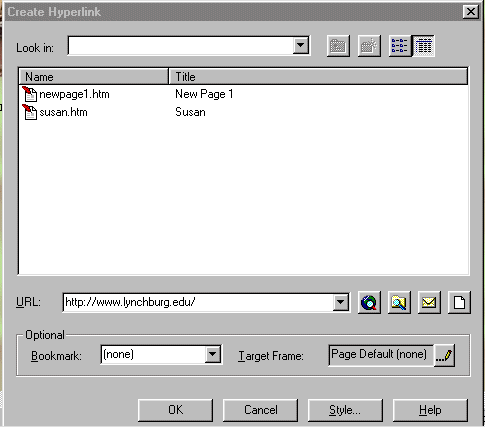
The following Create Hyperlink screen will appear.

Since the music we saved is on a disk or disk drive in the computer we’ll click-on the folder button in the screen above to locate our sound.
The Select File screen will now appear. Make sure you are on the A drive or folder where you saved your sound. Click-on your sound, and then click-on OK.

After you click-on OK and return to your web page, you will notice that the text you high lighted has now "turned blue" and is underlined. This is the universal "symbol" for a "link." You are now "linked" to your sound. This is why it is so important that all of your images and sounds are in one location.
Save your work and then click-on the Browser button again. Run down, when your page appears in the browser, and click-on your sound link. Sounds great.
Links to other sites on the internet
Now we’ll link, using the internet, to a great small college in Virginia. Make sure that you are below the sound link. If you are not, click-below the sound link and see if the flashing cursor appears. If it does not, tap Enter.
Now type-in something like: A visit to Lynchburg College.
High light what you just typed-in (just like with the sound), and click-on the link button again.
This time, when the Create Hyperlink screen appears, we’ll click-on the web hyperlink button
The Microsoft Internet Explorer appears with the following statement:
![]()
So, in the Address box, type the internet address for Lynchburg College:

Now tap Enter and you will "go" to the home web page for Lynchburg College.
To complete the link, carefully click-on the minus " – " sign in the upper right corner of the screen. This will take you back to the Create Hyperlink screen and will place the address for the internet site in the URL (Uniform Resource Locator) area of the screeen. Click-on OK. and the "link" will be established. You’ll notice that the Lynchburg College link is now "blue and underlined" just like the sound link.
Save again.
Now click-on the Browser button again to go to Microsoft Explorer and see your completed web page. Try the links. If you "go" to Lynchburg College and want to "get back" to your page, simply click-on the back button as you have done in the past.
Congratulations. You have now successfully completed a web page.
If you have any questions or comments please contact:
Thank you for your time and patience.