|
|
This article tries to describe a method to recompress a multi-channel movie sound track, in order to keep an acceptable bit-rate and maintain four discrete tracks, using SoftEncode.
Ive recompressed a few DVD movies using the DivX codec. In my experience, Ive noticed that 1 CD is not enough for movies longer than 90 minutes. However, 2 CDs is more than enough for 120 minutes movies. So in this situation, there is enough space for a higher quality sound track. So I tried to multiplex the original Ac3 source in my AVIs. This is the best solution in terms of audio quality, but sacrifices the video quality, as most tracks are encoded at 448Kbit/s. This is 400 megabytes for a two-hour movie (more detail here). What if we could have an Ac3 file with 4.1 channels, 256Kbit/s, and a 16KHz bandwidth, similar to the quality of a 128Kbit/s mp3? What if in the future we may be able to use other freeware encoders, with multi-channel capabilities?
3.1 Software RequirementsThe most important drawback in this process is that we need an Ac3 compressor. There isnt any free software to do this, yet. So it is necessary to acquire SoftEncode from Sound Foundry, which is costly and no longer available for sell at their web page. There are other encoders from more companies, but this article will use only SoftEncode. In the future, it may be possible to encode multi-channel sound with Ogg Vorbis. Hopefully, this guide will be updated it just doesnt depend on me... It will also be necessary a multi-track sound editor (I will use CoolEditPro1.2) or use Azid as the Ac3 decompressor. 3.2 Quality constraintsRecompressing an already compressed source always tends to degrade seriously the quality of the result. This method suffers from this problem, as mp3 or wma recompressing does. So this isnt a problem specific of this method. Typically, an mp3 encoded at 128kBit/s has a sound bandwidth of around 16kHz. This may vary a little, depending on the source and the codec used. This will be the suggested quality for the Ac3 sound. The primary disadvantage of [using a phantom center] is that the listener must be equidistant from the L/R speakers to achieve proper center imaging Using the center speaker alone creates a stable center image for every listener no matter where they sit.
As all divx;) are watched using a computer and most viewed through the monitor, the listener position isnt such a big issue. Even in a small home theater systems the problem isnt so important as it is in a big Theater. So I propose to properly down mix the center channel into the Left and Right Front. Doing that, it is possible to save space. The Ac3 tries to save space using a technique similar to the mp3s joint stereo. It joints the four channels, front right, left and the two surround tracks. So, the center channel needs a higher bit rate. For instance, if we need a 20kHz bandwidth in 5.1 track mode, soft encoder reports that its only possible with 448kbit/s bit rate. However, in 4.1 mode, soft encoder is able to compress with the same bandwidth, using only 320kbit/s. Discarding the front channel when compressing to Ac3, it is possible to save a great amount of space. There is an inconvenient when downmixing the central channel... the overall volume must be reduce in order to be sure that no overflow and consequent clipping occurs Azid sets the volume to 1/(1+0.7071)=0.5858. With CoolEdit Pro we will try to keep the sound at the original level hoping that the sound track does use full dynamic range, or amplify all the tracks by 0.5858 before downmixing. Just to keep a clear idea of downmix volume problem, when downmixing to stereo, as it is usually done to mp3, we have a gain of 1/(1+0.7071+2*0.7071+0.7071)=0.2612, this is a -14dB gain. This is mandatory or we risk overflows and consequent sound clipping. The problem is that when we have an isolated sound coming exclusively from the center channel ( like voices ), the resulting volume becomes considerably low. This way we loose dynamic range. A solution is to use some normalization previous to downmixing and adapting the gain accordingly. However, when reencoding to ac3 this can't be done because the decoder has the option, to or not to normalize the sound. Some times it's activated by default and the user as no control over it. Normalizing twice degrades the sound quality greatly. Downmixing is simply the sum of two waveforms, resulting in just one. If those waveforms uses the entire dynamic range ( 16 bit in mp3 or Ac3 ), would require twice the dynamic range ( 17 bit ), but the sound format and most sound cards doesn't allow 17 bit samples, cutting the top of the waveform. It is then necessary to reduce the amplitude of the waveform to half of the dynamic range ( 15 bit ) before downmixing, in order to obtain a 16 bit result. When converting 5.1 sound to 2.0 we have to sum 5 waveforms reducing the dynamic range to 1/4 of the original ( 14 bit ). That's one more incentive for the use of 4.1 channels instead of 2.0 mp3...
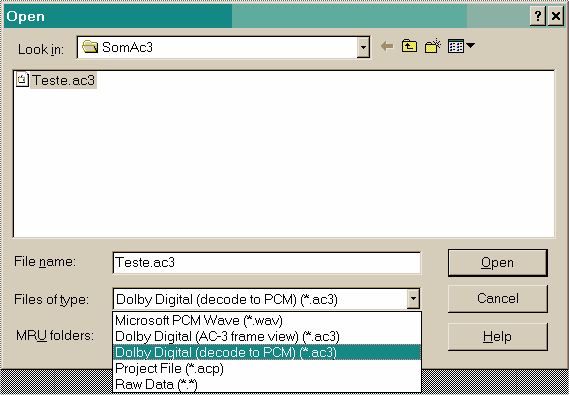
4.1 Getting the Ac3 FileThe target ac3 file may have several origins, but for DVD backup it is within a VOB file. In order to de-multiplex this file I use vob2audio, as it is versatile and very easy to use. Then I run ac3fix (vob2audio isn't very smart when creating the ac3 file). There are several ways of obtaining de Ac3 source and it is not the purpose of this article to explain them. 4.2 Decoding and down mixing the Ac3 file using SoftEncode and CoolEdit Pro.There are two ways to do this. Using SoftEncode decoding capabilities and a multi-track sound editor or decompressing and down mixing with Azid. Now is described my first approach which is a little complex, slow, and requires large amounts of disk space. Alternatively I strongly suggest using Azid even if it results in a little less sound quality, jump to Azid. 4.2.1 Step 1 Decoding with SoftEncode
Figure 1 Open and Decode the Ac3 File.
Figure 2 Important information about the Ac3 File. Click in the image to enlarge. The Stream Settings & Audio production information should be saved as they are necessary for the encoding process. Another important information is the track ordering:
Figure 3 The 6 tracks as they appear in SoftEncode. The track order is, in this case: FrontLeft, Center, FrontRight, LeftSurround, RightSurround and LFE. This information will be necessary.
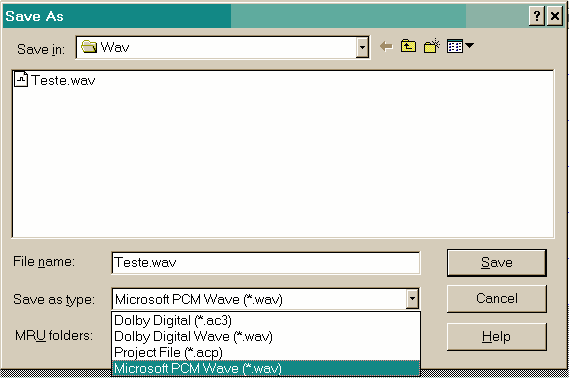
Figure 4 Save the Decompressed Sound in a 6 track Windows PCM WAV File. 4.2.2 Step 2 Down-mixing the central channel
Figure 5 Open the 6 track Windows PCM WAV File in CoolEdit Pro. Now there are 6 tracks open. Their order should be the same as in SoftDecode.
Figure 6 Mix Past the Central Channel to one of the front channels. Always use Overlap and 71% volume ( -3dB ). Click in the Images to enlarge. It is very important that Overlap is selected and the volume is set to 71% representing approximately -3dB.
After the process is done we should analyze carefully the waveform for any clipping. If it occurs, we should use Azid instead, or amplify all tracks by 0.5858 (-4.65dB) before downmixing.
4.3 Decoding and down-mixing the Ac3 File with AzidDecoding with Azid is presented as an alternative method because Im not sure if audio quality is better, equal or worst. Perhaps the decoder isnt so precise, but the down-mixing is calculated with more precision (24 bit). Ive noticed that the volume using Azid is lower than the original, but it doesnt mean the sound is worst, it is necessary because of the downmixing process (read this). Anyway, this method is much more easy, faster, and requires less disk space.
azid -M1 -d2/2 -L0 -l1 -ol,r,sl,sr,lfe -Fwav24 X:\TESTE.ac3 X: \TesteAzid.wav
Figure Ac3 File information as it appears in Azid. Click in the Image to enlarge.
4.4 Compressing to Ac3In this step we must use SoftEncode. First, lets configure the encoding options. The raw audio source can be originated by the SoftEncode/CoolEdit Pro Process or using Azid. In my opinion, using soft encode may result in better sound quality. However, using Azid is much simpler. 4.4.1 Encoder configurationTo configure the encoding option, go to Options ->Encode Settings.
Figure 8 Soft Encode: encoder configuration.
Figure 9 Soft Encode: This information is necessary to tell the decoder about the way the sound should be presented.
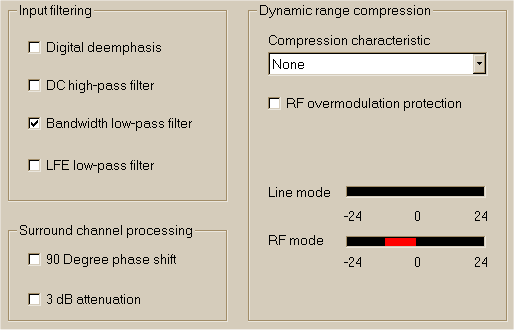
Figure 10 Soft Encode: Before compressing the sound, it is filtered. Most of the filters were perform when encoding the original Ac3 and must not be applied again.
4.4.2 Opening the raw audio source Cool Edit Pro method
Figure 11 Soft Encode: Opening the individual WAV files created by CoolEdit pro.
4.4.3 Opening the raw audio source Azid method
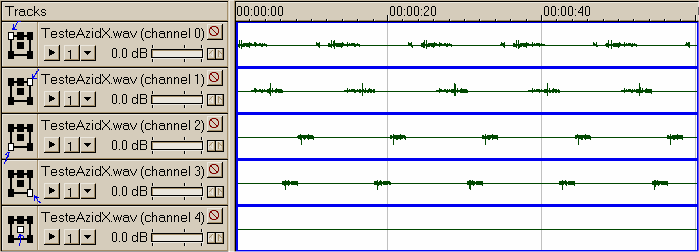
Figure 12 Soft Encode: Waveforms of the audio decoded by Azid. The channel ordering should be correct as the program assumes that there is a central channel.
4.5 Compressing with Ogg VorbisAs far as I know, the encoder still doesnt produce multi track files. However when possible this section will be updated. When using Ogg Vorbis we should decompress and down-mix using Azid. That way we only use free software and the output is properly pos-processed. In this case it may be usefull to set some overal dynamic compression. By default, the Ac3 decompressors usually set this value to normal. I've tried to encode a 4 channel wave file ( central and LFE channel downmixed ) using 1.0rc2 win32 version of OGGenc. The encoder finished the operation successfully, but the final bitrate ( and file size ) is as if the file had only two tracks. The file reported that it had 4 tracks but I was unable to play the surround channels ( DS filter, winamp ). Nandub 1.0 allways crashed when I tried to join a Vorbis file to an AVI. The DS filter 0.06 doesn't suport decoding from AVIs, yet. As discussed before, the central channel isnt necessary (for space considerations), and probably it will have to down-mix the LFE channel to the front channels in the same way as we do for the central channel. |
||||||||||||||||
|
©2001 NFJ
|
|
||||||||||||||||
|
©2001 NFJ
|