How to Create a Custom Sky for Trainz
If you've played around with Surveyor's World Panel, you've seen how you can select from a number of preset skies. You'll also notice one sky called "sky_example." Here's how to make use of that example to create your own skies. First, take digital photos, scan images from books or magazines, or search the Web for sky images. If you use a search engine, try entering "cloud pictures" or something along those lines. Then look through the pictures until you find one that strikes your fancy. Ideally, it should be high resolution with good contrast. Ideally, it should also have the clouds, assuming it's not a clear sky, "framed" by an uncluttered border of blue or whatever hue. In other words, it's better if the clouds aren't cut off in the middle by the image border. Also, be sure to check if the image is free to use, at least non-commercially. Once you've found your picture, open it in Photoshop or similar image/photo editor. There are many freeware or shareware editors available on the Web. You'll likely have to crop out a bit of the lower part of the image since many sky photos you'll find show treetops, buildings, and so forth at the bottom. After cropping, you should have a picture with just clouds and/or empty sky showing. Next, resize your image to 256x256 pixels. You'll likely have to instruct the program not to constrain proportions or "keep aspect" when you resize. Otherwise, the program will try to resize it in accordance with the original proportions, likely creating a rectangle, but we want a perfect square.
 We're using Photoshop for this example, so next you should select Filter-> Other-> Offset, set horizontal and vertical to 128, and select "wraparound." Notice how the image is now divided into four squares and how each horizontal edge could match up with the other, and each vertical edge could match up with the other if the image were wrapped around continuously. This is vital, because Trainz does just that, stretching the image and then connecting the same sky image multiple times so it can both cover the whole sky and scroll across it. If you just inserted the original unaltered image into Trainz, you'd see big lines crossing the sky where light meets dark or where clouds got cropped by the picture border.
 Of course, you can see that the image in this new divided state won't look right as it stands. Use the Clone Stamp tool or equivalent in the editor of your choice to carefully blend sections. If using Photoshop, trying setting the Clone Stamp tool to normal mode, 100% opacity, and use one of the diffuse brush tips. Once you've blurred the middle of the image, use the offset function again and finish blurring the remaining seams. Magnify the image as you work to make sure you blur every little seam together; they'll be easily visible in Trainz otherwise.
Making the image look really good takes time, and it can be a challenge with images like brilliant sunsets that show great color contrasts between areas. You may need to adjust the hue, saturation, brightness, and other factors and/or use color correction techniques where you "cut and paste" colors within the image before using the clone tool. Feel free to experiment with other tools in Photoshop or the image editor you're using. Photoshop's "liquify" feature is particularly well suited to artistically manipulating clouds.
Below you can see a very hastily done job.
Of course, you can see that the image in this new divided state won't look right as it stands. Use the Clone Stamp tool or equivalent in the editor of your choice to carefully blend sections. If using Photoshop, trying setting the Clone Stamp tool to normal mode, 100% opacity, and use one of the diffuse brush tips. Once you've blurred the middle of the image, use the offset function again and finish blurring the remaining seams. Magnify the image as you work to make sure you blur every little seam together; they'll be easily visible in Trainz otherwise.
Making the image look really good takes time, and it can be a challenge with images like brilliant sunsets that show great color contrasts between areas. You may need to adjust the hue, saturation, brightness, and other factors and/or use color correction techniques where you "cut and paste" colors within the image before using the clone tool. Feel free to experiment with other tools in Photoshop or the image editor you're using. Photoshop's "liquify" feature is particularly well suited to artistically manipulating clouds.
Below you can see a very hastily done job.
 Once you have the image as you like it, save it as a 24-bit uncompressed .tga (targa) file sized 256x256 pixels. It should be 192k. Name it sky_example. Now go into your Trainz\Custom\Environment folder, make a copy of the existing sky_example folder, paste it into the Custom\Environment folder, and name it whatever you want your new sky to be called. Place your new sky_example image into the new folder, overwriting the one already in there. (Be sure you're overwriting the file in the new folder, not the original Trainz sky_example folder.) You can also add in new night and stormy skies using this same technique. They'll go into this same folder and be called sky_example_night and sky_example_storm.
Now, just access the new skies in Surveyor as you normally would. Your new sky_example, sky_example_night, and sky_example_storm images will all appear under the name you gave to their new folder. Set the clock to an evening hour and set the weather to rain to see the night and storm skies. Adjust the hues as your normally would with the notches around the clock face (the black buttons that turn red when you click on them).
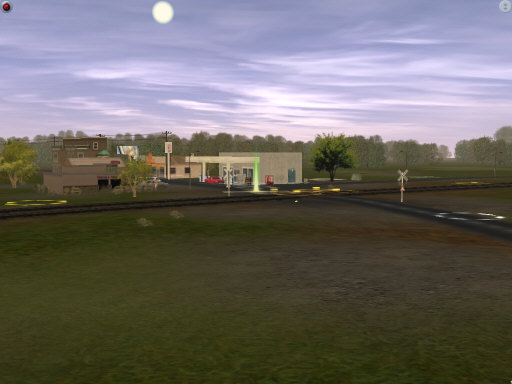
Below you can see the new sky in Surveyor as well as examples created from other sky photos. (The scenery is a work in progress from my big NN&U RR expansion.) I'm just learning this technique, so if you have any suggestions to achieve better results, please email me. I'm indebted to the Trainz forum members and content creators for inspiring me to create my own skies, and to my graphic artist friend for suggesting the image editor techniques.
Once you have the image as you like it, save it as a 24-bit uncompressed .tga (targa) file sized 256x256 pixels. It should be 192k. Name it sky_example. Now go into your Trainz\Custom\Environment folder, make a copy of the existing sky_example folder, paste it into the Custom\Environment folder, and name it whatever you want your new sky to be called. Place your new sky_example image into the new folder, overwriting the one already in there. (Be sure you're overwriting the file in the new folder, not the original Trainz sky_example folder.) You can also add in new night and stormy skies using this same technique. They'll go into this same folder and be called sky_example_night and sky_example_storm.
Now, just access the new skies in Surveyor as you normally would. Your new sky_example, sky_example_night, and sky_example_storm images will all appear under the name you gave to their new folder. Set the clock to an evening hour and set the weather to rain to see the night and storm skies. Adjust the hues as your normally would with the notches around the clock face (the black buttons that turn red when you click on them).
Below you can see the new sky in Surveyor as well as examples created from other sky photos. (The scenery is a work in progress from my big NN&U RR expansion.) I'm just learning this technique, so if you have any suggestions to achieve better results, please email me. I'm indebted to the Trainz forum members and content creators for inspiring me to create my own skies, and to my graphic artist friend for suggesting the image editor techniques.


Home Comments and suggestions are welcome