|
|
|
|
|
|
|
|
|
|
|
|
|
|
|
|
|
|
|
|
|
|
|
|
|
|
|
|
|
|
|
|
|
|
|
|
|
|
|
|
|
|
|
|
|
|
|
|
|
|
|
|
| Lowering springs install procedure for 2000 Eclipse GT |
|
|
| Note: Please read All the Instructions and a disclaimer before attempting to do this. |
|
|
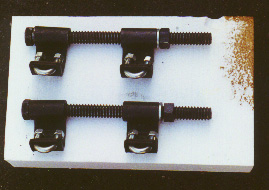
| To do an install You would Need a set of spring compressors |
|
|
 |
|
|
| You can buy these at a local auto parts store. I got these from Pep Boys for ~$40. |
|
|
| Start with the Front Springs since they require more work. |
|
|
1. Raise and secure the front of the vehicle with Jack stands. You should have a Jack that could go low enough so you
could remove it after you install the springs |
|
|
|
The springs that I use lower the car about 1.75 inches in the front and 1.5 in the back. |
|
|
 |
|
|
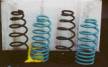
| Progress Sport Springs ? 1.8? Drop Next to the Stock Springs (Rear). |
|
|
 |
|
|
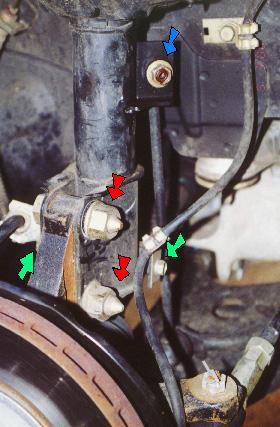
| 2. Loosen the top strut nut (GREEN Arrow) (DO NOT REMOVE IT!) . |
|
|
3. Now Loosen the three top nuts(RED Arrows) but do not remove them, this would help in holding the spring assembly while
removing the bottom bolts. |
|
|
 |
|
|
| Driver side shown. |
|
|
4. Remove the Nut that holds a ball joint to the strut assembly (Blue Arrow). You will need an Allen key and an open-end wrench
to do this.
5. Remove the two screws that hold the break cable and the ABS sensor wire to the strut assembly (Green Arrows).
6. Now You can Remove the two big Nuts (Red Arrows). Before removing the two bolts that hold the strut assembly to wheel
assembly make sure you have something under the rotors to hold it up. Otherwise you will have the wheel assembly held
only by the CV joint which could result in over extension of the CV Joint.
7. After Removing The bottom bolts remove the top nuts in step 3.
8. Repeat the procedure to remove the other side. |
|
|
| 9. Removing the Strut from the Spring. |
|
|
10. Attach the Spring compressors to the springs. ( You should fallow the spring compressors instructions ). Compress the
springs enough to relieve the pressure to remove the top strut nut (described in step 2 Green Arrow). |
|
|
11. After removing the strut nut, remove the rubber cap along with the spring. You should note the placement off all the parts
since you're going to be putting them back together again. |
|
|
|
12. Remove the Spring Compressor from the spring. |
|
|
| 13. As per the instructions for the springs you will need to cut the foam stopper that is on the strut. |
|
|
 |
|
|
| Rear strut with Foam stoppers cut in half |
|
|
14. Attach the spring compressor to the new springs and re-assemble the strut assembly. Attach the strut nut on the strut. You
don't need to tighten it, It is much easier to do it while the assembly is back on the car. Remove the spring compressors. |
|
|
| 15. Place the strut assembly back on the car by attaching the top three nuts first (don?t tighten them yet.). |
|
|
16. Attach the lower part of the strut to the wheel assembly and put on the bolts. (A jack under the rotor will help line up the
holes). |
|
|
| 17. Tighten the Lower nuts. Then the upper strut assembly nuts, and finally the Strut Nut. |
|
|
| 18. Re-attach the ball joint, break hose and ABS sensor cable to the strut assembly. |
|
|
| 19. Repeat for the other side. |
|
|
| Rear Assembly. (The Easy One) |
|
|
 |
|
|
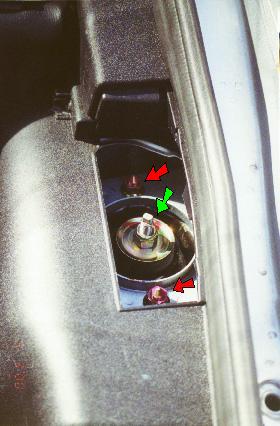
| Passenger side shown |
|
|
| 20. Raise the rear of the vehicle and secure it on jack stands. |
|
|
| 21. Remove the Wheels. |
|
|
22. Loosen the top strut nut(Green Arrow). You will need a strut removing tool to accomplish this, or you can use a pair of pliers
and an open-end wrench. The nut is 17mm. |
|
|
| 23. Loosen the two strut assembly nuts but don?t remove. |
|
|
 |
|
|
| 24. Remove the bottom bolt. Now remove the top nuts while holding the assembly. |
|
|
| 25. Now Is a good time to install the camber kit. |
|
|
| 26. Attach the spring compressor to the spring and remove the top nut. |
|
|
| 27. Again, before disassembling note the locations of all the parts. |
|
|
| 28. Cut the foam stop in half. |
|
|
| 29. Use the Spring compressor to reassemble the strut. |
|
|
| 30. Put on the top strut nut don?t tighten. Remove the spring compressor. |
|
|
| 31. Place the strut assembly back on the car by attaching the top first. |
|
|
| 32. Tighten the top two nuts first then the strut nut. |
|
|
| 33. Connect the bottom to the strut (again use a jack to help align the holes). Tighten the bottom nut. |
|
|
| 34. Repeat the other side and you're done. |
|
|
| I didn't take any before pictures since you can find plenty of stock GT's on the dealer lot. |
|
|
| This is what it looks like after: |
|
|
 |
|
|
|
|
|
|
| A Disclaimer! (I have to protect my self.) |
|
|
| Installing lowering springs should be left to a professional because of the special skills and tools required to do the job. |
|
|
|
I'm in no way a professional. It's just a hubby of mine. These Instructions Should be used as reference only. Although I have proof read these instructions I do not claim any responsibility of it being 100% correct. Nor do I claim any responsibility of someone getting hurt by fallowing these instructions. In other words Use at Your Own Risk. If you should find any errors or if you find that I've missed something please let me know. |
|
|
| Send Comments to: |
 |
Tony K. |
|
|
|