 | |
| The Official Free PDF Support Site...Your Portal for Free PDF Support. |
| This site includes Free PDF installation instructions. It also includes links to FAQs and other support information. |
Configure Free PDF on Microsoft Windows™ XP
Here is a short HOW-TO that will walk you through installing Free PDF on to a PC running Microsoft Windows XP
-
Download the following files:
-
Free PDF (p.s. - I'm using version .98f as of 12/19/2001)
-
Ghostscript
-
RedMon Redirection Port Monitor
-
Adobe PostScript Printer Driver
-
PPD file for the Adobe Acrobat Distiller 3.0
-
Adobe Acrobat Reader 5.0
-
Install Free PDF:
-
Use Windows Explorer and browse to the directory containing the files that you downloaded in the first step
-
Double-click on the file called "frpdf098f.exe"
-
Click on the EXTRACT button
-
Accept the default installation path of "c:\freepdf"
-
Install Ghostscript:
-
Use Windows Explorer and browse to the directory containing the files that you downloaded in the first step
-
Double-click the "gs703w32.exe" file
-
Click the SETUP button
-
Accept the default installation path of "c:\gs"
-
Click the INSTALL button
-
Install RedMon Redirection Port Monitor
-
Use Windows Explorer and browse to the directory containing the files that you downloaded in the first step
-
Double-click the "redmon17.zip" file. Windows XP will treat a Zip file similar to an ordinary folder and allow the user to seamlessly view the contents of a Zip file similar to the way
the user would browse the contents of a folder.
-
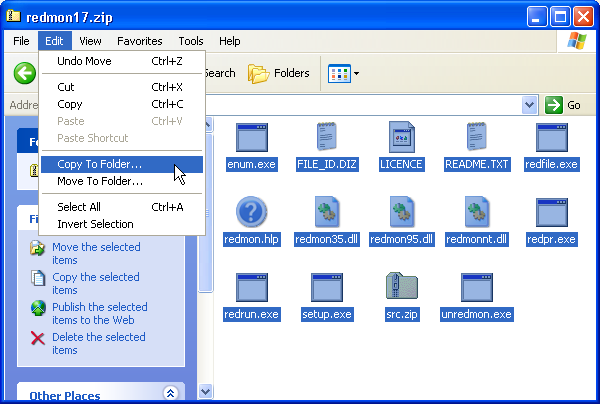
Highlight the 14 individual files contained within the "redmon17.zip" file.
-
Click EDIT
-
Click COPY TO FOLDER
-
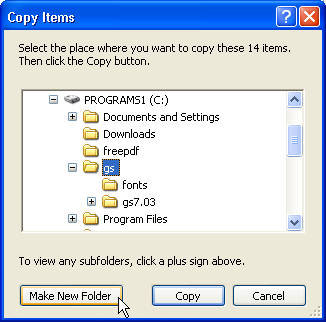
Browse to the "c:\gs" folder and highlight this folder.
-
Click the MAKE NEW FOLDER button
-
Name the folder "RedMon"
-
Highlight the RedMon folder
-
Click the COPY button to copy the 14 individual files to the "c:\gs\RedMon" folder.
-
Use Windows Explorer and browse to the "c:\gs\RedMon" folder and double-click the "setup.exe" file to complete the installation of the RedMon Redirection Port Monitor. When asked, "Do you
want to install...", click the YES button

-
Install the Adobe PostScript Printer Driver (using the PPD file for the Acrobat Distiller 3.0):
-
Use Windows Explorer and browse to the directory containing the files that you downloaded in the first step
-
Double-click on the installation file for the Acrobat Distiller 3.0 PPD file (e.g., adobe.exe) and UnZip the compressed files to a directory of your choice. You'll need to access
the PPD file a little later, so remember the directory name.
-
Double-click on the installation file for the Adobe PostScript Printer Driver (e.g., aps102eng.exe)
-
At the screen that says Local Port Selection, select File
-
At the screen that says Select Printers Model, browse to the PPD file for the Adobe Acrobat Distiller 3.0 (the file name is ADISTILL.PPD)
-
At the screen that says Printer Name, I suggest you name the printer "Free PDF - Acrobat Distiller 3.0"
-
Change the Port from FILE to RPT1:
-
Click START / PRINTERS AND FAXES
-
Right-click on the Free PDF printer
-
Select PROPERTIES
-
Go to the PORTS tab
-
Click the ADD PORT button
-
Select REDIRECTED PORT and then click the NEW PORT button
-
Be sure the port name is listed as "RPT1:" and then click the OK button
-
Click the CLOSE button. You should now see "RPT1:" listed in the Port column
-
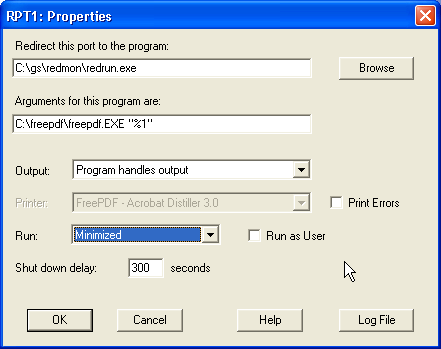
Highlight the RPT1: Port and then click the CONFIGURE PORT button. Setup the RPT1: PROPERTIES as shown in this screen shot
-
Click the LOG FILE button and setup the information as shown in this screen shot

-
Click the OK button on the RPT1:LOG FILE PROPERTIES box and then click OK on the RPT1:PROPERTIES box
-
Make sure that the port checked is RPT1: Redirected Port. Click Apply.
-
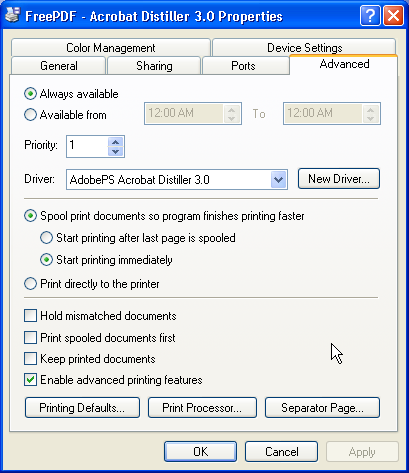
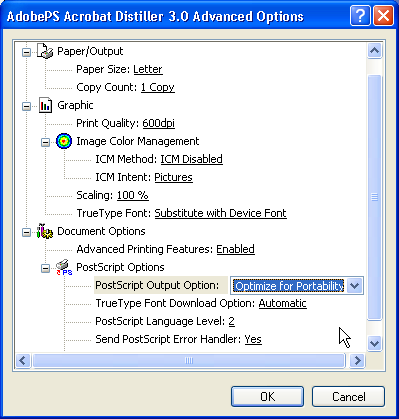
Go to the ADVANCED tab and setup the information according to this screen shot
-
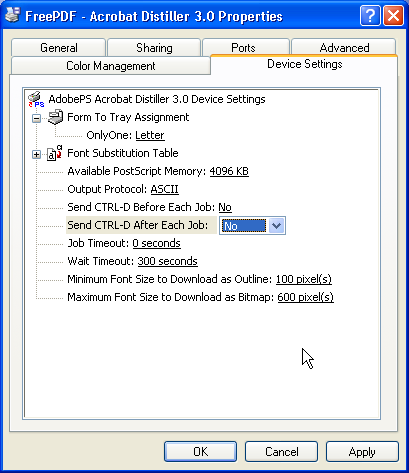
Go to the DEVICE SETTINGS tab and setup the information according to this screen shot
-
Go to the GENERAL tab and make the following changes {Note: this step was added per the request of 'Silas'}:
-
Press the PRINTING PREFERENCES button
-
Press the ADVANCED button
-
Under the POSTSCRIPT OPTIONS, select the option to Optimize for Portability
-
With Free PDF successfully installed, you can now create free PDFs from any Windows application
-
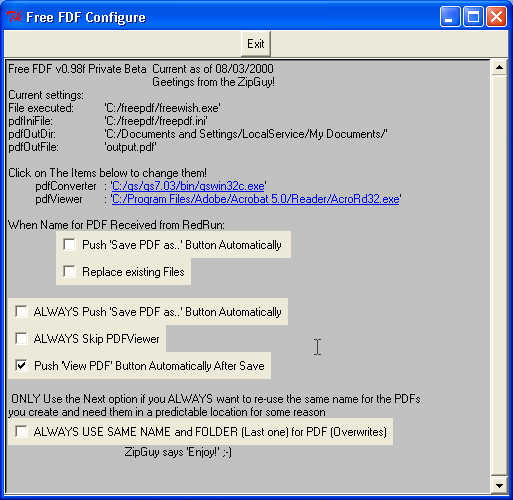
When you run Free PDF for the first time, click the CONFIGURE button on the Free PDF dialog box and setup Free PDF as shown in this screenshot.
-
Finally, view your PDF with Adobe Acrobat Reader
Please post all questions and comments to the Free PDF Message Board.
This document was written by myself, (), in order to help others install Free PDF on to a PC running Windows XP.
Quick Java Menu::Main Site::Mirror Site::This page was updated August 24, 2003