Making Wind Chimes
By James L. Haworth
The wind chime or wind-bell is an instrument that uses the wind as a power source and turns it into sounds. We?re going to show you how to build high quality wind chimes. What we don?t do is talk about ten minute chime making with cheap materials. You?re smart enough to know that you get back what you put into something. When you make your own chimes, whether for your own enjoyment or as a gift, something of yourself goes into every one.
Such devices can contain materials like seashells, wood, stones, glass, bones, old silverware, bamboo, or mechanics' wrenches. If you use these materials, you won't be able to tune them to specific musical notes. Their sounds will range from pleasant tinkling to dull thuds. But the good news is, you can easily make these breeze indicators and there is no tuning involved. Instructions on do-it-yourself chimes made of glass, bamboo, and old silverware are found in the links at the end of this article.
But first a little history.
Chimes or bells were first used before written history. There is evidence that metal bells were cast in Egypt and other places around the Mediterranean about 2000 B.C. A few have been found buried in Southeast Asia, which may have been cast around 3000 B.C.
The Chinese are credited with inventing wind chimes or wind bells (feng-ling) circa 1100 B.C. and were considered religious in nature. Buddhists are known to hang hundreds of wind chimes on their temples and on the island of Bali (Indonesia) bamboo chimes were put into rice paddies to charm the spirits. Eventually, wind chimes were adopted into the nonreligious world by countries all over Asia.
Wind chimes may be even older than the metal ones found in archeological sites today. If they were made of wood or bamboo, for example, they would last only a few years, then rot away and no trace of them would be left. Metals were a scarce commodity in the ancient world, and things made of these materials would be recycled again and again. Chimes may not have been considered as valuable as a knife or a sword, so they would have been recycled into something the owner felt was more useful after they wore out.
By the nineteenth century wind bells and chimes had become popular in the Western world. Precisely tuned wind chimes have become a high technology art form. They can be cut and tuned to ancient and modern musical scales. We just love their tranquil, musical sounds, and if you carefully follow these instructions, you will have the satisfaction of making windchimes that sound at least as good as the store-bought ones, and probably better.
The Pipes, the Pipes are Calling
You've no doubt seen tubular metal wind chimes in the stores. Perhaps you were considering purchasing a set for yourself or to give away to someone as a gift. The more expensive ones can cost four hundred dollars and more. As you read these instructions to make your own do-it-yourself wind chimes, at least you will get an education on what to look for if you decide to buy one of these items (even some of the expensive chime manufacturers take short cuts which reduce the quality of the sound).
If you are of a technical mind, there are engineering-type chime websites that you can go to with Google. If you find that they are too hard for you to understand, especially when they involve tuning the tubes, come back here. Chimes can be very complex, so we have tried to write this article in such a way that those with minimal knowledge can at least get a start on making their own.
At first glance wind chimes may appear to be simply made, A wood piece for the top, metal tubes underneath, a wind catcher to provide power, and a striker or clapper to caress the tubes and produce that marvelous sound. The tubes may be of random lengths, but many people prefer the precise notes available when you tune them with a computer program or electronic tuner.
Since wind chimes are generally hung outdoors we must build them with extreme conditions in mind. Among these are temperature variation, rain, snow, the sun?s ultra-violet rays, gravity, and the wind. The sun will weaken many suspension strings over time so we have to use something like ultra-violet resistant, strong nylon. The wooden top piece can be treated with preservative. The tubes could be aluminum, copper, or stainless steel for longevity.
Metal chime pipes aren't cheap anymore. It takes a lot of energy to smelt and work metals into pipes. The rising price of energy has driven up costs, so try not to choke when a price is quoted to you. There are a few online suppliers mentioned on our chime message board and some will cut the chime pipes into exact lengths for you. You want the big pipes? They've got 'em.
You can make windchimes from metal pipes that are readily available from hardware stores, home remodeling centers and metal recycling yards. Some sections of our article will be rather technical. Nevertheless, we will try not to overdo it, so that anyone can construct and enjoy their own handmade chimes. Just mentally filter out the hard parts if you want to keep it simple. For those of you who like technical things, you can obsess about getting the exact Hertz for each note, the optimal striking point, and precise placement of the nodes of frequency fluctuation, but don't make yourself too crazy. This is supposed to be fun.
Copper pipe of three-quarter inch or one inch diameter will work just fine, but you can also use electrical conduit or aluminum rods and tubes. In fact, the harder aluminum alloys are the current favorite among our chime message board constructors. Most tubes will be less than 18 inches long, but you may also experiment with pipes much longer. You can also tune the longer, larger chimes, but you may have to suspend them individually from the eaves of your house because of their weight. Copper pipe will not rust, but if left unpainted it will get a greenish verdigris coating. If the green color doesn't bother you, don't worry about the weathered look. The softer copper produces a mellower sound than steel pipe. Burnish the copper pipe with fine steel wool and coat it with a thin coat of outdoor polyurethane to keep it from tarnishing. Painting after tuning a chime may change the tone slightly, but it's not usually a significant amount.
Some people like the bright ringing sound of steel pipe. Go to the electrical department and look for galvanized conduit. Electrical conduit consists of mild steel with an outside coating of zinc to resist rusting. Anywhere we cut or drill it, rust can start, as the zinc no longer protects the steel at those points. The rust often starts on the inside because the zinc is only on the outside. You can make wind chimes from this material, just be aware of its limitations.
If you are into recycling, you can find many sources for your pipe. Metal recycling yards are marvelous sources for things like aluminum or stainless steel pipe. Some of them might let you pick through a pile of pipe and charge you by the pound. How will you know if a pipe is good for chimes? Hold up a piece of something that looks good and hold it between your fingers about one fifth of the way down its length (we'll explain this part later). Tap on it with something like a piece of hard wood (a screwdriver handle is good) and it should ring. If it clunks, put it back and try a different piece.
Look around, check out dumpsters, do some curb crawling and see what the neighbors are throwing away on bulk pick up day. Look for objects that use tubes in their construction. Discarded EMT tubes (galvanized), old bike frames, used copper pipe, etc. The tuning instructions that follow can be used for virtually any hollow metal pipe.
Smaller diameter pipes of equal length will produce higher frequency notes. If you like the softer, mellow notes, use three-quarter inch or one-inch pipe. You might want to try making large chimes. Larger diameters will give even lower notes, but they are a little more difficult to work with. The pipes with thicker sidewalls sometimes will produce the lower notes. Chimers who make their own usually try to get harder metal pipes to get a more sustained sound. If you try to make chimes two, three feet or longer, you will often run into multiple overtones that make it difficult to tune to specific notes, but go for it anyway.
By the way, we recommend that you join the Yahoo! windchimeconstruction
group message board. You may notice that we steer people to this
board several times during this discussion. The board will give you a wealth of
detailed information that no book or internet link has, no matter what the
claim. Even though we have been called "hard core chimers", it is a
great group which tries to help everyone. We have over 3000 members from all over
the world and our group continues to grow. After you join, first go to our
links and archived messages, which will answer many questions you might have
about making wind chimes. For instance, if you want to build one of those huge
chimes that so many chimers love, go to the links section and click on Messages. It
will take you to the index of selected archived messages, where you can go to Large
chimes/ low tones to see what our members recommend.
Wind chimes for personal use come in diverse designs. The smallest are tiny earrings. The largest depends on the ability to work with large, heavy tubes weighing hundreds of pounds each. In the Guinness world book of records, the largest wind chime is currently on display in Arkansas, the longest tube being 36 feet long with a low, sustained, bell-like sound.
Tuning Your Wind Chimes
The fast and dirty way of tuning chimes is not to tune them at all. Just cut the pipe to various lengths and if they each sound OK, you're done. If you're not going to hand tune your chimes, then skip the following paragraphs down to the Nodes of Fundamental Frequency section.
You may not know what notes you want to make your chimes. Here?s something you can try to help you decide. Listen to online chime notes or go to a store that sells top quality products. You may not realize it, but many of us carry around a certain amount of tension. Listen to the chimes with your eyes closed. When you feel the tension drop away, that?s the chime notes you should duplicate. The online sellers of chimes will tell you what notes are used and the materials. The store may have a tag that details the same information. Jot the specs down and find a formula online that will help you duplicate the store bought chime sets.
You can find computer tuning software or electronic tuners online. Check the links on our message board or go to Google.com and type in something like Chime Tuning. One thing to be careful of though. Even if the website claims to help you make chimes, many of them are only there to sell you their ready made chime sets. If you want to make your own from scratch, avoid these websites.
Tuning to specific notes can be difficult because the sound comes from the way each chime vibrates. Many factors determine the sound: length, type of metal, the diameter, thickness of the walls, and so forth. Some tubes you encounter will have different hardnesses, even if they are made of the same material. Add to that a mixture of metals like steel and zinc in conduit, tin, lead, and zinc found in copper and the problem becomes even more complex. If you want formulas that will come pretty close to specific notes for different metals, check out Chuck's Chimes link on the group's message board and tune to the first fundamental.
Maybe the first thing you should do is to decide how many chime tubes you want and the exact notes they should be. Five or six chimes are good for a first project. How about a single chime made of a large diameter pipe? You could suspend it with chain or wire as described below with an internal clapper and a sail hanging out the bottom. The clapper can be a lead fishing weight. Perhaps twelve chimes in a circle or in a line with several strikers and sails? The wind chime auction section of Ebay.com will give you some ideas.
A musician friend can help by telling you what notes make up chords that sound pleasant. Some people pick the first few notes of a favorite song and tune the chimes to them. Of course you will seldom hear the notes played in the same sequence of the song, but it will happen occasionally. Or you could simply use notes that sound good to you and don't worry if they "go together."
To achieve exact notes, get the help of your friend to work with you as you tune, preferably one with a keyboard or piano. We borrowed an electronic guitar tuner and it worked well because it used the same range as the notes we wanted. This tuner cost eighty dollars which is a little pricey, unless you want to do many chimes using only the notes it covers. There are several electronic tuners and free or low priced online tuning software our message board members recommend, so join us and collect our archives.
There is a problem often encountered with tuning chimes-the note seems to change from the note you first hear as the chime continues to vibrate. This is why digital tuners can show different notes when the chime is rung, from D to B to C# for example. This is because the chime vibration changes as the higher frequency overtones creep in. Most people find it easier to tune for the lowest frequency, and others find it pleasing to tune to the overtones that come after the first frequency occurs. On other Websites there are formulas that tune to the first and lowest frequency. Keep in mind this frequency might be called the first harmonic, the first natural frequency, the primary frequency, or the fundamental.
Anyway, don't fret too much, your brain is a marvelous instrument and compensates for the overtones. Getting the first fundamental sound right is the important thing. The overtones will be there too, but they won't distract from the pleasure of the sound. It's like this: a digital tuner tells us what note is playing exactly digitally. The brain, however, doesn't work digitally, it works sort of on the theory of fuzzy logic. For example, if you were in your house and someone was calling for you, you'd yell back that you're at the top of the stairs. Then the other person comes and sees you standing one or two steps from the top landing. Both your brains accept that you are at the top even though, strictly speaking, you are not quite there. This is not digital logic, which is true or false, on or off, etc, it is a kind of fuzzy logic, the kind that says "close enough". When it comes to tuning the sound of your chimes, your brain often filters out the overtones and recognizes the main sound as the "right" tone. Hard to believe, perhaps, but you'll see this time and again as you tune your chimes.
When you have the notes in mind, it's time to begin.
We'll assume you have purchased a ten-foot piece of one inch copper pipe from a
place like the Home Depot plumbing department (usually M type or L type). The M
type is softer and doesn't have as good a sound as you might like, so if the L
type is available, use it instead. The type of copper is stamped into the side
of the pipe in accordance with federal law. The stamp code will also say if it
is Extruded or Drawn. Drawn is harder and has a brighter sound,
while the extruded has a softer ring. It is generally believed that the thicker
sidewalls give the better sounds. The "M" type copper pipe has the
thinnest sidewall at .035". Type "L" is thicker at .050".
The thickest sidewall of this type of copper pipe is type "K" at
.065" is used for higher pressures and can sometimes be found at plumbing
supply stores at premium prices Many prefer the sounds produced by the thicker
K pipe. Just for a comparison the 3/4" copper pipe has the following
thicknesses; M-.035", L-.045", K-.065".
Tuning the First Chime
Start by cutting the longest chime first, if you make it too short, it can be used for another piece. We've prepared instructions on cutting pipes if you would like to go there and return back here later. The length of the pipe doesn't matter, just use metric measurements because the calculations will be easier. This will become your reference bar. Tune it to the nearest note it produces. For instance if you wanted an "F" and the chime turns out to be a "C", that's good, because it will still work as a reference and you can use it to calculate your "F". Later we'll be using a formula to compute the approximate lengths for the other chimes from this reference bar. It's easier to do the calculations by using millimeters, instead of inches and fractions of an inch. A pipe cutter will do a smooth job of cutting and is worth the few bucks it costs. A hacksaw will also work, but cutting a square end on the chime is harder.
Let's start with fifteen inches...oops, make that 380 mm. Hold it with two fingers and tap near the bottom with something hard, but nonmetallic to make the sound. You tune by removing metal from the end of your chime. The more you grind, the higher the frequency becomes. If it is a B flat and you want a B, for instance, you grind or file the end a little at a time until we achieve the B. On any chime that you grind too much, you have to cut another one a little longer to get a lower note. You can't put metal back on. For instance if you start with B flat and grind too much you get a C instead of a natural B. If the exact note is what you want, then cut another pipe length and use the first one to make a shorter chime with a higher frequency.
A note about grinding:
An electric grinder will make the work go faster, but it will leave a small
amount of metal around the lip where you grind (it's sharp!). You must remove
this before checking the note. Use fine steel wool or a file to remove the
metal burr. Be careful, that burr can slice
skin! A reamer can be used on the inside of small pipe. Fine steel wool
is less likely to leave deep scratches on the outside of soft metal pipes than
sandpaper. Now that you have a chime whose note you know, it's possible to
calculate the lengths of the others to get the notes you want. Bear with
us now. This next part gets a little involved.
Tuning the Other Chimes
Here is the formula. It will get you into the ballpark, but you must work to find the seat number listed on your ticket. In other words, this will get you close, but you still have to fine tune in many cases to get the note you want. If you are using a list of notes, choose the next higher note, which will be a little shorter than the reference bar. If you grind off too much, use the chime to make a shorter one. Cut the second one again, but a little longer this time.
L2 = L1 * Square Root (F1/F2)
Where:
L2
is the length to which you'll have to cut the next bar.
L1 is the length of your "reference" bar;
F1 is the note it plays (in Hertz frequency); See the chart below
F2 is the note you want the next bar to play. (Also in Hertz frequency)
See below.
All right, here's how it works: If your reference bar is a C (261 Hz) and its length is 380mm (L1). Now you need to know the length for your next bar (L2), which you want to be an D#(311Hz). L2=380 times the square root of (261Hz divided by 311Hz) ....... Calculator time!
L2=380 times the square root of .839
L2=380 TIMES .916 = 348mm. (The length of your D# chime)
This should be close to the note you want, D#. Add a few millimeters
to this length in case you have to do some grinding to get the D#.
Hertz Values
|
|
|||||||||||
|
C |
C# |
D |
D# |
E |
F |
F# |
G |
G# |
A |
A# |
B |
|
|
|
|
|
|
|
|
|
|
|
|
|
|
16 |
17 |
18 |
19 |
21 |
22 |
23 |
24 |
26 |
28 |
29 |
31 |
|
33 |
35 |
37 |
39 |
41 |
44 |
46 |
49 |
52 |
53 |
58 |
62 |
|
65 |
69 |
73 |
78 |
82 |
87 |
92 |
98 |
104 |
110 |
117 |
123 |
|
131 |
139 |
147 |
156 |
165 |
175 |
185 |
196 |
208 |
220 |
233 |
247 |
|
262 |
277 |
294 |
311 |
330 |
349 |
370 |
392 |
415 |
440 |
466 |
494 |
|
523 |
554 |
587 |
622 |
659 |
698 |
740 |
784 |
831 |
880 |
932 |
988 |
|
1047 |
1109 |
1174 |
1245 |
1319 |
1397 |
1480 |
1568 |
1661 |
1760 |
1965 |
1976 |
|
2093 |
2217 |
2344 |
2489 |
2637 |
2794 |
2960 |
3136 |
3322 |
3520 |
3729 |
3951 |
|
4186 |
4435 |
4699 |
4978 |
5274 |
5588 |
5920 |
6271 |
6645 |
7040 |
7459 |
7902 |
|
8372 |
8870 |
9397 |
9956 |
10548 |
11175 |
11840 |
12542 |
13290 |
14080 |
14917 |
15804 |
Do all the remaining chimes the same way. Use the reference bar each time.
Now we are ready for the next step, which
is nearly as important as tuning--- drilling the holes for hanging!
Nodes of Fundamental Frequency
When a chime is struck, it vibrates along its entire length in a sort of standing wave, but it's movement is so small you can't see it with the naked eye except on very large chimes. The wave has a mirror image of itself so it crosses itself at two specific points on the chime. Look at the illustration below, it will give you an idea of what's happening when the chime is struck.
![]()
These spots are 22.4% from either end. It is here that there is virtually no vibration and we call these places the nodes of fundamental frequency. It doesn't matter which node you use to drill your holes, either node will perform the same way. This means that if you suspend your chime from this node, you will not dampen the vibration and you will get a longer, more sustained sound.
Try this experiment to show how important the location of this node is to the sound your chimes will make.
Hold a chime (or any piece of pipe, tuned or not) about halfway way down with two fingers. Strike it near the bottom with something like a screwdriver handle. Strike it a few times to help remember the sound. Now slowly let the pipe slide downward while continuing to hit the pipe at the bottom. Do you notice how the sound changes? The note begins to shorten as the pipe slides down again. The place where it reaches its longest and most resonant, is right at the node and it will be 22.4% from the top. Isn't it great? Instead of a short bong!, it becomes a rich bonnnnnggg! Virtually any metal tube behaves the same way. After you've tuned your wind chime lengths, then can drill your holes for hanging and get that full sound with all the chimes. Just multiply each length in millimeters by .224 and place the holes that distance from the top.
For example if your pipe (after you've tuned it) is 380mm, multiple it by .224 to get 85.1 mm from the top. Drill there. (Instructions for drilling pipe) The same calculation is done for each chime in turn. You can see that the points will be different for each length. It may look a little odd but if you want that expensive chime sound, this will give it to you! Remember, drilling 22.4% from the end will give you the most resonant sound. Now you know the secret of those who manufacture expensive chimes.
This calculation works for chimes down to about one half an inch in diameter, but with pipes or rods smaller than this, the frequency gets so high, it matters less where you drill the hanging holes. That is why those little rods and pipes of the small, cheap chimes are often hung from holes drilled at the top, all the same, about one quarter of an inch or so. Unfortunately, some manufacturers of the higher priced chimes also drill the holes near the tops and the quality of sound suffers.
If short notes don't bother you, just drill all the holes the same distance from the top and don't do the node calculations.
Each time you drill a hole in the side of the pipe, a sharp burr will remain at the hole. Remove this with steel wool or a file. If you don't, this burr will cut into your hanging string as the chime vibrates and swings, with predictable results.
No matter how carefully you de-burr the holes, you still have a heavy metal chime abrading your string at two points. We can lessen this. Some hardware and auto parts stores sell very small copper tubing (down to one eighth inch) and it can be used as an axle, with the string going through it. Cut the tubing slightly longer than the width of the chime. Flare with an awl or small punch, push it into the chime, place the flared end and chime on a hard surface and cautiously flare the other end so it locks into place. Then gently bend the tubing downward in the middle very slightly (use the handle of a screwdriver or something similar), so the weight of the chime will be more evenly distributed on the string. To avoid flaring the axles, just epoxy or solder the ends without flaring the tubing. You can use polymer string or stainless steel wire to hang the chimes by pushing it through the axle. Just a word of caution. Whenever you put two dissimilar metals together you will start a chemical-galvanic reaction that will always corrode the softer metal. If you use a copper axle inside a steel pipe, the axle will eventually disintegrate in the outdoors as it gets wet. A coating of epoxy can separate the metals to prevent this.
Many people on our wind chime group board recommend using grommets or aluminum POP rivets to prevent line abrasion. The rivet consists of the body (the part that looks like a top hat with the end cut out) and the mandrel (looks like a small nail). If you use a one eighth inch diameter rivet, drill an eighth inch hole through a two by four, place the rivet in the hole with the sharp end up and gently tap the mandrel end with a hammer. The mandrel will come out, leaving the body. Place the body in the one eighth inch hole drilled in one side of the chime and tap in gently with a piece of wood or a hammer. Do it again on the other side of the chime. Secure with a drop of instant glue if you like. The line can then be pushed through and should last a long time.
Chime Caps
If you are using copper pipe, you may opt to suspend your individual chimes using a cap instead of hanging your chimes from two holes drilled in the sides. Copper end caps may be picked up at the same place you buy the pipe.
Drill a hole in the middle of the cap using the smallest drill bit you have. Deburr the hole so you so the sharp edge doesn't eventually cut your string or wire. After you tune the chime, sweat solder the cap to the pipe. This will flatten the note a little since you are adding material to the chime (cap and solder), so you may want to retune. If you like the sound after the cap is in place then skip the retune. If you are not familiar with soldering copper pipe with a propane torch, then go to a quality search engine to find instructions on the web. Practice on scrap until you get the technique.
Run your suspension line or wire through the cap and out the bottom of the chime. Tie a knot bigger than the hole in the cap, then hang the chime from the top piece. You could also tie a short piece of heavy copper wire to the end of the string to prevent it from pulling through if the hole in the cap is bigger than the knot.
If you're not sure whether to use a cap or drill holes in the sides, try it both ways with pipe of the same length. Whichever sounds best is the way to go.
The Other Parts
The entire chime assemble is supported by a ring at
the top. It should consist of some non-rusting material. You can cut a quarter
inch wide ring from one inch copper pipe and de-burr it. An item called a quick
link will also support the weight of the chime assembly. It is oval in shape
with a small nut on one side that closes the link. A plastic ring is OK, but
the sun's ultra violet rays may weaken it in time, and it does hold a
lot of weight.
Some chimers use those large swivels you can buy in the fishing section of some department stores. The swivels have a snap at one end, like a safety pin and use a closed swivel at the other end. Use only the stainless steel variety rather than the brass kind. Steel ones are more expensive but they will hold up much longer, will not corrode, and are stronger.
Attach three or four strings, wires, or chains between the ring and the cap that supports the chimes. Try to keep the assembly level because this will affect the way the chime hangs. Keep your eyes open when in crafts stores, flea markets, garage sales and so forth to find non-rusting plates or rings that you can use to suspend your chimes.
Each chime may be hung with its own string or you could use one long string and weave it through each chime up through a hole in the top, then down another hole to the next chime. Finally, it is tied and all chimes are attached to the top piece with one string. The advantage is that each chime can be easily adjusted up or down to get the effect you want. If the line breaks, however, more than one chime may hit the ground. Best hang it in a spot with a soft landing underneath.
You can suspend the chimes so that their bottom ends are roughly at the same level. Perhaps when making windchimes you may prefer that the chimes are the same distance from the top. The clapper can be placed in the middle of the chimes or near the bottom. Some people use two clappers.
The support cap can be made of wood about five inches in diameter for five or six chimes. The round should be hardwood about 3/4 inch thick. Polyurethane or paint will help protect wood from the effects of the weather. If you are handy, you could cut round pieces to hang the chime. The top may be constructed of exterior plywood or boards. Why not use a shape that corresponds to the number of chimes--triangle, square, pentagon, hexagon. Use a ruler, protractor, and compass (remember it from school? Pointy leg and pencil leg) to make sides which are then cut with an ordinary wood saw. An article on drawing and cutting out various geometric shapes can be found by clicking here.
Metal rings or metal plates may be used also. Use your imagination when shopping at garage sales or flea markets.
Let's talk about the strings. You may have noticed that many chimes are suspended with plastic string or monofilament. Any place that sells fishing supplies will stock monofilament line. The labels will say something like six-pound test, ten-pound test, thirty-pound test, etc. This tells you how much weight it will take to break the line. A six-pound test line will be much thinner and easier to break than a thirty-pound test line. Get a higher strength line, the flimsy line won't last long especially hanging in the sun's UV rays. Monofilament is a kind of plastic and is slippery, so special knots must be used to hold properly. Use a sheetbend knot or square knot below) to secure your monofilament line Tie the square knot twice if the line comes unraveled with a single knot. The Internet has illustrated instructions on how to tie these and other knots.

Trimmer line for electric weed whackers is much thicker than fishing monofilament and may also be used. Be sure it isn't so thick you can't tie it into knots easily. Twisted or braided Nylon string is very sturdy and comes in different colors. A drop of quick setting glue (Crazy Glue) will secure the knots of slippery string.
After we drill small holes into the support cap, the chimes may be hung. Braided Nylon or Dacron is used by the better manufacturers of wind chimes. You can purchase either online from suppliers of chime materials. Twisted or braided Nylon string is very sturdy and comes in different colors. Dacron may be the better choice because it has the reputation of long life and not stretching and this may be a consideration if your chimes are heavy. Don't place the string up against the sides of the chime, it could dampen vibrations and reduce the sound.
You will find it is a challenge to keep the top piece level when you use different length chimes. Try putting a temporary string through the holes of each chime with a fishhook at the end of the string to hang the chimes and experiment with their positions. The fishhooks can move the chimes around rapidly and get the best placing for balance. Simply mark where hooks are and drill a hole on each side of the mark for the chime. It takes some trial and error work to get it right.
We usually make the striker or clapper of hardwood in a round shape, although plastic or metal will work also. Craft stores sell wooden wheels that are used for making wooden car models. These are good. You could use round wooden balls about one inch in diameter. The balls are small enough that in a strong wind, they can leave the circle of chimes and strike them from the outside. We then coat the balls with polyurethane and drill two holes in the middle with a very small drill bit. The string is suspended from the support, passed through the striker and tied to the sail. The sail is the part that catches the wind and moves the clapper. It should be light and have sufficient area that it can move in a light breeze. A piece of glass or heavy wood will take a stronger wind to move it. If you have really strong winds, the sail can be eliminated. Use a clapper only.
For sails, light plastic, aluminum, stained glass, and thin wood are a few things that will work. I like to use a shiny metal platter from a defunct computer hard drive. Tie the hanger string through the hole in the middle without drilling the disk. You could also use an old CD disk. Drill it near the top edge, seal the edge of the hole with polyurethane so the aluminum in the disk won't discolor. Now tie it to the clapper string. It will flash as it flutters in the slightest breeze. The CDs that are shiny on both sides put on an enjoyable show when the sun reflects off them. OK, it's not as much fun as a bug zapper and a six-pack, but then, we're easily amused.
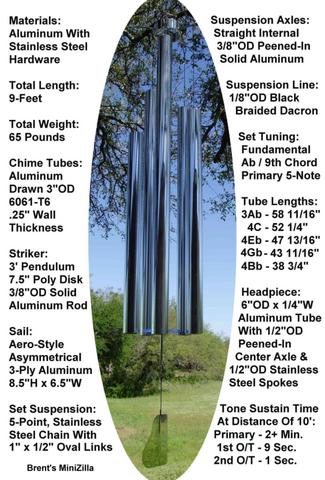
??????????? Take a look at one of our windchimeconstruction members? handiwork. It?s a chime made of three-inch diameter aluminum tubes, the longest one is over four feet. The creator, Brent, has affectionately named it Mini Zilla.
Well, that's about it. Make a bunch of windchimes and try not to drive the neighbors crazy. Wrap the chimes with a rubber band if you want to quiet them for the night. If you have found this article useful and you think others may benefit from it, please link your website to us. Who knows, you may inspire someone who never thought of it to make their own wind driven tension reliever.
We invite you today to join our wind chime construction message board on Yahoo. It is one of the largest wind chime groups on the net. We are a friendly group and with 3000 members from all over the world, we will surely have the answers to your questions. If you are new at chime making, always check out the board's links first. You may find your answers here and board members don't have to answer the same questions over and over. As you explore the archives you will come across information found nowhere else on the Web. Our data has grown tremendously over the last few years. Join us.
http://groups.yahoo.com/group/windchimeconstruction
![]()
Links you may find useful:
Creating Bamboo Wind Chimes--Harvest, dry, preserve bamboo to make into chimes.
How to Make a Silverware Wind Chime
Hard Drive Chimes--How to take apart defunct computer drives and make wind chimes.
Last updated April 4, 2009
![]()
![]()
![]()
![]()
![]()
![]()