Best viewed with Microsoft Internet Explorer at 800x600
resolution. Enjoy your visit!!

Current Project
1991 State of Illinois Retired Squad Car (9C1)
Last entry, January 10th/2002
This page will be done like a time line. Starting here, at the top, with the oldest entry in the log. Scroll down the page to view the project stages complete with photos and documentation.
December 31st/2000: Currently, I am working on my 1991 9C1 Caprice. I bought the car in July of 2000, with ONLY 155,000 miles on it. The body is in very nice shape and the interior is superb. I drive the car daily, and she has never given me any trouble to date. After purchase, I put a new serpentine belt on and new front brake pads and she was ready to go. The 91 cars are dogs, even with the 350. The ugly rear wheel wells kept me up many a night pondering the thoughts of how they could be chopped and shaped into the "roundies" that the 93 up model cars have.
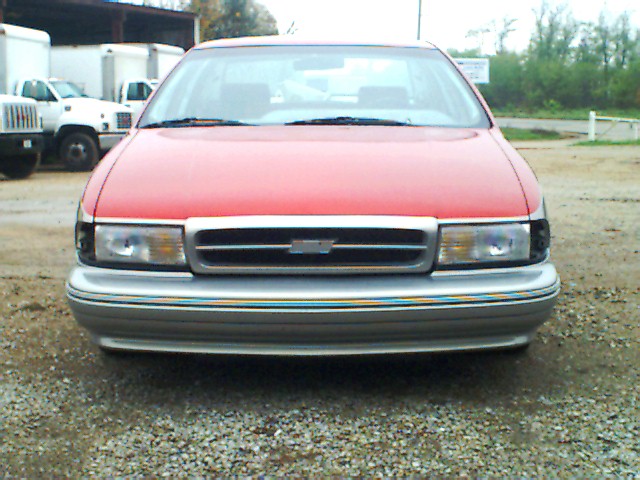
 Here is a frontal of the 9C1 at the shop. In this photo the only visible changes to the car are the addition of the Impala SS grille, and the deletion of the hood ornament. The Impala SS uses a different hood in that it has no hole for the ornament and the braces that the grille mounts to are designed alot different than the Caprice grille braces. I used the Caprice braces, just modifying the fastener locations and shaping the metal of the hood a bit better where it meets the grille with a grinder. The finished install looks just as well as a factory SS hood. The ornament hole is welded shut. I do not understand why people would purchase one of those LTZ flat hood ornaments to cover the hole when a 1" square piece of sheet metal placed behind the hole and welded in place is so simple. The area is then finished with some putty to hide the work. Saving money is what it is all about, and here we have saved the cost of an SS hood and the appearance is the same.
December 31st/2000: My two major challenges in the transformation of the 91 Cop Car are the wheel wells and the 1/4 glass. At this point, the wells are about 40% complete while the 1/4 glass is in the mail. I was going to order a set of Impala wheel opening moldings and use them as a template for the cutting of the roundies. I decided not to, rather, creating my holes using a template that either I get by going to the local dealer and copying a 93 up well, or one I fathomed up myself. I decided to design my own. Doing this was simple, and by appearance they are unnoticable to the untrained eye. They are actually a bit smaller than the wells on the 93 up cars, which gives the rear a bit of a lowered look to it without changing springs. The problems that arise when doing this are the lack of metal in vital areas that require metal to complete the well.
 In the above sketch I try to clarify what is ment by lacking metal. In the sketch you can see the areas that when you cut the round shape of the well to the desired size will need metal welding in to complete the shape. This was easy to do as well with a few pieces of scrap metal I fabbed both patches for both sides. On my car, the left side had some significant cancer on the extreme lower portion of the area so I used this as an opportunity to repair that as well by making my patch big enough to remove the rust. The part right after the door is an option. In order to acheive a correct Impala shape, you must add metal there as well, but on my car, I did not add any as of yet. Right now I have both sides cut and in rough draft form. There are two panels of material to cut through, and I chopped them both with a cutoff wheel, outside body panel first, then inner well. I cut the outside about 1/4 inch longer than my template. I do this so I can grind the shape perfectly once the rough cuts are made. The inner portion I cut about 1" longer than the outer. This is so I can use this material to form the lip of the wheel opening. I have yet to grind the perfect shape or begin work on joining the inner and outter panels. The reason I have held off for now is so when my 1/4 glass arrives, I can complete the entire quarter panel repair work at once.
 Here is a shot of the right quarter panel in rough cut form. Notice the snow on the ground. Like I said, I am POOR!! I drove this baby to the shop for the photo shoot with 20" of the white stuff on the ground!
December 31st/2000: I hate the 91 and 92 taillight lenses. Very poor when placed next to the 93 up style, which, by the way, are the same for the Impala except the Caprice ones have chrome trim and the Imps trim is black. Save money! Anyway, replacement lenses are very high priced. I searched on EBAY and found a set of clear lenses which use colored bulbs ($6.99 pair thru JEGS, I used bulb covers found at local truck stop, $2.99 pair for 2057 covers and $2.99 for 6 194 covers!!!) to produce the red light needed at the rear. The lenses are awesomely detail, and they have the same appearance as the 93 up ones. Mine have black trim surrounding the lense and each row of the lense has a small black trim seperation. The swap of lenses took me about an hour and is easy to do.
 I may have gotten lucky with the old glue used to hold on the stock lenses. But, never the less, I used a screw driver between the housing and the lense and cleared away as much glue as I could before prying the sections apart. Use trim adhesive when installing the new lenses to ensure they dont blow off down the road. I dont recommend ordering new replacement lenses if you have a 91 or 92 Caprice. Call the junkyard, anything!! New 93 up lense are over $100 EACH! I got these clears for $85, includes shipping and insurance. JEGS sells these for $122.99 a pair I believe. Still alot cheaper than stock units through your local dealer. The 91-96 assemblies are the same.
December 31st/2000: I like the HID headlights on the rich people cars so I searched around and found what I feel to be the best replica on the market. I got a brand called Naxos, Zenon Charged bulbs. They give a nifty blue appearance at night and are quite bright on the driving surface. They SUCK in the rain though, almost like no lights on at all. The price you pay I guess for style. Next up, getting the WIG WAGS hooked back up! I also plan to get some of them clear corner lenses that replace the amber stock units on front of the car. I have bid on several pairs on EBAY but have not won a bid as of yet.
 The front end. You can see the reflection of the blue glass on the headlight bulbs from the camera flash. They appear normal regularly. Kindof a neat picture.
December 31st/2000: That little dash emblem that says "Caprice" above the clove box can be directly replaced with an Impala SS one. They are identical except for the designation.
 These are only a few bucks, and you can get ones that say Caprice SS, Impala SS, and even the John Moss signature series Impala SS issue. You can get them at your dealer or at the Impala Superstore. A neat way to spice up the inside of your car.
 January 8th/2001: Pictured above is the rear quarter glass that I will be using on my 91. This glass came from a 96 Impala SS. Many people that tackle the glass project on there 91-94 Caprices purchase the kit from the Impala Super Store. I, however, found a pair of windows on EBAY with the bidding at $20. I placed my max bid at $30, and eventually won the auction for $26. The shipping cost was $12.50 so altogether, my quarter glass project thus far has cost me $38. The kit from the Impala Club is at $495. Benefits are you get correct glass for your body panels, in which I must fabricate the additional metal needed. You also get interior panels with the kit, of which I have to locate. The difference when complete will be with the kit, all cars will have the plastic applique covering the void where my install will look just like a 95-96 quarter without the applique. Once the bodywork is ready to be finished on the window project I will also complete the roundies. This is going to be the most critical part of the project.
 January 14th/2001: This is what I created out of a piece of cardboard. It is my template I use to cut the shape of the metal patch I will weld into place to fill the void when the 95-96 glass is in place. Basically what I did was once the 91 glass was removed, I installed the 95-96 glass and held it in place with tape. I placed cardboard in the area for fill and began to trim it until it fit in place. I used the 1/8 inch or so black molding on the outter edge of the glass as my resting point for the glass to seat to once installed. This means that my template was made so that the patch will also act as the channel where the glue is applied. The metal patch in place is pictured below. This same template is used to cut 2 pieces, one for each side of the car. The only thing I really was worried about was having the area look accurate, and after looking at a 96 SS at a dealership for reference, I noticed the area is very, very slightly curved, as it follows the rounded leading edge of the roof pillar into the body line of the quarter. Like I said, a very slight curve. I found some scrap sheetmetal at the shop that came off a center section of an S-10 door. The roundness was accurate. Checked with a template that I made much the same way NASCAR checks proper shape. Since I found the metal with the right curve, there was no need to bend my panel once fabbed. If I would have not caught this, YES, the job probably would have been a bit more noticable. Maybe, maybe not? Not a chance I wanted to take. We are going for perfection here.

 The patch will fit into the spot just so the there is a small V channel all the way around the patch which means when I weld it in place, all I have to do is fill the channel and she will be secure. Some grinding of the welds, and a few skim coats of bondo and the area will look perfect. I was able to remove the 91 glass in two hours without breaking it. I used a heat gun and the usual glass removing tools, but I also used a flimsy bladed serrated knife that I pushed through most of the glue. The blade follows the metal channel and emerges on the outside of the car. Hold the handle, and tap the blade with a rubber mallet around the glass and she comes out without breakage. Once I tried this, it only took about 20 minutes and the glass was out.
 The 91 quarter glass successfully removed!!
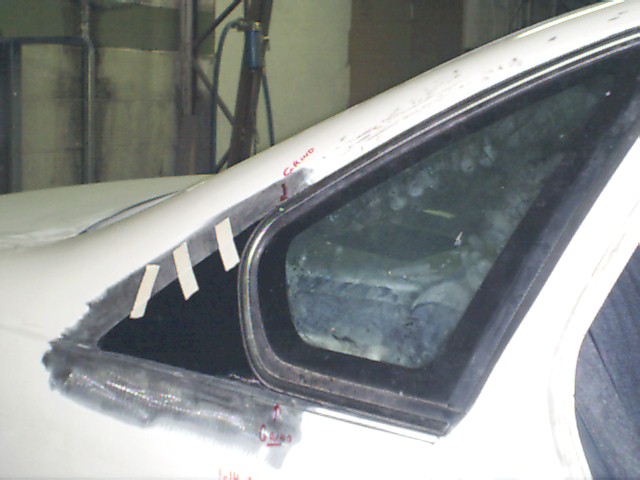 Here is a photo of the glass in place (not glued) with the metal patch also in place. My plan is to weld in the patch, construct the rest of the glue channel, then prep and prime the area. It will get painted once the car is in the booth. Then I will glue the glass in place. Once I get both sides of glass work done, the wheel openings will be completed. (Total time on this glass project thus far, 6 hours...) I still have yet to start the left side.
February 8th/2001: No phots yet of the quarter glass area but I can say this, the pieces are in place and the glass fits very nice. I am ready to get the putty work going on the mod area, and I will then prime and paint the surface and install the glass once the paintjob is complete. I ordered a set of clear corners yesterday, and also have ordered a set of 17x8.5 Impala SS wheels, which, by the way, are brand new in the box, OEM wheels, with lugs, center caps, and valve stems! Going to get some rubber shortly before the car is done. Right now, I am planning to trailer her up to Detroit in August for the Dreamapalooza event. Should be a neat way to show off the 91.
March 4th/2001: Been doing alot to the car, but not much on this website! The passenger side quarter glass area is now complete, with only some minor tuning before I call it quits in that region. The roundie on that side is also pretty close to being done, but I need some more welding to complete the lip for the wheel well. Below is a shot of the quarter area with a coat of primer.

The glass fits perfectly all the way around and will look excellent when installed. I have also began other projects on the car, such as mirror delete on the doors, which will eventually lead to installing the 95-96 mirrors when I locate a set cheap. See photo below. The patch was welded in place, and filled with mud. Also, there were a few small dings that I pulled in that area, and took care of them as well.


Like I said, I am also going to shave at least the rear door handles of the car. I made the patch above, built a template off of it, and have it ready for when I make the next one or the ones needed to complete the set. The patch fits micely into the recess which the handle resides, so, again, like the quarter glass project above, if welded correctly, only a slight amount of putty work is required to smooth the area.
I bought a set of brand new 17x8.5 SS wheels as well. I got them through a dealership that had been selling the sets on EBAY for $600. That is what I paid. I like the stock rims, and think they will look great on the clone. Now for the tires... You can contact Greg Heiken, Parts Manager, at Uftring Chevy in Lexington Illinois at 309-365-2161 or 1-800-782-4819. Greg deals with alot of SS parts reasonably priced. I also picked up a set of quarter deer logos that will fit behind the quarter glass. He sells alot on EBAY as well.
April 1sr/2001: I have a few new photos of the project. The first is a shot of the passenger side quarter with the quarter glass area complete, minus the glass. In the photo you can also see I have started the putty work on the wheel opening. The rear doorhandle has been shaved, and the mud work around the area is done. There where numerous dings around the rear handle, so all of them were leveled in the process.

I am also relocating the trunk keyhole. I saw this on the web on another Caprice owners page, and I am going to give credit for the idea once I find out where I read it. I think his name was Walker? UPDATE!!! Here is the link to Steve Walkers page!! Click HERE!! Anyway, the barrel is now under the lip, by the license plate light, on the angular piece just below it. The locks rod was cut and ground to fit into the lock mechanism itself. The barrel is held in place by the original clip. I cut the bulk of the clip off, saving just the business end.

May 26th/2001: Well it has been awhile since I updated this page, but, rest assured the project is still going smoothly. I have the passenger side complete, except for the front door handle needs to be shaved yet. The drivers side, the window applique as well as the glue channel are complete, ready for mud. The wheel well is still in rough cut form. The roof is ready, as is the trunk lid. To hood is close, except I cannot decide on whether or not to use the stock grille or my SS unit. I have decided more or less to paint the car white. Perhaps with some racing stripes to flavor it a bit. I want to get it on the road ASAP, and do not want to piss with changing the color. I have another 91 at the house that will enter the shop when this one is done. That my friends, will be the show unit. I will be sure to post some pics here shortly of what I have completed. Check back soon!!
May 30th/2001: Uploaded a few new pictures of the project. Two pics of the new 3rd brakelight mod I did using an Impala SS sticker over the lense to produce the luminated script you see. The third picture is of the trunk with the keyhole removed and a nice coat of primer applied. It is ready for paint.


The retrofit for this light I also bought on EBAY. But, the guy that supplied it can be contacted at THIS ADDRESS. It is very easy to install, and the instructions are very detailed and accurate. Takes about a half hour.

June 14th/2001: Some nice new pictures of the project. First off, the shot below is of the stock progressive 9c1 rear coil springs with the Suspension Techniques lowering springs next to them. I wanted to drop the rear of the car to check the relationship of the hand fabbed wheel wells, just to be certain that everything was going as planned.

Next, I have a shot of my way to shave the door handles and gain access without the solenoids that activate the latch. The idea is simple. Extending the original rod that connects to the latch by welding an additional rod in place, which I grabbed off a 79 Camaros lock assy, so that it will protrude through the top of the door where the moding rests. The moulding will have a hole placed in it to allow passage as did the door as you can see in the photo. The rod will have a button placed over it to make the assemby blend nicely with the molding and conceal the origin of the latch activator.

I have been getting alot accomplished on the driver side of the car. Here is a picture of the glass area on that side, with glass resting in place and welding visible.

Again, the passenger side is nearly complete, except for the door handle on the front door, and a bit of tuning on the rear wheel well.

A close up of the quarter patch welded in place.

I also have been working on leveling the front of the car. The hood had several dings in it, probably from tossing crooks all over the place, that had to be fixed. The hood is ready for a coat of primer.

Simply put, the driver side of the car is still a mess!!

Although, the driver side mirror delete went smooth and with little mud work. This as well as the door handle area on the same door are fairly straight now so they both should be rather quick and painless to smooth over.

Ocotober 22nd/2001: Here she is with the paint applied! During my week off of work, I was able to finish the last of the doorhandles that I needed to shave as well as the mods to both quarters. Below are a few pictures of the car from some different angles. The color on the top, because of my POOR digital camera, is not really justified. The color is Prowler Flame Orange, a 2001 Mopar color, and the bottom of the car is called Silvermist Pearl, a 1998 GM color. The car was painted on October 20th, and cleared on the 21st.
 The SS grille is temporarily installed. The bowtie emblem is getting ready for a shot of Prowler Orange as we speak.

 The quarter windows will be glued in place once the car has been buffed. They fit wonderfully!
 Shaved trunk lock, relocated under the lip above the gas filler!!


January 10th/2002: Finally some updated shots of the car, althought the quality is a bit poor, you will be able to see what more has been done to the car since the paintjob on October 22nd!

 Taillights are in, and the blink-blinks are activated!
 Note the fit of the glass and the appearance of the surrounding area, I think I have accomplished what I set out to do a year ago.


 I still havent decided about this grille yet. I may go Billet in the spring, I am not hooked on this look right now, something isnt right to my eyes and the billet grille would definitly produce a mean look up front.
CENTER>January 13th/2002: Here are a couple of nice pictures of the left side of the car. These were taken with my dads better digital camera and are the first decent pictures of the completed car I think I have!


HOME


