"The Metamorphesus of a Home Water System"
|
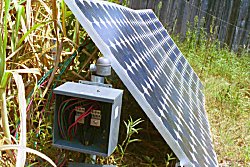
These are
the PV panels that powers my home
I
guess the place to start is at the beginning.... in January of 2000, reacting to
the rolling blackouts in Los Angeles, and in many other U.S. cities, I decided
to devise a way to power my own house, just in case there are serious outages
here, in Houston; so I set up my first photovoltaic system.
Photovoltaic, or PV system, is a method of using solar cells to turn
sunlight into useable electricity for home use... and producing my own
electrical power, and getting 'off the grid', was a real goal for me. I have
eight, 90 watt PV panels that are installed at this time; I also have four more
panels still in the box. I am reserving them for later use, when I get a solar
type fridge.
|
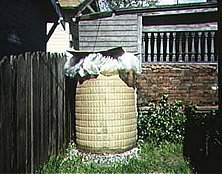
Even low
tek, home made water tanks work - this one has a fiberglas form, with a
plastic inner lining
|
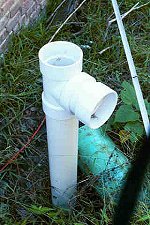
I hand
drilled this well down to 12 feet and hit a layer of clay that was a hard as
wood
By April, I wondered if there were
other opportunities out there to 'opt out' of the system that I have always
lived in. Remembering the drought of 1999, I thought that having an independent
water system might be a good idea too, so I started hand drilling a well. I
drilled down 12 foot, and hit a layer of clay so hard, that it was like wood...
so I looked for another way to become self-sufficient in water... and I found
it.
I was amazed at the growing number of people in the world that used
a simple, very low tek approach to solve their water problems; it was a simple
solution that was thousands of years old... they could capture rain water...
what a novel idea.
|
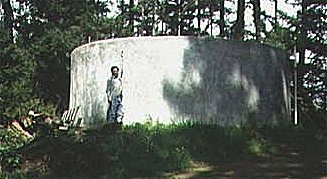
Some people
construct their own cement tanks, for larger water volumes - it's an
inexpensive tank, but it takes a bit of work to
construct

|
Here is a
more expensive, Stainless Steel tank, for potable home water
use
I talked to my mother about such a
'new' idea, and she (85 years old) informed me that her mother had the same idea
in the early 1900's, in fact, all affluent families had their own roof-rain
water catchment systems, called the Rain Barrel. Mother used to tell me about
the blessings of using soft water, (water without hard minerals) and how good it
was for the skin and hair. I realized that this rainwater harvesting idea was
not only Low Tek, but an idea as old as the Pyramids of Egypt; and in our modern
way of using highly mineralized (hard) well water, or lake water (some other
community's purified sewerage), that is chemically re-purified, floridated,
chlorinated, pressurized, and piped directly into our homes, (for our
convienence of course), it seems like we have forgotten this old, but very good
distilled rainwater idea.... an idea rooted in purity, as well as
self-sufficiency.
We have all been so spoiled by these 'City Water
Services' being offered to us (for a price, of course) that we have forgotten
that rainwater is free, and in some areas, abundant. In fact, as I looked around
the web, I found that many others have found this out too... there are web sites
where people not only harvest rainwater for personal home use, but some people
build their own water tanks, too.
"You have to think about your roof material, first"

|
Here is a
good water catchment roof- it is glazed concrete
tile

|
An Enameled
Metal roof is also a good choice for a water catchment system
So... the first thing to think about in
a water catchment system is the roof type. Wood or asphalt roofs are not
suitable for rain water catchment, since they deposit bacteria, or release oil
toxins into the water stream and you have to be careful of sheet metal roofs
that have lead in them. Enameled metal roofs are the best, and glazed metals
(glazed aluminum) or glazed tiles are also good. My roof is a glazed concrete
tile roof.
There are clay roofs too; some are good, but some contain
lead in the clay, so clay can be used, if it is glazed.
"I had a suitable roof, so... what's the next
step?"

|
My original
82 gallon 'experimental' tank
I usually
never rush into a project, I take each project, one step at a time... and since
my PV system was now producing free Electric power from the sun, I thought that
a free and dependable water source, could be my next step. So, as an experiment,
I set up an 82 gallon tank under the eaves of my Glazed Tile roof, just to see
how much water would drain into the tank directly, during a regular rain.
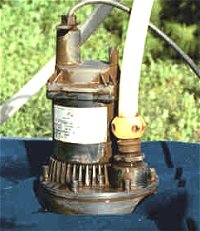
One of the first rains produced about half a tank of water, (40
gallons), so I felt this was important information, I took an old submersible
'Little Giant' pond pump, (I had this pump in the 70's and it still worked)..
and put the pump into the tank, running a hose out of the tank into the outside
faucet. I had to turn off City Water, and then leave the outside faucet, 'on',
so the the pump would always deliver water pressure when the pump's power was
turned on.

|
The outside
faucet, was the water inlet into House from the tank

|
A small
submersible 'Little Giant' pump, pumps water into house as
needed
I was trying to use the 40
gallons of roof collected water, inside the house, mostly to check the water
pressure inside... and I did have some water pressure, but it was low, and the
toilet took too long to fill it up. There had to be another way.... maybe a
larger pump?
Well, I did get a larger pump. I went to the Home Depot,
and bought a Flotec 1/6 HP submersible pump. Since I was treading on new
territority, I didn't really know what to get; it was all so... so
experimental... and I had to keep in mind, that a pump that would be too
powerful, might run down the PV system's batteries, especially when I took this
pump Off-Grid, in the future. So I wanted a pump that would do the job, but be
economical on power consumption, as well.

|
The water
pressure from the 1/6 hp pump, was still low, but OK for
showering
|
The new 1/6
HP Flotec pump provided me minimal, but adequte water
pressure
Did the New Flotec pump work?
Yes it did. It wasn't perfect, but it did deliver me sufficient water pressure
for household use. I did have to change the input pipes to the toilet, from 3/8
inch, to 1/2 inch... then the toilet filled in 2 minutes. And... I did have to
change out the shower head, to a new, and wider, flat head... then the shower
(which was not a hard spray) worked really nice... kind of like an April rain.
The new Flotec pump would work out, OK.... and the pump has been in operation
since the middle of 2000.

|
...and
resizing the toilet input pipes to 1/2 inch was necessary for a 2 minute
fill-up
|
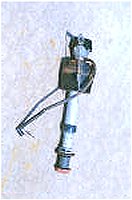
The Slide
float valve did not work well, it required a higher water pressure to ensure
a tight seal
One thing that I found out
in the process of changing my toilet float, was to use a ball float, (like the
one in the image to the left)...the slide float is not made for a low pressure
system, and requires more water presssure to keep the water seal tight... so
some of these slide float valves leak, under low pressure.
I had the
same problem with the clothes washing machine... it tended to fill up with water
even when it was off... the low pressure water system did not insure a tight
seal on the input valve, so I had to physically turn off the input faucet when
the machine was not in use.

|
Screening
the top of the tank for additional filtration keeps bugs and leaves from
falling into the tank
![Adding bleach]()
|
It was
necessary to add an ounce of ordinary bleach to the water every week, to
kill any the bacteria that might enter the
tank
Another problem that I noticed, was
bugs would sometimes get into open the water tank overnight... I would see them
floating around in the morning, and I would have to pick them out of the water
by hand. So I installed a screen wire cover over the tank. The screen wire cover
eliminated the bugs and other debris problem.
I also needed to make sure
no bacteria entered the tank... so I investigated the best solution... and from
those who have traveled this path before me, said that adding an ounce of bleach
every week, would keep bacteria type pathogens out.
The Summer
rainfall, from about July 15th, to September 15th, was very low, producing only
about 5 gallons (or less) of water a week... but the rainfall (for Autumn,
Winter, and Spring), would produce from 10 to 40 gallons a week in the tank. I
needed more water than that, for my household needs, so each week, I would
top-off the 80 gallon tank with city water if the rain was not sufficient....
and remember, that I was capturing rain water from only a two foot section of
roof. Even thought the roof water supply was only two feet wide, it did extend
to the peak of the roof, 25 feet away, so I had an effective harvesting area of
50 square feet.
My water usage was almost exactly 10 gallons of water
per day. I am a senior citizen, and live alone... and take only one shower a
day. I also do not use my clothes washing machine... I took my laundry over to
mother's house each week, and used her washing machine... so I fudged a bit in
the beginning.... but that is not true today, I have little, or no, outside
water help.

|
Then I
added 10 foot of roof gutters to increase water
collection
|
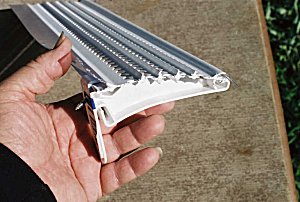
The Rain
Gutter Screen prevents leaves and other debris from getting into gutters and
the tank
I kept up this experiment of
using both rainwater and city water for several months, until October. October
25th of 2000, was the last time I used city water, and four days later, on
Sunday, October 29th, I attached 10 foot of rainwater gutters to the back of my
house... and routed the downspouts into the 80 gallon tank. I reasoned that if
two foot of roof would give me 10 to 40 gallons of water each week, then 10 feet
of roof would give me 5 times as much water. It rained that afternoon, minutes
after I finished installing the rain gutters, and that simple 10 minute rain,
filled my 80 gallon tank to overflowing... I knew then, that this water
catchment system was going to work for me... I think I was on a roll, and it was
the last time that I ever used city water. In early October of 2000, I started
keeping a rain journal, to document the level of rainfall, and how much water I
acquired and used. I still keep that journal, today.
|
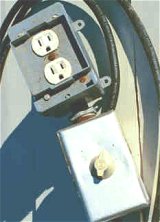
This the
Intermatic Timer Switch that I use
The
next step was finding a timer switch of some kind; a switch that I could turn on
for temporary water pressure, but would go off when the selected time period had
passed. I saw a switch I liked, on an attic fan. It was an 'Intermatic', and it
could be turned on for a few minutes, but when the selected time period had
elapsed, then the switch would automatically turn off. That way, there was no
chance that I could forget to turn it off when I used water, so I got the
Intermatic timer switch and ran a long, heavy duty, extention cord from the
pump, through a window, into the bathroom, where the timer switch was plugged
in. The timer switch has made the system an 'On-Demand' water source... that is,
it is pressurized only when the water is used.
Later on, my water supply
will probably evolve into a fully pressurized system... using a bladder tank and
pressure pump.... but, in the meantime, when my PV power usage is still
experimental, I will have to be content with the 'On Demand' system.
Since drinking or cooking water was not going to be a problem...I
have used bottled water (for drinking or cooking) for years, mostly because city
water systems all over the country has been contaminated with chemicals or
gasoline additives such as Methel Tertiary Butyl Either (MTBE) or other
contamanents.
So onwards and upwards... and is there more to this story?
You bet... read on.
"Now... I'm ready for the Big Time, Baby"

|
Since the
small, 82 gallon tank worked so well, I have now upgrated to a larger, 500
gallon tank. Using the same 10 foot section of roof gutter, the tank remains
nearly full most of the time
It was
sometime in March the following year, (2001), that I was thinking about the
coming summer... I knew that there might be a drought again, Summer months were
a bit dry around here in Texas, so rainwater might be scarce, and, an 80 gallon
tank would not be sufficient during a drought.
I needed a water solution
that would tide me over extended dry spells. It occured to me, that I should use
a bigger tank.
I remember that day, I was in the back yard, leaning up
against my old silver butane tank (which I used in the Oil Embargo days of the
70's for solar heated hot water) and wondered where I was going to get a larger
tank.... I hated to spend the money for a large water tank. I went into the
house and looked out the window at the tank I was just leaning against, and it
dawned on me that I could use 'that' tank... I'm glad it wasn't a snake or it
would have bit me. Now the old, 500 gallon, silver tank is painted flat black,
it looks sharp, and it's a proud addition to my backyard water catchment system.

|
Sanding
down the old Butane tank and repainting it flat black, it was a chore

|
The water
level guage is really handy
So the work
began... it took me all of April to sand the tank down and paint it flat black,
and when I finished, I moved the heavy, iron tank into postion, near the house,
under the rain gutter downspout. I also fixed a funnel input with some mesh
screen wire to catch any derbis that might try to enter the tank from from the
roof.
One thing that I liked about the tank, was that it had a water
level guage on the side that gives me the number of gallons of water left in the
tank, which has become handy for monitoring daily water levels.

|
This funnel
was used to prevent water loss during heavy rains

|
I
experimented with three filtering materials, Window Screening, Splatter
Screen, and a coffee filter
The three
filters that I experimented with were ordinary fiberglass window screen, a
Grease Splatter screen (the kind used to keep hot grease from splattering on
your clothes when you fry or cook), and a permanent coffee filter. I eventually
found a fourth filter; it was a steel screen mesh that was finer than the
splatter screen, and I am using it now.... but.. none of these screen filter
materials were made of Stainless Steel, which I would have preferred. The steel
screening material tends to rust and the plastic coffee filter did not hold up.
Anyway, I was ready for the first test of my 500 gallon rain tank, without a
stainless steel filter.
On Saturday May 5th, at 4am in the
morning, a cool front came over, and it rained... I jumped out of bed, took my
old flashlight (with batteries almost dead) and went out and looked at the
Tank's water guage... It had received its first 70 gallons of rainwater... I
went back to sleep, happy. Later that same Saturday morning, at 8am, there came
a second wave of showers, this time I slept through them... but went out at noon
and read the water guage again... it read 100 gallons, which was more water than
the old 80 gallon tank could hold. By Monday afternoon, with several various
rains passing over, the tank was full... 500 gallons... and it even dumped 40
gallons of excess (overflow) water into the old, 80 gallon tank. So, I was now
ready for the big time...
More to come in this enduring saga
of man and nature.... so.... stay tuned.
Gig