
SeGuruCool
The Largest Independant Solid Edge Resource Outside UGS
|
SeGuruCool The Largest Independant Solid Edge Resource Outside UGS |
|
Part 1 of 2 www.oocities.org/SeGuruCool  segurucool @ indiatimes.com segurucool @ indiatimes.com |
|
|
|
Welcome to the world of parametric modeling with Solid Edge ! The old days of creating static 2-D drawings of your designs is over. Along with advanced functionality, there are a few more considerations to be made when creating geometry than just layering schemes and line fonts. In order to create a flexible and reusable solid model, there are certain standard methodologies that should be used. The following list of rules will help the novice user and 3D expert alike, generate robust and solid models. These 10 rules can save hours of work each day by saving drafting (layout) time, ensuring adherence to company standards, and allowing changes to be easily absorbed, with little effort on the your part. |
 Feature Dimensioning Feature Dimensioning In Solid Edge, dimensions placed in the skether mode appear as-it-is in the final drawing. Due to this fact, two issues arise :  tool. tool. Dimensions can also be placed in the drawing view but they cannot drive the model like dimensions in the sketcher. |  |
|
Take care that dimensions do no go out of the sheet borders (1) and encroach into other views (2) |  |
|
Don't Do it in the Sketcher Do not use too many fillets or chamfers in the sketch. Always apply treatment features to the solid model. By using too many entities in the sketcher, the model takes more time to regenerate, since it has to resolve more constraints and geometric relationships that Solid Edge applies for you. Additionally, you have the benefit of automatically placed dimensions. |  |
|
Take for example a fillet used in a sketcher. Here you have to explicitly apply a radius dimension. On the other hand, using the Round tool, you have a dimension placed automaticlly. | 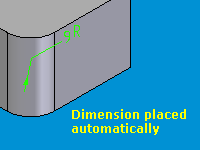 |
|
Capture Your Design Intent - Dimensioning Solid Edge is different from other cheap drafting programs, in that it helps you capture the design intent into the solid model. Take for example - a pipe. What is more important in the desing of a pipe ? Usually, its the later one. Wall thicknes is an important design criterion since it determines the amount of pressure the pipe can handle safely. |  |
|
And how does Solid Edge helps capture this design intent. The variable Table (Tools > Variables > Variables...) enables the user to create equations that control the relationship between new dimensions and other dimensions or between the new dimension and a non-dimensional variable. One example of this would be to have the wall thickness defined by the amount of pressure it must contain. In this example, the input (pressure) is not a dimensional value. By adding a value "pressure" to the variable table, it may be used to calculate the dimension for the wall thickness. The Variable Table allows you to link dimensional and non-dimensional values of featured between part files too. This enables you to percolate design intent established in one part throughout an entire assembly. To read an indepth tutorial on how to do this, Click Here Further, if you are comfortable with Visual Basic programming, you can include entire modules as functions to calculate dimensional values in the variable table. Read another indepth tutorial Here. Capturing desing intent, the possibilities are endless, courtsey Solid Edge. | 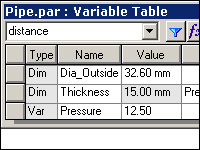 |
|
Make the Base Feature Symmetric In Solid Edge, making a base part symmetric about the two reference planes is not only a good practice but also extremely easy. Making a base feature symmetric about reference plane saves you hassle of creating another reference plane later, just to mirror features like holes or bosses. A quick way to do this is by using the Horizontal/Vertical constraint. Simply pick the midpoint of a vertical line (see figure) |  |
|
Then pick the endpoint of the horizontal reference plane. (see figure) Similarly, do this for the horizontal edge. This makes the base feature symmetric about the two reference planes. |  |
|
Create Drafts as Early as Possible Some features, by their nature, should be applied early in the modeling process. Draft features are such an example. A draft feature allows you, the deisner, to draft or taper a face or group of faces, so that the model can be extracted from a mold. Once an edge has been rounded, a surface that borders it cannot have a draft appplied. This makes it important to apply drafts before fillets. |  |
|
Draft featues rely on sharp corners to use as hinges for the surface to be drafted. For that reason, it is advisable to create drafts as early as possible, in order to avoid difficulties when creating draft walls. Begining Solid Edge V15, protrusions have draft value available, to allow creation of the drafted side walls. |  |
|
Click Here to go to part 2 |
|
Tushar Suradkar segurucool @ indiatimes.com |
 Download FREE 6 chapters & source code