
SeGuruCool
The Largest Independant Solid Edge Resource Outside UGS
|
SeGuruCool The Largest Independant Solid Edge Resource Outside UGS |
|
www.oocities.org/SeGuruCool  segurucool @ indiatimes.com segurucool @ indiatimes.com |
|
|
|
In this tutorial you learn : It is assumed that you are familiar with the basics of Solid Edge Part modeling. |  |
|
Surfaces from External Sources The source of our surface for this tutorial is AutoCAD. First we will outline the steps in creating flat and round surfaces in AutoCAD. We then highlight the limitations of surface modification in AutoCAD and import it in Solid Edge. |  |
|
Surface in Wolrd UCS Fire up AutoCAD and create a rectangle in the World UCS and explode it. Using the 3DFace command, create a face using the four sides of the rectangle. |  |
|
Surface in Front UCS Similarly, create another flat face in the front UCS. Then in the left UCS, create an arc. |  |
|
Arc in Left UCS Move the two planes to the ends of the arc as shown. |  |
|
The Round Surface Using the EdgeSurf command, create the round surface. See figure. |  |
|
The Other Surfaces Similarly, create the other surfaces as shown in figure. The problem lies here. There seems to be no command that would create the corner round equivalent of Solid Edge in AutoCAD. | |
|
The Corner Round Using the 3DFace command again would yeild a flat face as shown in figure. This can be created easily in Solid Edge using the Bounded Surface  command. command.
|  |
|
Limitations and Workarounds in Import-Export 1) AutoCAD 2D drawings can be opened in Solid Edge Draft but not in the Part environment. 2) AutoCAD files with solids can be exported as ACIS (SAT) files, and Solid Edge can import ACIS (SAT) files. 3) But, surfaces in AutoCAD don't use the ACIS kernel and cannot be exported as SAT. 4) Next, Solid Edge can also open IGES files but AutoCAD can't export to IGES. 5) But, But , But... 3D Studio MAX/VIZ from the makers of AutoCAD can import a DWG file and can export to IGES which Solid Edge can open. So 3D MAX seems to be a bridge between AutoCAD and Solid Edge. MAX 3.1 can open dwg files upto R13 only, MAX 4 can open ACAD 2000 files and probably MAX 6 can handle ACAD 2004 files. In 3D Studio MAX/VIZ, the AutoCAD surfaces are imported as editable meshes and don't export to IGES surfaces directly. NURBS can be exported to IGES, but editable meshes cannot be converted to NURBS direcly. Right click the imported surfaces and convert them to editable patch. Again right click on the patch objects and convert them to NURBS surfaces. Only after converting to NURBS, the surfaces can be exported as IGES surfaces. Download (575 kb) the AutoCAD 200 drawing, SE 14 part, 3D Studio MAX 5 scene and the IGES file. | |
|
Import IGES in Solid Edge Fire up Solid Edge and open the IGES Document (*.igs) In the Open dialog box, click the Options... button. In the IGES Import Wizard - Geometry Type, Select the Surfaces and Solids only option. Ckeck off all the check boxes. In the Stitching step of the wizard, select the Do not stitch or heal option. You might lose the flat surfaces in the process, but we can easily create them in Solid Edge. See figure. |  |
|
The Corner Round The corner round feature in SE works with solids. So, use the Bounded Surface feature on the Surfacing toolbar. Select all the edges and click accept  on the ribbon bar and then Finish. on the ribbon bar and then Finish.
| 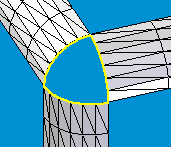 |
|
Surface Healing The bounded surface is created but it is very faceted. You may want to create three Derived Curves  and then use them to create the bounded surface. and then use them to create the bounded surface. Here, the purpose is not to create a smooth surface but to close the opening in the surfaces. This is called Surface Healing of (wounded/open) imported geometry. |  |
|
Out of Control For this tutorial, we created a noticeably large opening in the surface to import. Noramlly, Surface Healing would come into picture when you have legacy data from outdated solid modelers and the only option to get it into Solid Edge is via the IGES surface route. In such cases, there are no large openings, as in this tutorial. But, there can be very small slivers (not silvers) where two curved surfaces meet. So how do slivers appear when the imported file was a solid model ? This is because the IGES traanslator reads solids as surfaces and if the model to import has very sleek features, like rounds with very small radius or small chamfers, etc, then they fall out of the tolerance zone. |  |
|
Solid Edge can Control Solid Edge can take care of the tolerance thing by offering to set the tolerance limit in the Stitches step of the IGES Import wizard , but again we didn't opt for it in this tutorial. |
|
Stitch it After the bounded surface is created, the next step is to turn it into a solid using the thicken command. Prior to that use the Stitched Surface  tool on the surfacing toolbar and select all the surfaces. The Surfaces are now stitched. tool on the surfacing toolbar and select all the surfaces. The Surfaces are now stitched. Solid Edge also offers to stitch in the IGES Import Wizard and in the Stitched Surface feature, but again we didn't opt for it for this tutorial. Finally use the Thicken  tool on the Feature toolbar to turn the surfaces into a solid. tool on the Feature toolbar to turn the surfaces into a solid.
|  |
|
Tushar Suradkar segurucool @ indiatimes.com |
 Download FREE 6 chapters & source code