
The Marijuana Connoisseur's Cabinet
There are lots of reasons to grow weed. I
wanted to grow to keep my spouse and I in fresh supply of gear. I’m not into dealing,
or being around real dealers. Growing makes us independent of outside suppliers and even
less likely to get caught if done correctly. We needed our grow to be done in our home,
and it needed to be extremely stealthy. I want to grow, but I don’t want to go to
jail. Growing aside, I am a standup citizen and I want to keep it that way.
With this in mind, I set out to build the smallest grow cabinet I could.
I believe in understanding the requirements of any project before undertaking the design,
so here is a general list of my requirements for this cabinet:
· Must be completely stealthy. The smaller the better was the primary design force.
· Must supply two regular smokers plus occasional friends.
· Must support bonsai mothers as outlined in Oldtimer1's Overgrow article <http://www.overgrow.com/iss3/mums.html>.
· Must adapt to a variety of growing methods, but in particular Shallow Water Culture (SWC) SCreen Of Green (SCROG). This method is outlined later in this article.
When we relied on dealers to supply us, my spouse and I
typically smoke about 15 to 25 grams per week of poor quality bud. When we started growing
and had top quality bud to smoke, the two of us smoked about 10 to 15 grams per week.
Knowing how much smoke your situation will use will help in designing the best-sized
cabinet. I figured 10 weeks per harvest at 15 grams per week equals 150 grams of bud. To
get that, the cabinet has to support at least 150 watts, but preferably upwards to 300
watts of HID lighting. Using an average of 50 grams per sq. ft., I decided that 3 sq. ft.
of flowering room would be good.
Visualize and plan your new growing space
My requirements for the cabinet looked like they could be accommodated in about the size of a 36-inch TV box. Actually, I had a strong desire to make sure the box could fit in such a box. What if you need to move? Most people throw away their TV boxes, but I kept mine and it now works great as a skin around my growing cabinet. When we move, it will be easy to keep the mothers safe from point A to point B.


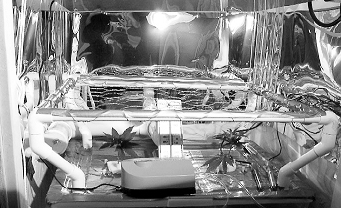
The cabinet is divided into 3 separate chambers, each serving a different role. The utility room is located in the top left chamber and holds the lighting ballasts, main electrical wiring harness, exaust fan, timers, and a place for air freshener gels. The mother room is located in the bottom left chamber and is designed to hold upwards to 6 or so mothers. Notice the room is only 8 inches wide. The mothers will do great in such small quarters. The flowering room is located in the right chamber and is just big enough to accommodate a custom air cooled hood as outlined in Jackerspackle's article, and a mini-scrog that will accommodate 10 inch buds.
Keeping everything fresh and flowing
Airflow is important, but I wanted it to take up as little space as
possible. The cabinet is designed to use an exhaust fan because I wanted a negative
pressure environment. This keeps smell from leaving the box from any place other then the
exhaust fan.
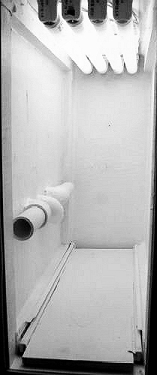
Air enters the cabinet via the mother chamber. I used 3 1-inch PVC pipes to provide the
air inlets. This lets me route the air to different parts of the mother chamber. Figure 3
shows the air inlet holes. Air flows in through each hole and is directed throughout,
effectively cycling all of the air in the mother room. The PVC also keeps the light from
the mother room from glowing out the side of the box.
 Getting
the right equipment
Getting
the right equipment
Air leaves the mother room via a 2 inch pvc pipe that wraps around the walls of the
flower chamber to the back and into the center of the room. This places the air inlet for
the flowering room directly under the screen and buds and then flows directly upwards
towards the air-cooled hood. This also provides enough bends to keep light from the mother
room from getting into the flowering room during the dark period. It also puts the air
right where it is needed, in the buds. This helps eliminate any problems with bud mold.
Finally, air is sucked out of the flowering chamber into the utility chamber via
another 2 inch PVC pipe that is attached to the air cooled hood via metal hosing used for
driers. PVC was used for least resistance. Dryer hose causes drag, while the smooth
surface of the PVC makes airflow easier.
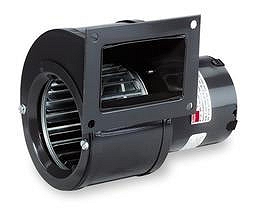
The power behind this is the 150 cfm Dayton pole fan shown in the above photo. You cannot
get this at the Home Depot, buy you can get it through Grainger. This thing works so well that the air inlets for the mother
chamber can hold up a piece of paper no problem. It’s like a vacuum cleaner. The
mother chamber gets fresh air, the flowering chamber gets fresh air and keeps cool, and
the utility room is able to vent heat from the ballasts; all from one fan.
 Shallow
Water Culture - not your ordinary bucket
Shallow
Water Culture - not your ordinary bucket
I find hydro to be easier to deal with then soil. It is true that it reacts quickly to
bad mistakes, but it equally responds to kindness. Also, soil is messy, and I don’t
want to deal with buying soil for my grows. Let me explain the way I came about this hydro
setup.
Of course I owe all of my new knowledge of growing to Overgrow, and one of the great
things about this site was 10K’s contribution of the cheapo-areo-cloner. I built one
and thought it was great, but wondered what would happen if you let the clones stay in and
gave them more light and nutrients. The result? Bonsai mothers hydro style! They thrived,
and I was able to control the roots by giving them haircuts once every 6 to 8 weeks. The
only problem was that the “reservoir” size was too small for full growth and
flowering. So, I basically bought a bigger version of the areo-cloner reservoir and used
it for the entire harvest.
One of the properties of the aero-cloner I like is its lack of any growing medium or cups.
I hate rockwool, grow rocks, and cups! The aero-cloner simply rests the roots from the
stem directly into the water. Support is supplied via the air hose it is hanging in. It
cannot get any simpler or cleaner then this. For the larger version to take the plants all
the way through to harvest, I figured the air hose support wasn’t going to work. What
would happen when the trunk got too thick?
 Supporting
the impending buds
Supporting
the impending buds
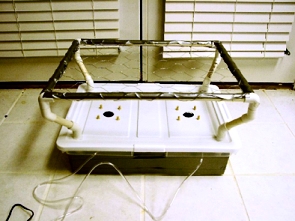
In this SWC design, support for the plant is provided with 3 different
mechanisms. First, when the clones are first taken, they are supported by a strip of foam
rubber. 1.5 inch holes are cut into the top of the reservoir for each plant and the foam
rubber fits snuggly into each hole, clasping the clone and blocking light from entering
the res. While the clone is small, the foam rubber “plug” is enough support. As
the trunk gets thicker, the foam rubber will give way and squeeze as needed.
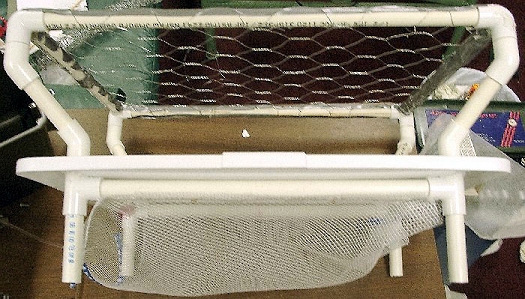
The main reservoir is made out of a 7 gal. Rubbermaid tub. The screen is
made out of 1 inch PVC piping, and is attached directly to the top for the tub. Figure 5
shows how the PVC pipes actually go through the cover. This helps to provide support to
cover for weight. The weight of the screen is actually resting on the PVC legs on the
bottom of the res, not on the cover.
As the clones grow roots and fill the reservoir, the root net provides support for the
root weight. As the roots get bigger, the bulk of them will sit on top of the net and grow
through. When lifting the cover with the plants off of the reservoir, the net will help
hold the weight of the plant roots. Finally, as the plants grow towards the screen, the
branches are trained and tied down with twist ties to the screen. This further provides
support for the plant. Once the plant has started to fill the screen, the foam rubber is
simply blocking the light and no longer provides any support.
All in all, this SWC design only uses 6 inches of height for the reservoir, thus the usage
of the term shallow.
Putting the bloom reservoir together
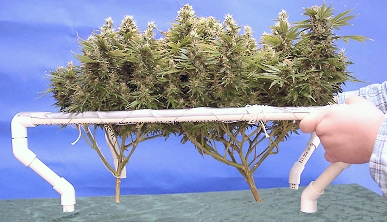 I
glued all of the PVC pipes into the elbows except for 8 joints. This allows the screen to
be removed from the top, and to break down even further for storage when needed. Figure 6
shows the screen removed from the top, which helps greatly when taking in the harvest. By
cutting the trunks and removing the screen from the top, the buds are quickly separated
from the roots and ready to be stripped for drying. The cross bar PVC pipes directly under
the cover and the T-fittings are glued to the cover using at hot glue gun. The top corners
of the screen are made with 90 degree elbows. The crossbars are simply glued to the sides
of the elbow.
I
glued all of the PVC pipes into the elbows except for 8 joints. This allows the screen to
be removed from the top, and to break down even further for storage when needed. Figure 6
shows the screen removed from the top, which helps greatly when taking in the harvest. By
cutting the trunks and removing the screen from the top, the buds are quickly separated
from the roots and ready to be stripped for drying. The cross bar PVC pipes directly under
the cover and the T-fittings are glued to the cover using at hot glue gun. The top corners
of the screen are made with 90 degree elbows. The crossbars are simply glued to the sides
of the elbow.
The reservoir water is supplied with air via aquarium air pumps and bubble wands
or air stones. I am currently using bubbler wands as I find them more reliable
and easier to deal with the heavier air stones. The bubbler wands should be replaced every
other harvest for maximum air supply to the roots.
 Sand the
bottom of the tub where the bubble wand ends are located and glue them down to the bottom
of the tub.
Sand the
bottom of the tub where the bubble wand ends are located and glue them down to the bottom
of the tub.
Drill holes towards the top of the tub for the airlines to go into the tub and to the
bubble wand. Remember that your water levels must stay below these holes, so make them as
close to the top as you can. Keep the hood on the tub while drilling to make sure the
cover will still fit over the tub with the airlines in the holes.
I taped the cover and tub with 3 layers of duct tape. Notice that I left a gap along the
top of the tub. I did this so that I can see the water level and bubbles to verify all is
well.The water moves through this system too fast for algae to be a problem. After a
complete grow, I never once saw any signs of algae.
Shallow Water Culture parts list
Woodworking 101: Building the Cabinet
Before attempting to build the cabinet, make sure you have the space
and the tools to do the job. There is some real work involved with the creation of this
cabinet. I am not a master carpenter and this project took me about 2 weeks to complete on
a part time basis. I am not going to outline the step by step process of how to build a
cabinet like this. If you need that kind of carpentry knowledge, go to Home Depot and
pickup a book on how to build cabinets.
I used ˝ inch B/C plywood and ľ inch hardwood to build the cabinet. I didn’t intend
for the cabinet to look good on the outside, but rather to sit in something that looked
good. I am currently storing the cabinet in a cardboard TV box, but it could easily be put
in a wall (best place if you ask me), or have it sit on a large shelf. I believe that the
cabinet “facing” should be unique to the grower to help ensure stealth. Some of
the possible facings this cabinet could have:
Use the ľ inch hardwood to frame the inside of the box. This provides
structural strength and makes it easier to make the cabinet chambers air tight. Use
silicon sealant around the seams of the box to further make the cabinet air tight.
Both the mother room and the flowering room have sliding shelves at the very bottom to
allow the plants to slide out and be easily accessed. The 100 lbs kitchen drawer slides
work well. With the reservoir full of water, and the plants in full bloom, they still
don’t weight too much for the shelves to slide out completely. Also, the box weighs
enough to not tip over with the shelves extended out.
Cabinet Construction parts list
Rather then trying to cut all of your plywood during construction, have
the hardware store you bought the plywood cut the pieces for you:
1/2 inch B/C plywood:
ľ inch B/C plywood:
For air circulation, I used 1” pvc for air into the mother chamber and 2” pvc to connect the mother room to the flowering room and the flowering room to the utility room.
2” pvc parts:
Miscellaneous parts:
When I started constructing the cabinet, I began from the bottom up. While fastening the hard wood, use plenty of wood glue and wood screws. The hard wood strips also serve to reinforce air containment to the box as it helps to seal the joints between the plywood. This picture shows various points of interest of the cabinet construction. Remember the old adage, measure twice - cut once.
 Cabinet
Lighting System
Cabinet
Lighting System
This cabinet uses two different sets of lights. The mother room is
powered by 4 15 watt fluorescent bulbs while the flowering chamber is powered by a 150
watt HPS. The choice of fluorescent bulbs for the mothers was fairly straightforward. The
150 watt HPS was a more difficult choice.
I was hoping to achieve the 1-gram per watt measurement with this box so a 150-watt would
meet my demands. I could have gone with a 250 watt HPS and probably gotten a slightly
larger yield but I think the grams per watt ratio wouldn’t have been as good. Later,
I will show an example yield from this box with a 150-watt HPS and I think you will be
impressed with the results. Besides, a 150-watt bulb generates less heat and uses less
electricity. The heat issue is important as ganja does well at 70 degrees Fahrenheit,
which can be done in this box with a 150-watt bulb.
Both the fluorescent and HPS ballasts are kept in the utility room. This keeps the mother
chamber and flowering chamber cooler. Between the two sets of lights, the box uses
210-watts of electricity when both light systems are going. Having the mother room’s
fluorescent lights using a remote ballast helps keep the mother room at external
temperatures.
With the Dayton 150 CFM blower, the flower chamber was able to lower the temps by about 16
degrees from what the box would be without the blower. With external temps running around
72 degrees, the flowering chamber averages 72 to 74 degrees just below the lamp.
 Building the 150 HPS grow light
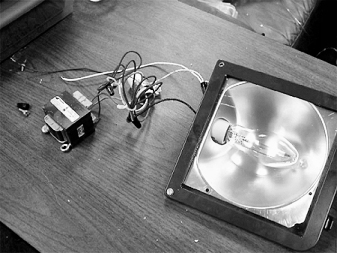
I went with a 150 watt HPS security light bought easily at any home
improvement type store (such as Home Depot, Lowes, Home Base, etc). I got mine for $79 at
Home Depot.
Turning the security light into a remote ballast horticulture light is very easy. I bought
a 2-dollar metal meatloaf pan and put the ballast and starter in there and bolted
everything down. I used a 5-dollar extension cord for the wiring. I wired a female plug to
the wiring that the bulb socket plugs into. The hood and socket are wired to a normal male
extension cord allowing the ballast and hood to be separated as needed. This picture shows
the hood and ballast after final construction.
Building the fluorescent grow light
I found it easiest to just buy 2 cheap 2-foot/2-bulb fluorescent shop
lights and dismantle them rather then trying to buy the ballast and other pieces
separately. The ballasts in these lights can handle a range of bulbs, not just the 2-foot
ones. I bought 4 18-inch/15-watt fluorescent bulbs which work fine. This adds up to
60-watts of fluorescent light rather than 80-watts with the 20-watt bulbs. Each bulb
produces about 850 lumens, for a total of 3400 lumens. This is plenty of light for the
mothers.
Grounding is very important for fluorescent lights to work properly. If
you don’t wire the ballast and bulb sockets correctly, the lights wont turn on when
power is applied. It is important to make sure grounding makes it all the way to the
sockets, not just to the ballast. Normally, the entire metal housing serves as ground for
both the ballast and the sockets. Separating them means you must wire the ground from the
ballast to the sockets. This is accomplished by bolting a piece of sheet metal to the top
of the mother chamber and having the bolts go through the sockets from the bulbs to the
utility room. Ground the bolts from within the utility room and the lights will turn on
instantly every time.
Cabinet Airflow Setup Details
Using PVC for the air-ducts produces the smoothest path possible for air-flow through cabinet. This is an important factor because there is considerable drag put on the exhaust fan due to the plants, light hood, and the fact that the air is moving through three separate chambers. Ultimately, there should be a small amount of air-drag because we want any small, unintended, holes in the cabinet to have air sucking in through them rather than blowing out through them. Remember, air management needs to consider smell, as well as cabinet temps and fresh air for the plants.
Step 1: Setting up the initial air-inlets
 The mother chamber is a long rectangle, which provides an interesting
challenge to keeping a fresh supply of air to the mothers. If the air inlet isn’t
placed properly the mother room would require a small fan or there would be small dead-air
pockets in the foliage of the mothers. Rather then having one larger air hole to the
mother room on the side of the cabinet, I created 3 1-inch holes in a horizontal line
across the outside of the mother room.
The mother chamber is a long rectangle, which provides an interesting
challenge to keeping a fresh supply of air to the mothers. If the air inlet isn’t
placed properly the mother room would require a small fan or there would be small dead-air
pockets in the foliage of the mothers. Rather then having one larger air hole to the
mother room on the side of the cabinet, I created 3 1-inch holes in a horizontal line
across the outside of the mother room.
Each hole is fitted with a 90-degree elbow and 4 inches of PVC as shown in this picture.
Be sure to position the PVC so that the air coming in through each is flowing through proper places in the room. Locating them near a mother is best and ensures that the mother is getting access to constant fresh air.
 Step 2:Setting up air-flow to the flowering chamber
Air flows from the mother chamber to the flowering chamber, which has
to deal with the fact that light will be on in the mother area when the flowering room is
in complete darkness. Light should not leak into the flowering room or the crop with be
threatened. This can be dealt with by placing 4 90-degree elbows in the vent between the
mother and flowering chambers. Given the need for so many elbows in such small quarters,
the air inlet to the flowering room can be optimally positioned to provide the best air
flow possible to the screen of buds. Given the desire to have air flow from the bottom of
the room, through the light and out the top, the best place for the air-intake is directly
under the middle of the screen. This causes there to be a air vent “arm” jetting
out of the back wall and between the water reservoir and the screen - as well as between
the two plants.
Painting the PVC black doesn’t seem to be a necessity. My first harvest was done with bare PVC. It didn’t seem to affect the harvested yield. In operation, light can be observed coming from the flowering chamber through the walls of the PVC when the 150-watt HPS is running. However, the light from the bank of 18-inch fluorescents isn’t powerful enough to penetrate the PVC pipe. You might opt to paint the PVC with flat black paint anyway, just to quell any paranoia you might have about light leaking into the flowering room. I used a product called “liquid nails” to fasten the pipe to the walls of the flowering chamber. This works better than trying to strap and screw the pipe to the walls, which might affect the air integrity of the room.
 Step
3: Setting up the flowering chamber air exhaust
Step
3: Setting up the flowering chamber air exhaust
Air leaving the flowering chamber needs to flow through the air-cooled
hood first (or it wouldn’t be an air-cooled hood, now would it ;-) ). The air cooled
hood should have a grid of holes on the opposite side of the hood from the vent to the
utility room. I routed 2-inch PVC from the utility room around to the other side of the
flowering chamber. This was due to the fact that the wall between the utility room and the
flowering chamber is fairly well packed with the fastened power strip and ballast wiring.
There just isn’t enough room for the air vent setup on that side.
About 10 inches of flex duct is needed to connect the hood so that it can be raised as
needed during the grow. I should say that my first grow was done without this. During
operation, even without the flex duct, the sucking power of the air exhaust was capable of
pulling heat from the hood fairly well. Hooking up the flex duct causes air temps to be a
few degrees lower. I kept external room temperatures at 70 degrees, so not having the flex
duct was ok. If the room temperatures were kept at 75 then the flex duct would be an
absolute essential.
Air-flow setup conclusion
With the squirrel cage fan installed in the utility room and the doors closed, air should flow nicely from the mother room, through the flowering room and light hood, and into the utility room. It should be obvious that the air-flow system will not operate correctly while the doors to the various rooms are open. With the door to the utility room open, little to no air is moving through the mother and flowering chambers. With the door to the flowering room open, little to no air is moving through the mother room. Having the mother room door open does not affect air flow much, but if kept open no fresh air will get to the back of the mother room.
 Utility
room setup
Utility
room setup
To provide power to the cabinet, I took a heavy-duty extension cord, cut off its female
end, and wired it to a 2-gang metal box mounted to the side of the utility room. Make sure
the extension cord is made from at least 14 gauge wire and that it is properly fastened to
the box and plugs.
I placed the ballast for the HPS below that, and the ballasts for the mother room
fluorescents in front, but behind the fan. The flowering room powering strip can be
plugged in through a hole cut out to the flowering room (which should be filled with
something like silicon).

Air-tight/Light-tight
Once the box is running, make sure the box is both air-tight and light-tight. You should see no light leaking from anywhere around the box. This can be a challenge around the doors, but a little weather stripping will do the job.
Weather stripping is applied around the door opening to help create a good seal when the doors are closed. Count on needing to change the stripping, as it wears from use.
First Harvest Report
After 3 weeks of curing, the total dried weight of the buds came in at
110 grams or just 2 grams shy of 4 ozs. That’s a QP of quality bud sticks! This next
picture shows the dried harvest with a standard bic lighter as a reference. About 3 oz
came from the longer buds, and the rest of the weight was in loose buds. The high of the
Silver Pearl is very strong. That amount of bud is more than enough to keep me and my
partner happy until the next harvest.
After looking at the first grow, I am happy with the choice of a 150-watt HPS. I think the
250-watt would have produced too much heat, and it probably wouldn’t have produced a
good gram per watt result like the 150-watt did.
This grow also showed me how important clone selection is. I started with only 6 cuttings
from the mother and took the best two. However, those two clones were not identical in
development. One clone was about 15 to 25 percent more developed than the other. This
difference became more apparent as they were grown out. At the end of the harvest, the
smaller clone didn’t produce as much as the hardier one. I now believe the more
cuttings you take, the better. I would probably try to have 12 to 16 cuttings to select
the best, most equal, clones for flowering.
Conclusion
After a successful harvest from the box, I am happy that everything
worked out well. When growing in such confined areas, a significant amount of imagination
and ingenuity has to be applied to get a successful system running. As well as this box
produced, there are several areas for improvement.
The biggest drawback I have with this box is the watering schedule the mothers need. Doing
bonsai mothers in small soil grows means they need watering almost daily or every other
day. This can be a real hassle when going on vacation. These mothers are supposed to last
for years, so sooner or later watering will become an issue.
I have done some good experimentation with hydro bonsai mothers and was able to maintain
them quite well in an aero-cloner style device. Bonsai size was maintained through regular
(every 4 to 6 weeks) root trimming. The hydro mothers seemed to be able to go 7 to 10 days
without having to water in a fairly small reservoir. I am planning on replacing the soil
mothers with hydro mothers in this box and seeing how they last over the long hall. This
would ultimately be an easier system to deal with. I recently cut back the roots on my
soil mothers and found the mess a bit unruly. With hydro mothers, this box would have
almost no waste materials other than clippings from the plants.
Written by NewGanjaBoy.
![]()