Building A Robotic Arm
Page 1
Cut off 16-1/4" from a stock 1 by 4 piece of wood. Place the caster in the middle 4-1/4" from the end of the wood. Hot glue the caster in place; this will hold it in place while you drill the pilot holes. Now drill two pilot holes and screw the caster base down using two #6 1-1/8" drywall screws.

The wood used for the rail is call a furring strip. Although all stores say it is 1" by 2" by 8'; the true size will vary from store to store. The strip I am using is about 1-14/16" wide and 3/4" thick. I used this type of wood because it seems to have the least amount of warp and bow. Cut a 60-1/2" long piece.
Next we want to make wooden rollers for the arm. Using a 1 1/2" circler hole blade cut a hole in a 3/4" thick piece of wood. Take out the wood (see photo) from the blade. This will be used as a roller. Make four of these rollers. A "16D 3-1/2 inch" nail will become the shaft of the roller.

Cut two 3/4" thick pieces of wood 3 1/2" by 5 7/16". Place a roller near the back top of the wood. Place the rail in front of the roller. Now place the wood with the caster against the wood that has the roller on it. Keeping everything parallel, move the rail so that it touches the caster. Move the roller so that it touches the rail. Hammer the nail in the center of the roller but not too far in because you will be pulling them out later. Now do the same for the rest of the rollers making sure they are tight against the rail.
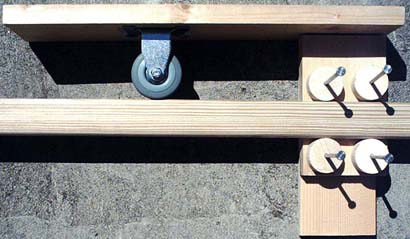
Remove the rail and then remove the four nails from the wood. Using the nail holes as a guide drill four pilot holes in the wood. Take the 2nd piece of wood you cut and clamp it over the 1st piece. Now drill the four holes thru the 2nd piece of wood as well.
Nail the four 16D 3-1/2 inch nails into the four holes in one piece of wood. Put the four rollers and rail back in place.

Take the 2nd piece of wood and hammer it in place over the 1st piece of wood. You will have to play with the 2nd piece of wood a little until it is close to the rollers but yet the rollers can spin freely. Slide out the rail.

Cut another piece of wood (about 3 1/2" by 2 1/4" ???) that will cover the side of the roller section. Using a panel nail (the type of nail that is use to put up wood panels in a house. The length used here is 1 5/8") nail the wood in place. Now cut off all the nail ends that are sticking out.
Now using four 1-5/8 panel nails, nail the roller section to the top middle of the wood with the caster.

Slide the rail back into the roller section. There will be spots that will bind against either the rollers or the side of the wood. Using sandpaper (best if the sandpaper is mounted to a block of wood) sand down the spots on the wooden rail where it is binding.
Next Page
Home Page