 Webpage
Tree's
R1100RS Webpage
Some
odds and ends for your BMW R1100RS .

German crashbars for
the R1100RS
. . . . . . . . . . . . . . . . . . . .
. . . . . . . . . . . . . . . . . . . . . . . . . . . . . . . .
.
Improve your sidestand
. . . . . . . . . . . . . . . . .
. . . . . . . . . . . . . . . . . . . . . . . . . . . . . . . . .
.
Poor man's Lexan
shield
. . . . . . . . . . . . . . . . . . . .
. . . . . . . . . . . . . . . . . . . . . . . . . . . . . . .
Have you ever wanted better protection for your oilhead's top end ?
It can be expensive to find out the hard way, I heard one quote of
$ 4000 for shop repairs to a bad hit , and that was not even a lay down
.
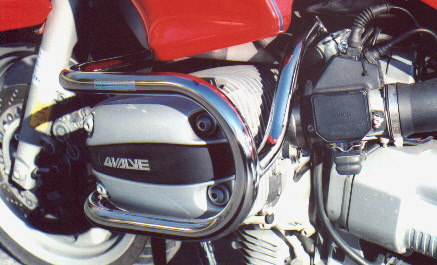
Well, there is good news. Check out a German company that makes crash
bars for various cruisers and a lot of the BMW models. They are Fehling
metalfabrik, and can be found on the web at
www.fehling.de
They
have good pix and all prices ( listed
under preise ) .
. . . . . . . . . . . . . . . . . . . .
. . . . . . . . . . . . . . . . . . . . . . . . . . . . . . .
When you order,
this is the catalogue item you want . . . .
Zylinderkopfschutzbügel
3 tlg. 7174 Z BMW R 1100 RS
Paar
178,15 206,65
or translated . . . .
( cylinder crash bars
3 pieces # 7174 Z BMW R 1100 RS
Price
DM 178.15 (export price to you) or DM 206.65 (if bought
inside Germany)
( 178 Marks
equals about $ 110 US at the moment ... not a bad deal eh ! )
. . . . . . . . . . . . . . . . . . . .
. . . . . . . . . . . . . . . . . . . . . . . . . . . . . . .. .
. . . . . . . . . . . . . . . . . . . . . . . . . . . .
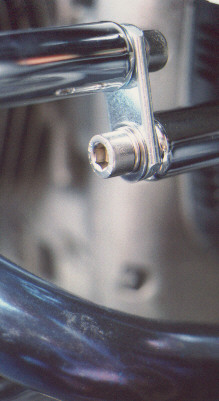
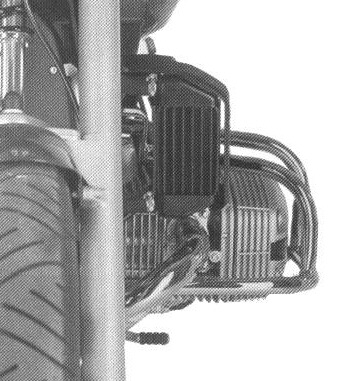
These bars mount low at the front through the empty bolt hole in the casting
at the front bottom of the engine, and high at the rear where the rear
subframe bolts to the engine . There is a crosstube joining both
halves high at the front. You can see it under the telelever arm in the
picture.
It took me about an hour to install them. Chrome
quality is first rate , as you would expect from the Germans,
and the bolts are plated hex and allens. I
replaced six of the hex bolts with stainless 10mm allen bolts 25 or 30mm
long (length is not critical for these).
Yes, I admit it . . . . I'm a stainless nut , there
is no other substitute for me.
Go for the stainless !
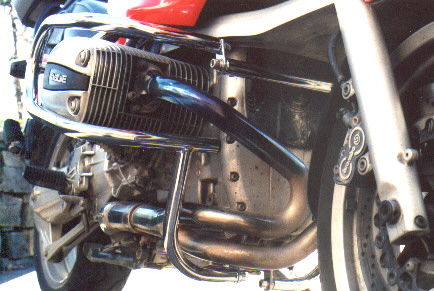
The only problem I had was the need to reroute the right throttle
cable lower through the fuel lines to give it more slack. I found
that out when I fired it up and the bike ran verrry
rough.
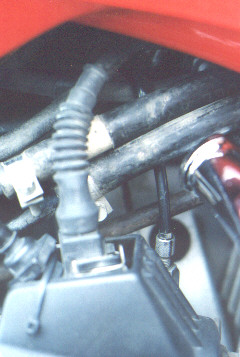
Cable
routed under fuel lines and over others farther in.
Before you take off the right throttle cable,
here's a tip that may save you some grief. Use a sharpie pen and mark the
adjuster with a vertical line on the sleeve , then count how many turns
it takes to back it out counterclockwise and remove it completely.
This lets you reinstall it very close to the original position ).
You will still need to sync both sides later.

Sharpie line drawn on sleeve
Disconnect
it at the pulley end ( use a 10mm wrench to loosen the cable adjuster
locknut at the throttle body ) and play around and reroute the free cable
end till you find a shorter and straighter path to the pulley.
I tuned the throttle bodies for sync at 2000 rpm with my mercury
carb stix by
adjusting the right cable only. Then go back
down at lowest rpm idle ( and MAKE SURE that
your left idle screw is solid against metal stopper bracket
) . I fine tuned the right idle speed screw with a 7mm wrench
for equal vacuum. This seemed to work just fine, and guarantees that you
have not changed the left side at all, but have synced the right throttle
body to it. ( At least that is the theory. . . . it worked fine for
me ). For more advanced throttle tuning, see Rob Lentini's tips on
the IBMWR website , BUT REMEMBER . . IF IT AIN'T BROKE , DON'T
FIX IT.
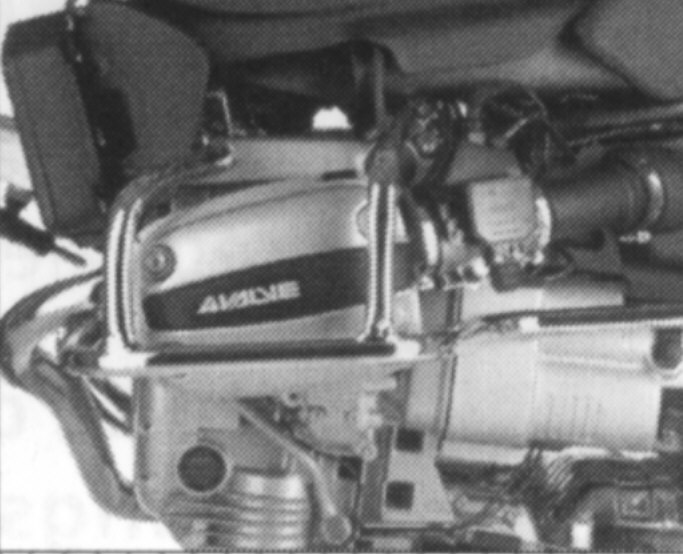
I have been getting email lately asking if Fehling makes R11R roadster bars... the answer is no. Here is a picture of ones sold by Wunderlich at www.wunderlich.de in black or chrome. Prices run 228 and 269 marks. Catalogue numbers are 8160033 C for chrome, and 8160033 S for black.
. . . . . . . . . . . . . . . . . . . .
. . . . . . . . . . . . . . . . . . . . . . . . . . . . . . .
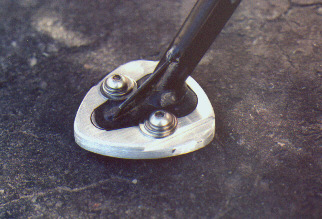
Another part I made for the RS was a larger footprint for the side stand.
This was fairly easy, took about two hours.
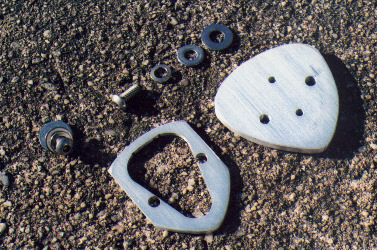
I used 1/4 " aluminum plate for the bottom piece, even 3/16" might work. Draw a shape on a piece of cardboard that you like. Cut this out and trace it on the aluminum. A sharpie pen works well for this . To cut it out of the plate, I used
a jig saw with a metal blade and wasn't fussy about being accurate, just as long as you cut oversize by staying outside the lines.
Then for speed ( unless you really like using a hand file....)
grind down the edges on a disc sander and trim to the pattern sharpie lines you have
drawn. An 80 grit disc works fine.
Trim the edges
to the final shape
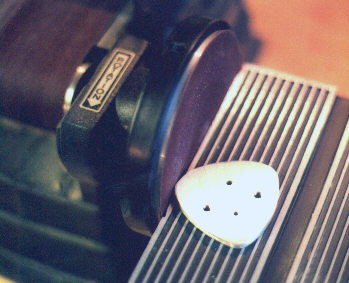
To get a nice burnished aluminum finish, lay the piece flat on the belt
sander for smooth parallel scratches. A belt with 120 grit works fine.

Burnishing the aluminum
The top piece is a little bit harder, I used
1/8 " aluminum plate.Trace the side stand foot shape on it. Cut this out with any combination that works for you.
I drilled some holes and inserted a round
carbide hacksaw blade. These are great, very
thin, only about $5, and they will cut in any direction (great for ceramic
tile to cut pipe holes). You can finish the inside with various hand
files. Don't worry about the final outside edge shape too much, you will
grind
it down flush to match the bottom 1/4" piece
once you have them bolted tightly together (off the bike).
Find some stainless bolts and washers that you like, I used 1/4 " buttonhead,
and get them overlength, 1" or less should
be fine. Drill ( and tap threads in
) the two lower holes in the quarter inch plate to fit the sidestand so
they just hug the steel edge of the stand (
use a 3/16 " drill bit for the thread holes ).
Drill the upper holes to match these with a 1/4" bit . ( I also drilled two smaller holes along the centreline to let water drain out from under the steel foot ) .
Now bolt these two pieces together tightly with all the washers and go
back to the belt sander.
This way, you can contour the whole unit as one piece and get some nice
bevels and flush edges that will match perfectly. Also trim the exposed
bolt ends down on the bottom side with the disc sander or hacksaw (
only to within 1/8 " or you will scratch the aluminum ), then
lay it down flat on the belt and you will
get a burnished surface with perfectly flush bolts that are level
with the bottom surface.
Take
it apart , bolt it on the bike and enjoy a nicer looking sidestand that
doesn't
sink into the hot pavement or dirt !
. . . . . . . . . . . . . . . . . . . .
. . . . . . . . . . . . . . . . . . . . . . . . . . . . . . .
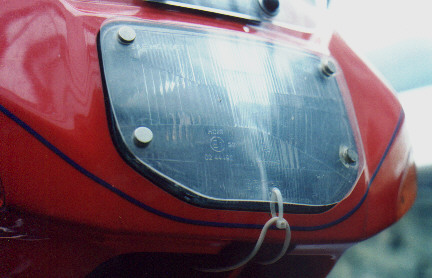
I
needed a quick fix for protecting my headlight on a trip to Alaska last
summer, was going to order a plexi cover but waited too late. I had some
2mm lexan , so decided to try fabricating one.
Cut out a piece the same shape as the headlight, then put a heat gun on
it and slowly coaxed it to bend enough for the curve on the glass.
Bought some rare earth magnets from Lee Valley carpentry , 1/2" in
diameter. These will lift 10 lbs each and are a serious magnet.
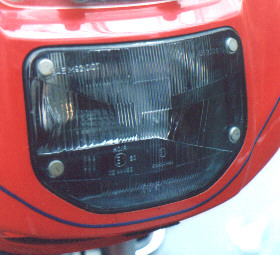
Epoxy 4 of these to the glass on the headlight, and the other 4 to the
outside of the lexan. You want the magnets to squeeze the lexan, so don't
mount them on the backside of the lexan. They will eventually lose
their bond , so use the magnetism to push the lexan towards the headlight,
not pull it.
I put
a nylon safety tie thru the lexan as shown because I didn't trust the magnets
at first . . . . but they never let go in 19,000 kms. For night riding
I put the lexan in my luggage . . . just keep it away from any credit cards
or tapes. . . these are serious suckers !
. . . . . . . . . . . . . . . . . . . .
. . . . . . . . . . . . . . . . . . . . . . . . . . . . . . .
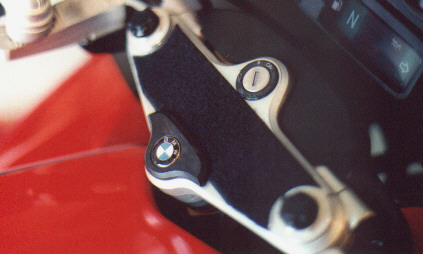
Here
is another solution to the bike keys scratching your triple clamp
problem. Take some self stick 2 " black velcro , the smooth
half , trim it to the right shape and stick it on.
Works
great.
Hope
you enjoyed this page, any comments or questions welcomed.
Email
me at: pmtree@hotmail.com
Paul
Mitcheltree - Nova Scotia
Sign Guestbook
..... View Guestbook