 There
is really no "pattern" for this quilt.
There
is really no "pattern" for this quilt.
Just start to lay out your strips in a pleasant way on a sheet or a design wall. The only planing I ever did just to make sure that I didn't have "spots" of light or dark.
Now I could say to "brown paper bag it", and you could, but I seemed to get all the same blocks in one pick when I did that.
Now you see why I said that you shouldn't worry way too much about what strips are sewn to what? Because you never know what it will be against in the quilt anyway.
If you are adding the "built in" borders that all have the same fabric, add them to the top and bottom of each row.
 First
you want to make two stacks, your zigs and your zags.
First
you want to make two stacks, your zigs and your zags.
 I
have two dark diamonds at the top. I can just flip the green one on the
top left with the rose over and put it at the bottom. This helps
to avoid "dark spots" or "light spots". Your diamonds go two
ways, one is for the left side of the peak and one is for the right side
of the peak. That is the only way they will fit.
I
have two dark diamonds at the top. I can just flip the green one on the
top left with the rose over and put it at the bottom. This helps
to avoid "dark spots" or "light spots". Your diamonds go two
ways, one is for the left side of the peak and one is for the right side
of the peak. That is the only way they will fit.
However, you can take one diamond set and flip it over top to bottom and use it in the same side. Try it, the angle will still be going in the right direction. It just gives you a little more of a choice.
You can't change the side it goes on, but you can flip it over.

It is best to start from one end and sew to the other. Why?
Because that way, you can flip your seams up or down to make it butt with the previous on on the other strip.
The first time I did this, I tried to sew the quilt in "sections" thinking I was quite keen to think of that... until I went to put it all together, and I had to twist some seams because I didn't ever think of which way the seams would be going in the next strip that it would be sewn to.
So, with some planning you can sew it in sections, but it is easier to start at one side and sew to the other side.
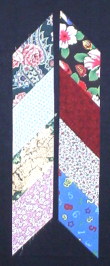
 Here
is anther sample from a class. I really liked her built in border.
She used black on the first and third rows of the border and a bright
tropical print in between the black. This was all tropical prints
and it sure did shine! I loved it.
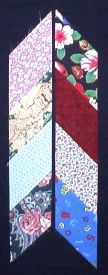
Here
is anther sample from a class. I really liked her built in border.
She used black on the first and third rows of the border and a bright
tropical print in between the black. This was all tropical prints
and it sure did shine! I loved it.You can swap strips with friends or guild members. We had a strip swap before this frenzy and I have strips from all over the world now.
Hope you enjoyed this lesson.
Send me a picture of your quilt when you are done and I will post it on the internet.