Painting Techniques
At the outset, let me make it quite clear that I'm no expert when it comes to painting figures - Far from it! However, I have fiddled around with a number of different techniques, so I thought I might just lay them out here (so to speak) for any one to try out (or not) as they please.
The Block Technique ("Wargaming Standard")
The simplist method I have used on the vast majority of my figures, like 99% of the plastic ones, is just 'block painting'. That is, nice and simple, no shading, nothing fancy, just one colour for one area. This is the way most folks do it, as it requires the least amount of time. I just prepare the plastic figures, and paint away.
I started using enamel paint (of which I had a heap left over from my aircraft modeling days), but I have since realised that it's a lot easier, cleaner and over all nicer to use acrylics, as you don't have to use smelly terps to clean your brushes, and the paint generally goes on easier.
Dry Brushed Undercoat
A slight variation on this is to undercoat your figures black, then dry brush them white and then block paint them.
The result can give a subtle shading effect as the contrast between the white and black shows through the top coat (sometimes - depends what colours your using for your top coat). This can look quite good on facial features, as it leaves the eye sockets slightly darker than the rest of the face, depending on who's flesh colour your using. I have found that Citidels Bronze Flesh looks a little washed out this way. The effect is really a little too subtle to be noticed without close examination, however, it's comparitively quick and easy, so if that's what your after, I'd suggest you at least give it a go and make up your own mind.
Below is another variation on the block painting technique, as explained by Tony De Lyall, from Australia, in his own words...
Tony's Technique
Undercoat in black. I now use "student colours" from newsagents or art stores. These are tubes of robust acrylic paints intended for students to use in school. They are thicker than hobby paint. I think this then combines your PVA undercoat approach with a black undercoat in one hit.
My technique is to do cartoon style painting. That is, block colour with black outlines at major boundaries and in the recesses. I do this by either leaving a thin line of black undercoat between colours or adding a line with a very fine "draftsmen" fibre tipped pen afterwards. I use 0.1 and 0.3 mm sizes. These are available from newsagents. The ink does not subsequenetly disolve in water or solvent based paint or varnish. Many fine tipped fibre pens ink disolves in one or the other.
I don't paint every feature on the figure.
I tend to use colours slightly brighter than real life. I think this is needed on small size figures.
I use acrylic colors - Tamyia and Humbrol and Citidal. I use straight from the bottle. I don't mix colours up.
I finish the figure off with a resin based varnish I got from an art store. This is intened for acrylic based paintings. I don't think this finish would be as robust or as flexible as your PVA coat. I am thinking to moving to that. I'll need to do some experiments to test the diferences out.
Tony
However, if your after that more sophisticated kind of look, I was shown by Mark Otley (second in the 1997 DBM 15mm nationals - and you should see his figures!) a reasonably easy technique that produces realy nice results, and that works equally well on figures from 30mm to 15mm.
"Wargaming Plus"
The first step - if your painting metal figures - it's going to be your second or third step if your using plastic, after washing the grease off and possibly undercoating them with PVA - see painting in the plastic pages - is to undercoat your figure matt black. (note: I've given away the PVA undercoat (but not the overcoat) on the plastic figures, and skip straight to the undercoat instead). Then decide on the colour scheme you want (not an easy task in itself). From there:

 |
mix the colour for your base coat,
paint it on, leaving a thin line of the black undercoat showing through between the different colours of your figure (so as to produce a definite contrast between the different areas of the figure),
apply the top coat to your various colours,
touch up the eyes,
prepare the base of the figure/element,
varnish the figure(s),
and finish the base.
|
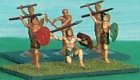
Presto, as easy as that! A couple of examples of can be viewed above - some Revel Aztecs, as painted by Mark himself, and some Esci Barbarians painted by yours truley.
Ok, now I'll try and flesh out the details, so to speak...
1.Mixing the Base Coat
Basically, you need the base coat the same colour as your top coat, but a shade darker. This is one of the big reasons I use acrylics - it's nice and easy to mix them. I use the an old plastic lid (off a baby formula tin!) and just load up some paint on a brush and transfer it to the palete, washing the brush before changing from one colour to the next, and then just mix them together with an old paint brush. As a general rule, mix warm colours with warm, and cool with cool.
Then paint the entire area of your figure that your working on with the darker shade (ie the tunic, or pants, or flesh, or whatever). For example:
| Generic Colours |
What I Use (Citidel paints unless otherwise stated) |
| Colour |
Base Coat |
Top Coat |
| Red |
Mix Red with Brown |
Red |
| Green |
Mix Green with Blue |
Green |
| Light Blue |
Blue |
Mix Blue with Grey
Note: The mixed colour is the top coat |
| White |
White Mixed with Grey |
White |
| Black |
Black |
Black Mixed with a little Grey
Note: The mixed colour is the top coat |
| Grey |
Grey |
White Mixed with Grey
Note: The mixed colour is the top coat |
| Flesh |
Mix Flesh with Brown |
Flesh |
| Yellow |
Mix Yellow with Brown |
Yellow |
| Leather |
Dark Brown |
Leather |
| Wood |
Dark Brown |
Light Brown |
|
| Colour |
Base Coat |
Top Coat |
| Red |
Mix Blood Red with Bestial Brown or Siena (Artist Acrylic) |
Blood Red |
| Green |
Mix Snot Green with Humbrol Navy Blue |
Snot Green |
| Light Blue |
Humbrol Blue |
Mix Humbrol Blue with Shadow Grey |
| White |
Skull White Mixed with Shadow Grey |
Skull White |
| Black |
Chaos Black |
Chaos Black Mixed with a little Shadow Grey |
| Grey |
Shadow Grey |
Skull White Mixed with Shadow Grey |
| Flesh |
Mix Bronze Flesh with Bestial Brown or Siena (Artist Acrylic) |
Bronze Flesh |
| Yellow |
Mix Sunburst Yellow with Bestial Brown |
Sunburst Yellow |
| Leather |
Siena (Artist Acrylic) |
Snakebite Leather |
| Wood |
Bestial Brown |
Siena (Artist Acrylic) |
|
2.Applying the Base Coat
This isn't as hard as it sounds! You just stop short of the edge of the area you are working on. I have found that it does improve your painting skills quite noticabley. And if you do paint over the undercoat completely, you can alsays go back and apply a black line with a fine brush.
3.Applying the Top Coat
Use the top coat to pick out the details and highlights, leaving the base coat showing in places that would normaly show shadows, like the creases caused by folds in their clothing, or by the position of their limbs (ie the inside of elbows and legs) etc.
4.Facial Details
The eyes are done by painting little brown in the sockets, and a black dot for an eyeball. I have found that, although you want to use a reasonably fine brush, a very (very) fine brush is of little use - the small amount of paint you do manage to get onto the tip of the brush invariably dries on the brush before you can transfer it to the figure.
5.Preparing the Base
I use balsa wood for the actual base. I have made a price comparison with cardboard, and the balsa works out cheaper, except that it warps quite a bit on the bigger bases (chariot sized and above). For those bases, I use carboard. At this stage I just paint the bases green and leave to dry.
6.Finishing the Figure
Varnish with either a PVA overcoat (if plastic), or spray on plastic (if metal).
7.Finishing the Base
For DBx bases, I apply model railway flock by painting PVA onto the base, and then sprinkling (actually, shoveling from a height would be a better way to put it) on the flock whilst the glue is still wet, making sure the entire base is covered. I used to use sand on the DBx elements, painted green and highlighted yellow, but I found it takes a heap of paint, is more messy and time consuming, and, in the end, the flock looks better! However, for individual [metal] figures, I am still using the sand painted green, highlighted yellow technique, as, for some reason, it adds to the personality of the individual figure.
Ok, so this does sound all very time consuming, and it is to a point. However, I think the end results justify the means. Also, I have very little time to paint, so I figure if I'm going to do a job, I might as well do it well and get it right the first time - I havn't got time to go back and do it again!
And besides, I actually enjoy this aspect of the hobby!
Well there you have it, for what it's worth. Please feel free to try any, all or none of the above, as you see fit.
And happy painting!
Links to Related Web Sites
Online Miniature Painting and Modeling Guide
Peter's Picture Page - A site on painting models
The Miniatures Page
The Paint Pot - a guide to painting Games Workshop miniatures
Dr Faust's Painting Clinic
The Figure Modelling Archive
Painting FAQ
Glenn Pruitt's Miniatures Photos
TerraGenesis - Clever terrain building tips for Wargamers (GW)
Hive Constructors Inc. - more clever (and inspiring) tips for making your own [mostly 40k] terrain pieces
Hirst Arts
makers of silicon moulds to make your own medieval [stone] buildings out of plaster of paris.
Net Terrian - very nicely done.
[Home] [Plastic Figures] [Buy] [Battles] [Gallery] [Guestbook] [History] [NZ Wargaming] [Painting] [Rules]
This page hosted by
 Get your own Free Homepage
|