This grinder started out as an excercise bike. It was one of those Health Rider imitations. You know the type that lifts the seat as you pull on the handles. A WORD OF CAUTION: ASK YOUR WIFE BEFORE DESTROYING ANY OF HER EXCERCISE EQUIPMENT. This one was not used and taking up space. With her permission I confiscated it.
The motor was a freebie. It was given to me by a friend off of an old air compressor. It is a 115/230 volt. I set it up to run off of 115. It is a 3 hp 3450 rpm motor. I had the drive pulley machined to the correct diameter to get a lower belt speed.
The formula:
Here is the formula for figuring out desired belt speed for a given rpm and pulley diameter. Lets use mine as an example. Remember that for yours you will substitute your own specs. My motor is 3450 rpm with a 2" drive pulley. 2" x 3.14 = 6.28 6.28 divided by 12 = .523 .523 x 3450 = 1805 which is in fpm (feet per minute) So my belt will have a speed of 1805 fpm.
Thanks to Rob Fink of Beaumont Metal works for the nicely crafted aluminum wheels!
I hope you can make use of these pics. If not drop
me a line and I will try to help you.
Sincerely,
Cory McAlpin
|
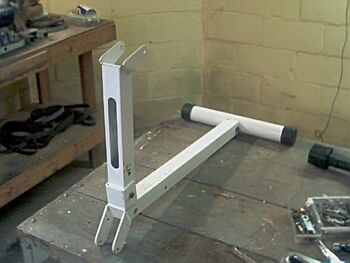
This is the starting point for my construction. The main part of the
frame.
This is my tracking device. It took alot of thought and tinkering to come up with the right parts from my junk drawer at work. It is simply a pivoting arm with an axle through it for my pulley to bolt to. The 3/8" bolt is hand tightened or loosened to change the pivot angle of the arm thus letting the belt ride further out on the pulley or closer in.
 |
This is my upper tension arm. It was already made as part of the bike.
Note the spring. I bought this at the local hardware store for $3.00
 |
This is my lower wheel mounting assembly. The bracket was already there as part of the excercise machine so no welding was required.
Finished! Total cost breakdown: Wheels $90.00 from Beaumont
Metal Works. Spring $3.00. Everything else, FREE!
 |
 |
This is my platen assembly and my platen with rest bolted up. It is
mild 1/4" thick flat bar stock. I took this idea from Wayne Goddards book
since you can easily true up a mild steel platen every so often.