 Checking new points with guage.
Damn this car has two coils... what the **** updated August2003
Ignition Tuning for your Rotary ....
Need to set the timing or replace the points.. heres how....
Part 1- Replacing the Points and setting the Dwell angle
Part 2- Adjusting the Timing.
>>Note you MUST check the timing after replacing the POINTS, as replacing the points often affects the timing..
If you have Electronic Ignition then Proceed straight to Part 2
Special Tools required.... Timing Light & Feeler Guages (less than $10 from Kmart)
First of all the Maintenance schedule says to replace the ignition points every 12 months or 20,000 km's....
or otherwise when the contact surfaces become pitted then its time for new points.
Part 1
Replacing the Points.
Ok lets get these old points out...
1. Unclip and remove the Dizzy Cap and slide off the Rotor Button.
2. Using some long nose pliers, remove the wiring (spade lugs) from both Contact points.
3. Undo the (one each) philips screw holding the contact set, and remove both from the distributor.
4. Give the base a good clean with a rag, and also the cam lobes that actuate the points.
5. Apply a small amount of grease (supplied with points normally) to the cam lobes while the points are out.
6. Install the two new sets of points, and do up the screws finger tight.
7. Now you will need to rotate the Engine until 1 set of points is open its maximum amount... i.e. right on the apex (no pun intended :) of the cam on the dizzy shaft). Either turn the dizzy and belt by hand... or a 19mm spanner in the crankshaft pulley.... or if you cant rotate the engine.. just remove the dizzy bolt and turn the dizzy.. since we have to do the timing next anyway.... just mark where it was so you can put it roughly back in the same spot.
8. Insert your 18 thou = 0.018 in = 0.45 mm feeler guage between the contacts on the points. You may have to make 18 thou with say a 12 thou blade plus a 6 thou blade.
9. Adjust the Points to the guage and tighten the screws.
10. Check the gap by sliding the feeler guage in and out of the contacts. If you cannot get the guage to slide in then the gap is too small. If the guage slides in and out without touching both sides of the contacts then the gap is too big. The guage should slide in and out with a slight drag felt. You may have to repeat steps 8 to 10 several times to achieve the correct gap.
Checking new points with guage.
11. Adjust the second set of points, the same as the first. You will need to rotate the engine again, slightly.. as in step 7.
12. Be sure to replace the wiring connectors onto the new points.
13. This is the same for twin dizzy engines... except obviously each dizzy has only one set of points.
14. Give the Rotor Button a good general clean, and also the spark path metal can be cleaned with an ink Eraser, or very fine Sandpaper.
15. Using a flat screwdriver, scrape the carbon off the metal surfaces in the Dizzy cap, then give it a general clean.
15. Once you are happy you can replace the Rotor button and Dizzy Cap.
16. If you set the gap correctly the dwell angle will be correct. They are the same thing. Therefore it is generally not required to check the dwell angle with a special tester.
Part 2:
Ignition Timing Adjustment.
 This picture shows which timing mark is which, and where to
adjust them too...
This picture shows which timing mark is which, and where to
adjust them too...
1. Using some liquid paper or similar... mark the Timing Pin on the Front Cover and the Timing Notches on the Front Pulley so they are easy to see.
2. Loosen the Dizzy retaining Bolt and do it up just tight enough that you can still turn the distributor.
3. Connect up the Timing Light to the battery Terminals and also to the #1 (front) chamber Leading ( L ) Plug.
 Connected to #1 Leading
4. Start the Engine and let it reach full operating temp.
5. Adjust the Distributor by turning, until the first... Leading .. notch lines up with the timing mark, then tighten the adjustment bolt so it doesn't move when doing the next step.
6. Move the pickup for the Timing Light to the #1 (front) chamber Trailing ( T - Top ) Plug.
 Connected to #1 Trailing
7. If your dizzy looks like the one shown in the picture below... then... loosen the screws holding the vacuum advance mechanism. You will see the mounting holes are elongated so the advance mechanism can slide in and out of the distributor body.... move the vacuum advance until the Second.. Trailing.. mark on the Pulley lines up with the timing mark.
 My 1976 model has this type with the adjustable vacuum advance...
to set the timing!!
My 1976 model has this type with the adjustable vacuum advance...
to set the timing!!
8. If however you have the (crappo) type shown in this picture, then you must turn the engine off, remove dizzy cap and rotor, losen breaker plate retaining screws... adjust breaker plate (there are graduations marked onto the plate to make this easier), re-assemble dizzy, start engine and test. Whew what a pain in the ass compared to the other type... just keep going until you get it right.
 My 1977 model has this annoying Rx4 type where the
Leading/Trailing split is adjusted inside the dizzy.
My 1977 model has this annoying Rx4 type where the
Leading/Trailing split is adjusted inside the dizzy.
9. Retighten all screws, dizzy mounting bolt etc.. and check the timing has not moved.
10. Note.. moving the whole dizzy advances and retards both Leading and Trailing timing... where as the second breaker plate adjustment (or vacuum advance adjustment) adjusts the split between the two plugs.
11. The Leading timing is set to 5 deg ATDC, and the Trailing 15 deg ATDC, but on the Rx5 and later, these are the only two marks on the pulley, so you cant make a mistake. Rx4 and earlier may have 5 marks or more. The first is TDC, 2nd is 5 deg ATDC, 3rd is 10 deg ATDC, 4th is 15 deg ATDC.. and so on. Therefore on this car.. you would set the Leading to the second mark, and the Trailing to the fourth mark.
12. TWIN DIZZY's are even easier.... simply adjust each dizzy seperately... to adjust the corresponding plug timing... Leading or Trailing!
 Coils are mounted, the same as the plugs..... T - Trailing - Top,
Leading Coil is underneath. The tacho normally connects to the Leading (bottom)
coil, but it doesn't matter unless your car is running full emissions computer,
which cuts the Trailing coil under some circumstances (which means your tacho
would die too).
Coils are mounted, the same as the plugs..... T - Trailing - Top,
Leading Coil is underneath. The tacho normally connects to the Leading (bottom)
coil, but it doesn't matter unless your car is running full emissions computer,
which cuts the Trailing coil under some circumstances (which means your tacho
would die too).
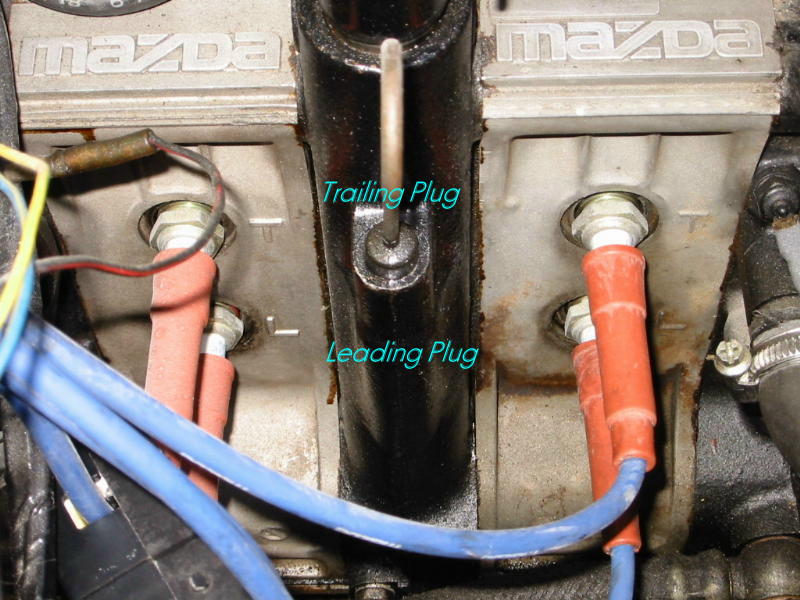 Trailing and Leading plugs are identified by T and L cast into
the Rotor Housing.
Trailing and Leading plugs are identified by T and L cast into
the Rotor Housing.
Common Problems:
*** Faulty Spark Plugs:
If your car just will not run... and you believe you have spark.. and you have fuel... but the engine wont quite run... and keeps flooding..... you may have fowled spark plugs. Even if you have cleaned them up and they look alright.. if the insulator is black / grey then they may need replacing.
*** Sticky breaker Plate:
If you have the type of dizzy with the adjustable vacuum advance mechanism and moving the vacuum advance in and out does nothing..... then most likely the breaker plate inside the dizzy is tight. You may have to disassemble the dizzy and clean and lube all the moving parts. If you do remove the dizzy, simply put a mark on one end of the rotor, then mark on the engine where the rotor is pointing.... then when you put it back in... just make sure when the dizzy is fully seated, the marks line up again.
*** Poor 12 volt Coil supply
With the car running, check the supply to the coil. Either the Coil + for electronic ignitions... or the supply side of the ballast resistor for points systems. The voltage on your battery should be approx 13.8 volts.... the supply should be at least 12 volts.... allowing maybe 0.3 volt drop across the wiring... any other drop will be across the ignition switch... or a loose connection. If the voltage is too low you will have a poor spark. If the ignition switch contact is worn out (quite common) then you will need to replace the switch or wire up a relay to take the load off the factory ignition switch.
*** Incorrect Plug Type:
If you are running points ignition then you should run a spark plug suited to this... i.e. the Original type plugs available from the dealer... Do not use plugs that were designed for an Rx7! ... all Rx7's have electronic ignition and there plugs run bigger gaps... approx 1.0mm compared to 0.7mm. Do not use plugs that have an inbuilt resistor for supression on late model vehicles.... and do NOT use plugs out of your piston engine!!!! or you will destroy your rotary... first time every time.... rotary plugs are shorter than normal piston engine plugs..
Symptoms of Weak Spark:
Engine misses at idle.... (can also be caused by bridgeport of side housings :) ... )
Possible Causes: Low voltage on coil... incorrect plugs..
Symptoms of a Major loss of Spark Energy:
Car will only accelerate at very low throttle openings.... any more throttle opening causes the engine to suddenly loose power..
Vehicle will almost start but will not run.
Possible Causes: Fowled plugs.... Open circuit Coil lead