A Repair Scheme for the Dragon Spring Problems
By Mark A. Cole, September 8, 1999
Obviously, this repair will devalue these figures as a collectable but it will increase the play value considerably. Personally, I can't see returning these figures. Especially not just for the sake of "salvaging their collectable value". These things have no collectable value once they are a part of my collection so I'd rather just fix them and get them back into service.
I came up with this method to accomplish this. Please read this completely before beginning. I make no promises. I offer this method in good faith to those who have an interest in doing things like this themselves.
Advantages
It is non-destructive to size/shape or the exterior surface of any body part. It can be repeated even easier in the future, if necessary, and it increases the range of movement in the head/neck and the chest/abdomen ball joints. It is old GIJoe technology that requires no sawing or cutting.
Material/Tool list
A strong thumbnail
A Variable Speed Drill
Two or three drill bits (1/32 to 1/4")
7" strip of 1/8" or, even better, 1/4" elastic band
Hemostats or tweezers
A dab of super glue gel.
Note
To do this requires completely separating the neck, chest and abdomen pieces from each other. To reconnect the head the abdomen must be removed and to reattach the abdomen the head/neck piece must be removed. Both have to come off to effect this repair. Regarding the spring problem, the spring can damage a couple of different pieces to the point of failure. The easiest to fix with this scheme is where the spring shears off the end of either, the post for the head or the post for the abdomen. The hardest (because repair parts must be made) version is where the spring in the abdomen forces the plastic washer to split completely apart (two pieces). This washer piece is required to accomplish this fix. The washer at the neck is a non- factor because whether it is present or not it will not be a factor, either way, in this repair.
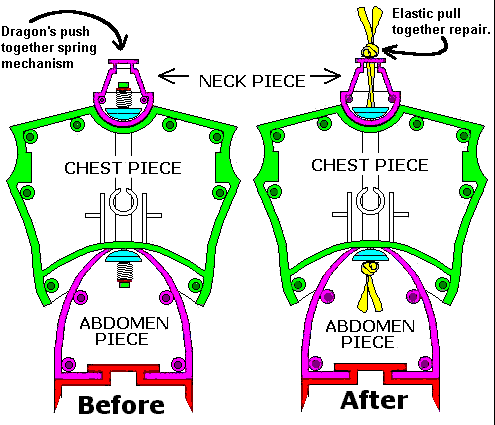
Here is the overview expressed in this drawing. A hole or shaft is drilled down through the axis from the neck post to the abdomen post. This shaft will be used to pull elastic through to attach the abdomen to the head and sandwich the chest piece between them.
The first and hardest part of this is getting the head off of the neck piece. Look for a natural weak spot where there is a gap between the two pieces that you can exploit. The neck piece is hard plastic and the head is soft, so if you have to use a knife to cut the glue connection push or cut to the hard neck piece side. This usually can be done with the edge of my thumbnail, but it is still a lot of cutting and pulling, cutting and pulling and slowly working you way around the neck piece.. Take you time and you won't damage either piece. On the other hand if you have the one in ten head that is completely glued on all around, you are in for a battle.
And here is a map of what I will be calling these body parts.
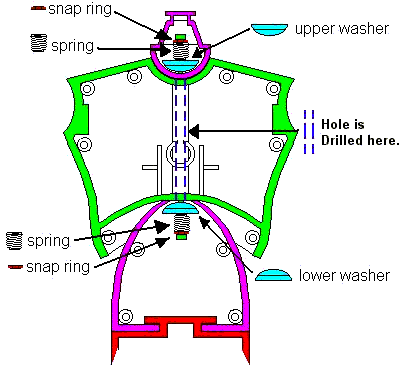
Both the neckpiece end of the post and the abdomen end are connected in the same way. Each has a spring in compression pushing down and up on- at one end a metal snap ring over the end of the plastic post and on the other a custom plastic washer shaped to mirror the spherical shape of the opposite piece that it rests against. These pieces can be seen in the following photos.
The following photos are courtesy of Jim Stelling - jimbob1@flash.net . He has authored several very good articles regarding these Dragon Bodies. They are available at his website:
His site is not for the squeamish, but, then again, neither is fixing these things for yourself.

This photo shows the neck post (the end that would have held the snap ring on is sheared off), the spring, the snap ring, the upper plastic washer and the halved neckpiece.
The plastic post will be drilled out and displaced with a hole or shaft from the dish shape at the top of the chest piece down (and through) to the washer in the abdomen piece. For this example I will describe the way to repair this doll(where the neck is sprung or off), but the same repair technique can be done just as easily starting at the bottom where the abdomen has fallen off.
Start by removing the rest of the exposed neck post piece that is shown here protruding through the bowl shape top of the chest piece. Mine broke off clean by bending in back and forth over and over again until it broke off. It even left a small crater to start the drill bit in.
Then use a variable speed drill with a small(1/16th or smaller) drill bit to slowly drill down through the post. Keep the chest and abdomen piece aligned and go slow while eyeballing the verticality of the drill bit's path both from the front view and the side view. Drill at low rpm and light pressure. Once through, you will have your pilot hole. Next use a larger drill bit to drill down the pilot hole. After that go to the 1/4" drill bit and repeat. The abdomen and legs fall free after the second or third drilling.