|
- Redistricting allows spatial units to be combined int larger spatial units based on their common characteristics. For example, enumeration districts may be combined into wards. MapInfo also sums the data for the newly comined units, and provides totals of these data. There are two methods to do this.
- The first method is non-systematic, with the choice of spatial units to be combined entirely subjective. This uses the same process as discussed in Section Two, Part Three, where a new field is added to the existing table to receive the summed data, the spatial units to be combined (which must be adjacent) are selected, and the column is updated (using Table > Update Column.
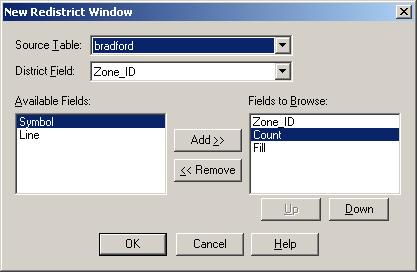
- However, the usual way to perform a redistricting operation is to use Window > New Resdistrict Window (or to use the New Redistricter icon on the toolbar). A dialog box appears.
- Choose the table you wish to work with from the drop down list. Choose the field containing the spatial units you wish to combine. Choose which of the Available Fields on the left you wish to know the value of for the new spatial unit and transfer these over to the right using the Add >> button. Use the shift key to select all the fields. Use the << Remove button to move fields from the right back over to the left if you do not wish to include them. Do not remove the field representing the spatial unit though, for example, zone ID. Click OK.
- The results of the Redistrict operation appear on the map and in a new browser window entitled District. In the browser, click on in the symbol field to change the symbol for that record.
- To make the new districts permanent and save them to the table, go to Redistrict > Assign Selected Objects.
 If you do not wish to overwrite your original table with your new one, save a copy of your work before beginning, and give the new table another title. If you do not wish to overwrite your original table with your new one, save a copy of your work before beginning, and give the new table another title.
|