Match your clothes, not your eyes, or instead of people looking into your eyes and thinking they are beautiful, their attention will be drawn to the shadow itself! There are many effective ways to make up your eyes. Here's just two daytime looks you can strengthen at night:1: Sultry Do the light colour first on the lid (here apricot), sweeping outwards and fading towards the outer brow. Then do a darker defining colour in the socket and in a triangle or line (here in coffee) at the outer lid corner. Finally a highlighting colour (here emerald green) on the centre of the lid. Blend them carefully. If you are not confident with this, or not sure what colours to use, just do light and dark brown.
Try a light colour in the socket
to bring deep-set or baggy eyes forward. Add a bright eye catching contrast colour near the lash line and blend carefully.
Pretty Result:
If you find your eyes get sore, use cream textures to prevent powder falling in the eye.Eye pencilsDefine over your eyes with a liner pencil or cosmetic felt pen, from just beyond the outside corner of the top lid to three quarters of the way to the inside. This needs practice to get it thin, straight, and perhaps with a tiny lift at the outer end.Use a soft sharp kohl pencil under the eye. Roll the end between your fingers, if it seems too hard to draw any colour on. If the result looks too wide or stark, remove some by smudging with shaped cosmetic cotton buds. Browny-black or dark grey doesn't look as hard as black, while still giving a strong emphasis to your pretty eyes.Consider using a clean white pencil on the inside lower rim of the eye. This gives powerful , subtle contrast with your dark kohl. Pink is even better, as it doesn't make eyes look red.Party emphasisLast, for evening, put a little of a very light, shimmery highlighter shade on the browbone just below the outer half of the eyebrow, and blend with a clean finger or sponge applicator. This draws still more attention to your eyes. Note: Use your translucent powder brush last under your eyes, to lift away any particles that fell off just now. If you are really clever, you put extra "setting" powder on this area, and didn't brush it off from your foundation earlier.
General information
Having well defined brows causes people to look into your eyes, draws attention to your eyes and reduces any shadow you may find there. Well defined brows make people look into your eyes, so vital for communication. There are three common techniques most often used for eyebrow definition; colouring, plucking, and waxing. To decide which is best for you, consider your situation. Are you looking for something quite temporary, for a night out on the town, or is your goal just slightly longer than a night out?
Colouring:
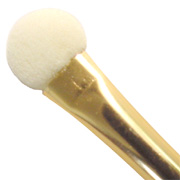
Shape them using a very sharp brow pencil, usually lighter (or not much darker) than your natural brow colour. Blend gently with a small firm-bristled brush to look softer. Use individual strokes being careful not to colour the skin itself except for the occasional gap where a hair is missing. Alternatively, eye shadow can be applied with such a brush directly to achieve the same look. Fade and narrow towards the outside.
Plucking:
This requires the use of a standard pair of tweezers, or alternatively eyebrow tweezers. Eyebrow tweezers look almost like scissors with flat ends instead of sharp edges. Personally, I find a standard pair of tweezers works best for me. There are some key points to remember when plucking your own eyebrows. First remember to always fade and narrow your eyebrows toward the outside. Second, having one great uni-brow that covers the entire width of your brow from left ear to right is not usually desirable! When plucking, don't forget to remove the tiny hairs above the bridge of your nose. And third, a lot of genetic males have heavy brows to begin with and we don't want to accentuate this fact by making our eyebrows too thin. Begin by using an eyebrow brush and brushing your eyebrows from the centre to the outside edge. This gives them a little definition before you start and provides a better working area. Get into the practice of brushing them for a few weeks until they start laying this way naturally. You may not think that brushing them makes a big difference, but how many women have you seen with big bushy wild eyebrows? It presents a nicer, cleaner look. Now, look closely at your eyebrows. The object of plucking your brows is to create the highest possible arch above your eyes, to open them so that attention is drawn to your eyes and to minimize any shadow created by them on your eyes. You will probably notice that there is one little section at the top of your eyebrows, probably in the thickest part, that extends well above the rest of your eyebrows. We do not want to touch this area quite yet, as you will want to use this area to achieve the best arch. Start by carefully plucking any random hairs growing from your eyelids and directly below the main growth of your eyelids. Next, choose three points along your eyebrow line; the furthest right (beside the nose) the furthest left (the outside edge), and the highest point. Carefully pluck an arch from one point to the next on the under side of your eyebrow. Your goal right now is to achieve the basic arch, not the best definition at this point. Don't be afraid to thin your eyebrows a little too, as whatever you do now will grow back in a few weeks time if you mess up. Remember that little patch of extra brow hair that we mentioned earlier? Try to arch your eyebrow so that the highest point on the underside is just below this area. Now that you have the basic arch on the bottom, go back and do the same thing for the top side. Remember to fade the top side on the outside edge. Keep in mind that you want to try to keep the highest point of the top of the arch in the same area as the bottom side. When you are done creating the basic arch, if you find that you would like even more of an arch, work on the bottom side again, thinning your eyebrows slightly so that the lower arch is raised. Because you want to open up your eyes, you should always work from the bottom to achieve the best arch. Once both the top and bottom areas are done, and you have the basic shape you are looking for, you can then go back and fade the outside edge even further. When doing the outside edge, remove hairs from the outer-most area, not the inside, or underside. This will fade your eyebrow and bring your arch in closer toward your eye, creating even more of an arch. Because it is on the outside edge, it's not going to interfere with the openness of your eye. Finally, when you have the look you desire, go back and clean up any stranglers both above and below your eyebrow. Remember to pluck any remaining hairs at the top that are not part of the arch. Also remove any hairs on the outside edge that aren't part of the arch. Last, pluck out all the hair remaining above the bridge of your nose. These hairs are usually very fine and if you find that it is too difficult to pluck them, carefully use a razor to cut them off.
Waxing:
Waxing, I must admit, takes some practice, but the results tend to last a bit longer than the other methods. But, be warned, if you're not brave, don't try this as you can potentially remove large portions of your eyebrows by mistake. You can purchase several brands of eyebrow waxing kits at your local cosmetics shop. Generally speaking, they provide a small tube of wax that you submerge in hot water, and a tiny wand applicator as well as thin strips of paper. Submerge the tube of wax in a cup of hot water for about 1 to 2 minutes. Be careful to get the right temperature as you do not want to burn yourself when applying the wax. One note of suggestion here: work quickly. Use the same techniques described above (under plucking) to decide upon the basic shape you desire, and apply the hot wax using the wand in the same direction of your eyebrow growth. Be very careful to not get the wax anywhere you don't want it. Next, apply the strip of paper over top of the hot wax and press down. This adheres the wax, and thus your eyebrow, to the paper. Place the fingers of your other hand on any loose surrounding skin. Starting at the outside end of the paper, pull quickly up and toward the centre of your face to remove the hair. Proceed in this manner for the rest of your eyebrow. When you are done, use tweezers to get any odd hairs that remain. Use a gentle aloe lotion on the area when you are done as this will help alleviate any discomfort and help reduce the redness afterwards. If you notice some puffiness, gently press with your fingertips for several minutes to help reduce. Remember to get the hairs above the bridge of your nose, and any stragglers on your eyelids. Again, this is best done with tweezers.


Long, full lashes make your eyes look bigger and wide-open. This conveys innocence, youth, dependence, and implies submission.
Mascara will only last for a certain period of time. Throw away mascaras over about six months old; they dry out quickly. Even if you think yours has some mileage left, you don't want a bitty, crumbly look, with dry bits falling into and irritating your eyes. Make lashes lots longer and curly to open the eyes (see below), as opposed to making them look thick, cakey and false.
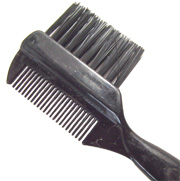
Lash curlers are a good and inexpensive investment. After curling,
apply one mascara coat on lower lashes first, looking up; then upper lashes, looking down, allowing each of two coats (day) or three coats (night) to dry. Try to put most on the outer edges to help lashes fan out, and use an eyelash comb to separate if they stick.There are some good eyelash curling mascaras now which open your eyes, but not all work! Look for lengthening rather than thickening ones. Keep cotton buds handy; dip them in foundation, and use to wipe away mistakes without leaving a makeup "hole".