How to create the dorsal tail or spine
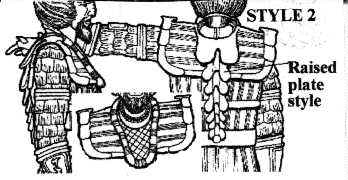
To choose the correct style of chest protector and dorsal tail look at the [style1.pcxgraphic] and the [style2.pcx graphic] to decide which version you prefer.

Style 1 is usually worn by anyone who is not a head of a house, Captain, or any higher ranking authority. Unless you make the front section open, it means that you have to put on your costume before you can put on your head. Consequently you can not shed your body armor without taking off your head piece.
Style 2 is worn by captains and anyone of high rank. The advantage of this style is that it opens up in front for easy access and it allows you to remove the body armor when it becomes too hot or uncomfortable during the event.
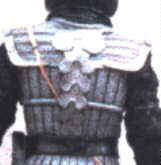
The dorsal tail has 3 distinctive styles. The first is viewable on the back of style 2. It is raised and quite elegant. The second style is modeled by style 1, where only the second plate is raised. The raised plate gives the visual illusion that the Klingon spine is somewhat raised and different from the human form.
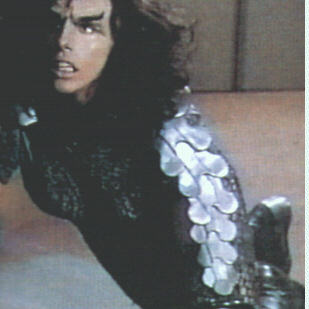
The third version is seen on the [Kruge.pcx graphic] shows the completely flat style. It is visually boring and seems to serve little in the way of spinal protection.
The three dorsal styles can be applied to any of the chest protectors and be applied directly onto a costume such as that worn by Worf's Nanny Kahlest, worn in the Next Generation in "The Sins Of A Father" or as in the rather cheesy costume from the first season of ST: Next Gen.

To create the dorsal tail you can print out the pattern using legal length paper(portrait orientation).[Dorsalpa.wpd] You fold your paper in half and trace each individual piece onto the fold line of the paper. It will take a few sheets to trace all the plates.
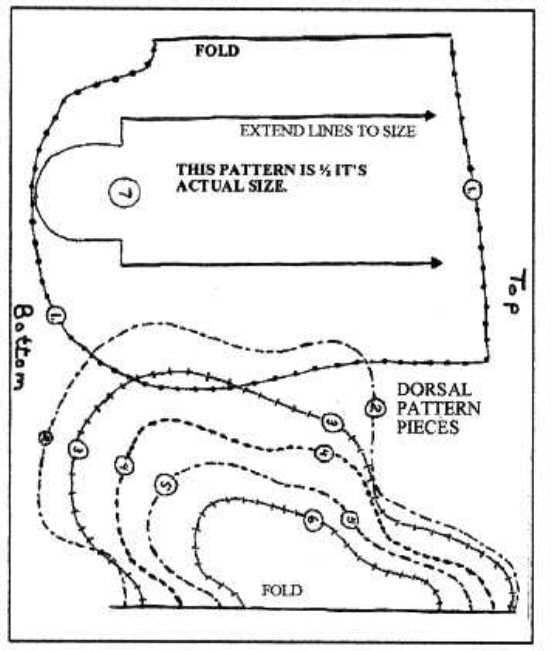
Click here for pattern to print out
Note: " Whopper poppers" is the technical term used by the theater to describe very large snaps.
To create the dorsal tail you can use a number of different materials. The cheapest and easiest to construct is with the use of vinyl place mats. You will need 3 or 4 to complete the project. Try to get the place mats in the color you want the dorsal tail to be finished in.
Place mats come in various colors, including gold and silver metallic which are usually only available around Christmas.
If you cannot find the color desired, use acrylic paints on the place mats. Do not use oil based paints. They will melt the vinyl. The paint will cause sticking to the bottom of the sewing foot of your sewing machine.
Cut out all of the pattern pieces and just lay them out on top of each other, to see if you have to add or remove some of the smallest dorsal plates. When you are satisfied with the length, you make the decision whether or not you wish to create the raised effect or stick to the flat version.
To sew by machine use an even feed foot and set the presser foot dial or pressure dial to "darn".. Use a jeans needle and set the stitch length to a longer setting.
You begin by sewing the bottom most plate to the long support piece. To create the raised effect, place the plate slightly off center of the support column. With 3 or 4 stitches tack in place. Push the edge of the dorsal plate to create a arc in the middle. Sew the second side in place. [graphic:plate1.pcx]
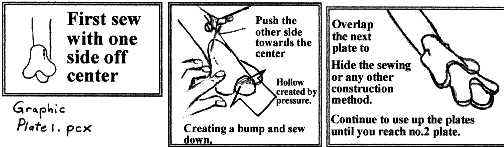
Take the second dorsal plate place it off center as the first, overlapping the first so the sewing does not show. Tack it in place, create the arc and sew the second part of the plate down. Continue this till you reach the second to last dorsal plate (plate 2 .)
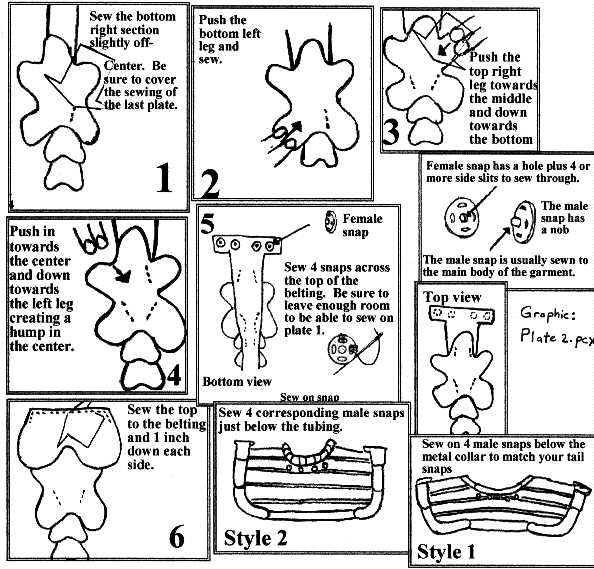
You begin by sewing the bottom half of the plate slightly off center. You then create the arc and tack down the second bottom half. You then take the top section press it towards the bottom section and sew it slightly off center. You bring the top into its usual arc and press towards the bottom of the plate to create the second arc. Sew into place.[graphic:plate2.pcx]
The top of the support column should have some female whopper poppers already sewn into place as shown in the diagram. Use plate 1 to overlap plate to and sew around the top section going down about 1 inch on either side of the plate. With the final plate in place, sew the male whopper poppers to the back of the chest protector as shown in the diagram, making sure that the whopper poppers line up exactly.
For the semi flat look you sew up the smaller dorsal plates flat onto the central column, until you come to the second dorsal plate which you attach the same as the raised dorsal method. It is the second dorsal plate that gives the shape to the dorsal tail.
By attaching the tail with whopper poppers it makes it easier to transport the costume pieces intact. The vinyl method has one drawback. You have to lay out the dorsal tail flat when it is not in use, or hang it up flat attached to either the chest protector or a hanger. If you put things on it for any length of time, it will leave marks permanently on the dorsal tail. If you don't hang it up or lay it flat, the pieces become warped permanently.
You can use the above method to create the tail out of heavy leather but the price for the project goes up drastically. On the other hand it will last longer and take a lot of wear and tear.
Choosing the correct support column depends on what you want the dorsal tail to do and what is available. When working with the metal sheeting, I use the elastic belting because the sheet plates are light enough not to pull the spine out of shape, and flexible enough to prevent some damage to the plates. I use this method purely for decorative purposes. I use heavy duck belting with the high impact plastics because this combination gives you the strongest construction for actual combat, and still has some flexibility. The leather is used with heavy materials, it flexes down the spine, but has little or no flex from side to side.

To make the dorsal plates from aluminum siding, brass sheeting, or any other metal sheeting, cut out the design pieces as above with the addition of the small rounded end piece,[graphic: endpiece.pcx] and lay them out on the elastic belt webbing, or a leather belt (second hand from Value Village)or heavy duck belting. Check to the sure of the length and then decide whether to create a raised back effect or the flat.
To create the raised, you will need a half rounded piece of doweling, and a rubber hammer. Place the dorsal plate over the doweling and carefully hammer the shape of the arc down the center of the plate. The second plate is hammered over a larger arc in one direction, and then turned to hammer in the arc in the other. This takes patience, and maybe more than one try to create successfully.
When all the pieces have been shaped, and punched for the rivets, carefully sand the edges and punch marks to remove any sharp edges.
At this point you can paint the desired colors onto the metal or if you are working with brass sheeting, polish the brass and coat with a clear lacquer to prevent oxidization. You then attach the plates beginning with the circle end piece to the column using rivets and washers for extra hold. Look for old automotive bodywork book for full instructions for hammering out dents from automobiles.
High impact plastics and plastic barrels make excellent dorsal plates. They can take any abuse, and will not warp. You cut out your plates with various cutting implements, and lay out over the column support.
You then decide whether to go with flat or raised. You then take a piece of scrap and test the heat and time required to allow the plastic to be draped over a mold. If you want the flat look, you lay out all but piece number two on cookie sheets that are flat. For a raised effect you put 2 round doweling onto the cookie sheet, and place the plates over them. I stick a pin through the nose of the plate, to keep the plates from slipping off the doweling. I usually keep a close watch on the plates has they melt. Using oven gloves, I adjust any plates which may shift during cooking.(Doweling can be replaced by pencils.) For the end piece lay the plastic over the end of the doweling. Roll a ball of aluminum foil and press it down to create the proper shape for the plastic to slump over. [graphic: melt.pcx]
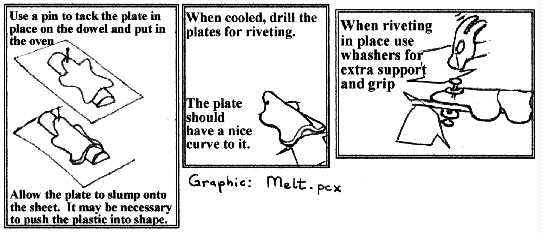
For dorsal plate number 2, I either make a mold from the vinyl version of No. 2 when it is assembled (I use durabond 90 because it is made to be used in hot situations up to 450 degrees.) Or create the proper shape with molding some sand.(cover the sand mound with foil or the sand can get stuck to the plastic.) Use your oven gloves to shape the plate when it becomes soft and malleable. Allow the plates to cool, and then drill them for riveting. If one of the plates is not shaped to your satisfaction, just reheat and try again.
At this point you sand any rough edges, and paint if necessary. Then simply assemble as the same as with the sheet metal. You can rivet the dorsal spine directly onto the chest protector since it needs no special treatment.
I should note that I usually back number 2 plate with a plastic plate when I am working with sheet metal. It gives it the structural support it needs to keep from being crushed by accident. I also wouldn't bother to make a No. 2 plates mold if I was only going to make one dorsal tail, but it would make sense for a ship or group to have one. It can be used indefinitely, and it is the most important section which gives the dorsal tail it's shape. Another good idea is to make the dorsal spine removable from the chest protector for easy transport, and it can be used with various other chest protectors and costume parts.
Another point is that if it is the correct color to begin with, then you don't have to retouch it when it gets scraped. I have also put a whopper popper on the end piece of the dorsal tail and on the back of the costume to keep the dorsal tail over the hidden zipper, or just from creeping up during wearing.
It has been pointed out that the whopper poppers could be replaced by Velcro. I think it would work well with the metal sheet versions, but I am uncertain if it work with the plastic version. You can use Velcro Adhesive found in most sewing stores, Zellars, Walmart, and hardware store.
Use the Velcro adhesive to glue the Velcro to the metal sheeting. You can also glue it with vinyl, leather, and wood. When working with vinyl or plastic, test the adhesive first on a piece of scrap. It melts certain plastics and vinyls. If your unlucky and the fore mentioned melts, sew on the Velcro by hand. Although some Velcro comes pre- glued, the glue does not hold up very well on anything. I have used Velcro dots on the bottom of the tail to hold it in place. I find it preferable to the whopper poppers since they don't hurt if you sit on them.

When the caulking is dry, you can either glue or rivet the strips in place. Use some "Rub and Buff' to give more dimension to the surface designs.
Capt. Klaa and Vixis both have cut down uniforms. Their chest protectors are completely open at the front for easy access.
General Chang has another style of chest protector. In this film version the klingons looked like they were dressed by the Michelin Tire man. The chest protector is made with padded leather or vinyl. It is sewn down in sections. Unlike most of the other versions, the lines going across the chest protector is not made of medical tubing glued in place. Instead they are simply lines of sewing sewn across the chest or heavy chain .
Good luck with your body armor and dorsal tails.