 |
|
|
|
|
|
|
|
|
|
|
|
|
|
|
|
|
|
|
|
|
|
|
|
|
|
|
|
|
|
|
|
|
|
|
|
|
|
|
|
Working with Metal Mesh |
|
|
 |
|
|
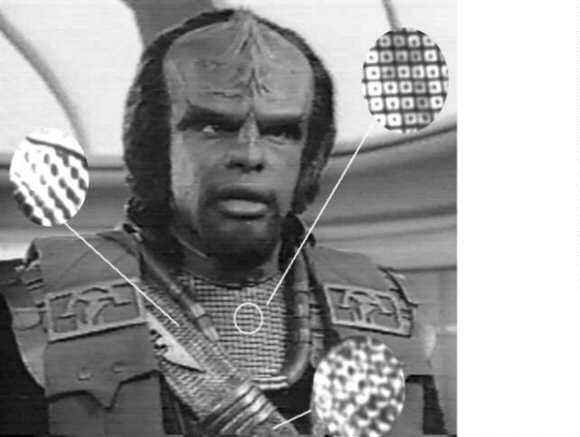
| Metal mesh is used in various Klingon costumes. In Star Trek: The Next Generation the male Klingon uniform has metal mesh beneath the gorget. The metal mesh used in the gorget costs $65. A yard. The mesh is only 15 inches wide. There is also metal mesh in the sash. In the "Emissary", K'Ehleyr's uniform has metal mesh continue from the neck to the bottom of the vest. In the film the Undiscovered Country, Azetbur's headpiece is trimmed with bluish silver metal mesh. |
|
|
 |
|
|
 |
|
|
|
|
| Value Village sometimes has metal mesh bags. You can take the bag apart and use the metal mesh. There are many sizes and grades of metal mesh. There is a tight woven metal mesh which is used for jewelry and halter tops. The tiny legs at the back of the nail heads are carefully sealed so it will not scratch bare skin or tangle hair. The metal mesh found in handbags are a coarser grade and have to have a backing or they will snag on skin, fabric, and itself. They come in different colors, shapes, and sizes. The larger sizes are easier to work with. The really small gauge mesh requires magnification to clearly see the tiny legs. |
|
|
 |
|
|
| The metal mesh can be opened at the back by the little legs. You can combine several bags to create whatever project you want. You can combine different sized meshes by carefully coordinating the legs and rings. Before you begin looking for your metal mesh you should draw out the pattern piece and take it with you went you go shopping for the mesh. You may find the right sized mesh but it may be the wrong color. |
|
|
 |
|
|
| I have used Decoart Ultra Gloss metallics acrylic enamel paint for silver or gold, and gloss acrylic paints on other colors. Apply a little at a time so you don't get globs of paint acting as glue on the rings. When the rings are glued, the metal mesh loses it's liquid flowing motion which accents curves and valleys. |
|
|
 |
|
|
| To open the little legs on the back of the nail head, use a pin. It will shortly become bent but that doesn't matter. I haven't found a better tool to open them. The tiny screw drivers still won't fit. Once you have opened the legs and have removed the excess rings or have put it through the ring to join it to an other mesh section, carefully bend the leg back to it's closed position. Be careful not to bend it too far or break it off. |
|
|
 |
|
|
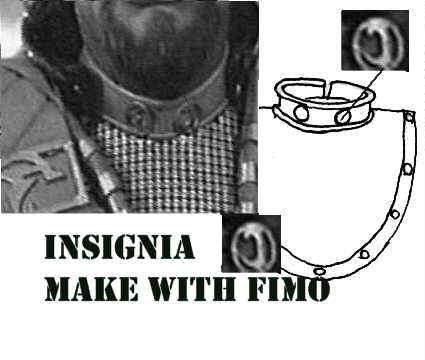
| The neck piece should only require one large handbag. Draw out the pattern which scale is one cube equals one inch. Cut out the ground fabric, and pin the metal mesh on top. Pin it first around the neck hole. Sew down that edge. Put on the neck piece and pin it shut in the back. Let the metal mesh flow down and pin down the remaining edges. Sew some small snaps around the outside edge and where it should be closed. Sew the matching snaps to the neck line of your uniform corresponding to the snaps already sewn to the neck piece. |
|
|
 |
|
|
| Measure a piece of tubing to fit to the inner neck piece. Slice it down the center, and with an awl make holes so it can be sewn down on to the neck piece. Measure a flexible piece of plastic to fit into the tubing you have just sewn on. Use Velcro adhesive inside the tubing and insert the plastic. Cut a piece of tubing for the top. Slice and glue the tube to the plastic. Cut out two disks and glue into place. Paint the tubing, plastic, disks, and metal mesh the proper colors. |
|
|
 |
|
|
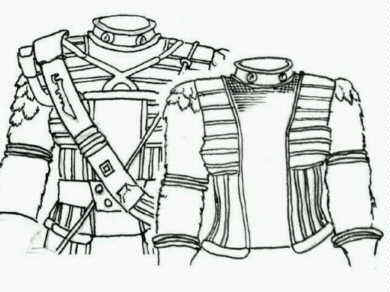
| For K'Ehleyr's uniform top start with pinning the top or upper section. Hang up your fabric and mesh and carefully pin down the sides. Pin down the bottom last. Drape the metal mesh where it will be worn. First pin down the sides, and then the bottom. |
|
|
 |
|
|
| Put a leather or Jean needle in your sewing machine and zigzag the mesh around the edges. If the needle hits a nail head, bring up the needle and shift the mesh to a ring and continue sewing. You can also straight stitch if you prefer, but you will have to stop and move the mesh more often. From there you can cover be edge in various ways. You may need to touch up the paint on some of the nail heads that you hit with the needle. Since you are usually sewing at the edges, the nicks will be hidden by whatever you sew on the edges. Otherwise use a bit of paint or nail polish. |
|
|
 |
|
|
| The metal mesh used on Azetbur's head piece gives it a bit of flash and adds very little weight. Remember if you are not using jewelry grade mesh you must back it or it will tangle in the wig. |
|
|
| Using metal mesh in the sash gives it a lot of texture and shine. Since the metal mesh is mostly light weight, it won't add to an already heavy costume. Some metal mesh can be found in hanging curtain material. Although this is usually light weight, some industrial applications may give you beautiful but very heavy metal mesh. |
|
|
 |
|
|
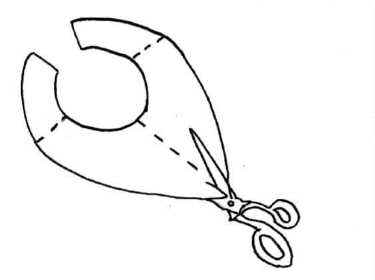
| The pattern is drawn to my size. To enlarge draw out the pattern and mark a center line through the fold line. Then approximate the center of the neck. Draw a line through the center through the two sides. |
|
|
 |
|
|
| Cut out the pattern and cut through the lines that you drew. Insert a piece of paper a third of the measurement needed to fit your neck. To measure your neck use a measuring tape around the lowest part of your neck. Measure the inside circle of the pattern and see how much extra you need. |
|
|
 |
|
|
| Tape the inserts in place and cut off the excess. Carefully try the pattern around your neck. Remember you need some overlap at the back to be able to close it. If you need more space just add a bit more to the inserts. |
|
|
 |
|
|
 |
|
|
| The last two pictures are of a dress I made using the metal mesh from three different handbags. This was my first attempt to use the metal mesh in a costume. It was also my first shot at working with suede. Although the dress worked out quite well, there are some problems with sewing the mesh over other metal pieces. When you put a necklace over the edge of the metal mesh to hide the edges, the thread is very quickly cut by the movement of the mesh and the necklace. Even though I used Kevlar thread, I have to sew on the necklace every second wearing of the costume. Use something other than metal to hide the edges. |
|
|
 |
|
|
| Index |
|
|
| Pictorial of the construction of a metal mesh collar |
|
|
|
Metal Mesh Honor Sash- construction and ordering information |
|
|
|
Index |
|