Welcome To Kev Warburton's 1961 Humber Super Snipe Series 111 Restoration Site In Western Australia
kev6@hotmail.com
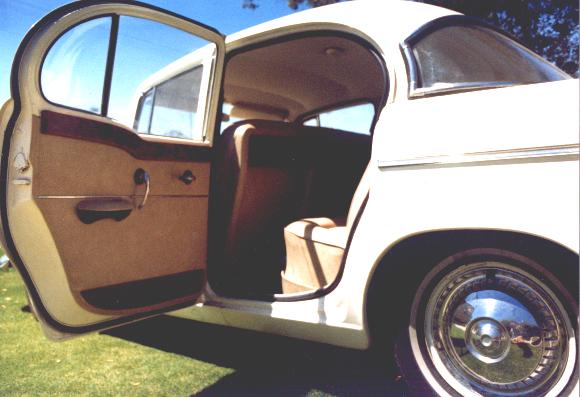
The Restored Humber

BOOKMARK THIS SITE NOW SO YOU MAY FIND IT AGAIN::))))
INTRODUCTION
Hello there from Western Australia. I am Kev Warburton and a large part of my life has gone into restoring my beloved Humber. I really do trust that this information will continue to assist folk from all parts of the world. My dream one day would be to have enough money to do a world tour and visit the fellow Humberists who have been so kind to make contact over the last few years. My thanks to to those who have taken the time to respond from places like Ireland, England, Scotland, Canada, South Africa, New Zealand, USA, Mexico, so many of the other European Countries and of course Australia.
I am also concerned that there is very little detail relating to Humbers on the net. Given this is the medium of the future I trust that the material here will stimulate interest in a car which even today has the capability to keep up with the modern "plastic" vehicles. Since I placed my first Humber page on the net some years ago I have been encouraged by the efforts of others who have done likewise. Well done people and keep up the good work. The Snipe is an absolute delight to drive, easy to work on and suffered no problems in relation to the Y2K problem. I hope that you enjoy reading the notes here and looking at the pics which illustrate a program which has so far taken thirteen years of my life. I have decided to stay with the one long page format and further down you will see Heading Links which will take you to the sections specified without having to scroll all the time. If you want to go "back" simply go to the "back arrow" on your browser. Its at the top of the page to the left.
You may also like to visit my first Geocities Site to see some additional snaps of quite good quality. I know they take time to download but they say so much I really think the wait is worth it.
My First Geocities Site.
Please email me at kev6@hotmail.com
if you have any comments or would simply like to chat on the subject of Humbers or car restoration in general. The project as described was a hands on effort for me and the only work done by others involved the actual seat upholstery so you can get an idea of the depth of the learning experience which occurred. As time permits I will be adding to this page and extending links to others so please visit again. Please also note that I DO ALL THE WORK MYSELF and this page is written for the person who wants to do same. If you have lots of dollars to pay for someone else to do the job that is fine but for heavens sake make sure they are doing what they promised to do. It is amazing the stories I hear so be careful.
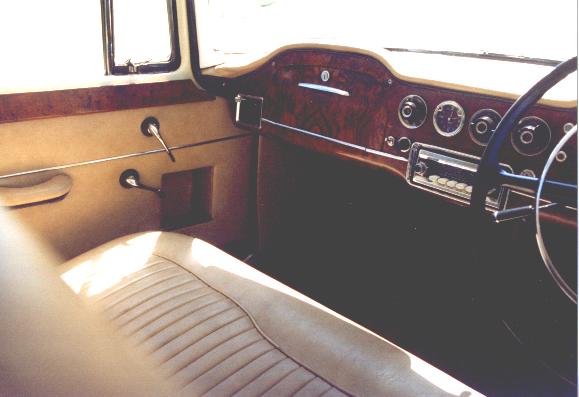
AN INTERIOR VIEW OF THE FRONT INCLUDING THE GLOVE BOX
Additional information is being added on a regular basis so keep checking.
For further information on the Humber please visit my first Geocities site with some alternative pics at
My First Geocities Humber Site.
My very first site is still worth the trip as a couple of pics here are not posted at the other sites. People still visit and Fortunecity at least still provide space which is free.
My Very First Humber Super Snipe Series 111 Site
Further Information
I have kept a log of the development process which I will be sumarizing here as time progresses.
The following headings will all eventually lead to more details further down the page with a click of the mouse button. Feel free to email.
The next part of this page is being added to as the thoughts come to mind and I look forward to including sections from people who email me in the future. It really is a case of getting all this stuff in writing for the world to see before the knowledge disappears for good. If you have access to any information at all in relation to Humbers please get in touch. Where are parts???????? For example!!!!!
For more info on a specific area click on one of the following headings to go straight to that section further down this page:
As I have said on so many occasions getting started seriously was one of the hardest stages but keeping the momentum going to the stage where an end was in sight was far more difficult. If I was doing it again I would try to refine the time frame to no longer than two years. I began by cleaning the motor and removing tonnes of red Victorian clay from the underbody of the car. It took ages and seemed to be stuck everywhere. There was surprisingly little rust in the car but there were still several holes in the bottom of the doors and the wheel arches which I filled with a special fibreglass filler after thoroughly cleaning the areas concerned. This takes longer but it stays put. You can use a heat gun to hurry the process but again be careful. By the way the fibreglass filler has a tube of additive which must be used to make the stuff set. the hotter the day the faster it sets....get the idea::)))) This stuff takes longer than the cheaper filler but trust me it is the way to go if you are serious about keeping the car.
My Humber originally came from Victoria and was purchased by Mr K. Wilson of Apollo Bay from Halloran Motors in Colac on the 5/6/61. The registration number was HJD989 and I still have one of the original plates. The 1500 mile service was carried out by Mortlock Agencies on the 20/6/61 and the amount of three pounds ten shillings and seven pence was paid in cash. I purchased in Western Australia nearly nine years ago and although unlicensed the car was driveable once the handbrake was loosened.
ENGINE: 6 Cylinders. Overhead valve.
GEARBOX: Mostly auto transmissions were sold in Australia. I would like more information if anyone knows about a manual version here. They exist...but where are they? There are some in Canada. Email me if you have any data in this area.
BRAKES: Front disks and huge drums on the rear which are efficient even by today's standards. If you are doing a restore there are really no short cuts here. Do the lot. It costs heaps even when you take all the parts out yourself but at least you know that you are driving a safe car. It goes without saying of course that all the hydraulic fluid needs to be replaced. Even when you think you have finished there is that little blighter that needs tightening just when you go to licence the car. It happenned to me. Looked like I had a major prob. In fact the connection on the "bleeding valve" just needed tightening and all was sweet.::))) Safety Brakes were very helpful and it is possible to rebuild all the components as I did for around the AU$1000 provided you take the bits apart and put them back yourself. The power booster costs but it is essential to have it working correctly. By the way the handbrake cable needs regular greasing at the point provided even after it has been retored fully. I had good reason to find this out just the other day.
COOLING SYSTEM: The water cooled system is quite low pressure by modern standards and the large rsdiator once flushed copes very well with the job at hand given the water pump and thermostat are okay. Does anyone know where you can still buy new water pumps that fit??? The supply here ran out years ago. The Humber Club of WA has supplies of housings for the upper and lower thermostat and although I have both only the upper one has had to be replaced. I also still need a new temperature electrical sender unit so that I can get the temp gauge to work. There must be one from another vehicle which will fit ....so far I can't find it. Will have to do something about this one soon so please help out here if you can.
Radiator hose info courtesy of The Humber Club of WA: The top hose of the Snipe may be replaced by the bottom hose from a Cortina TC,TD 6 Cyl 1972-77[and a 6Cyl Ford Transit] The part Number is CH1025 and the cost is AU$12.95. The bottom hose may match with the bottom one from a Landcruiser but I will check this out.
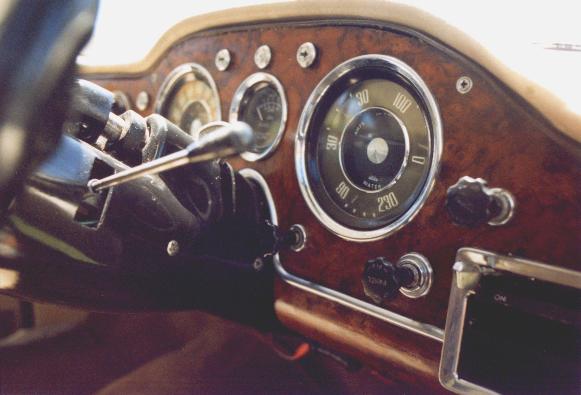
The Front Dash Details And Placement of Gauges Etc
Driving the Humber is always a relaxed process and this is assisted by the very convenient placement of all the gauges. This photocopy is from the handbook and does not include the radio.

The Restored Humber Super Snipe Series 111 Front Interior View With Glove Box
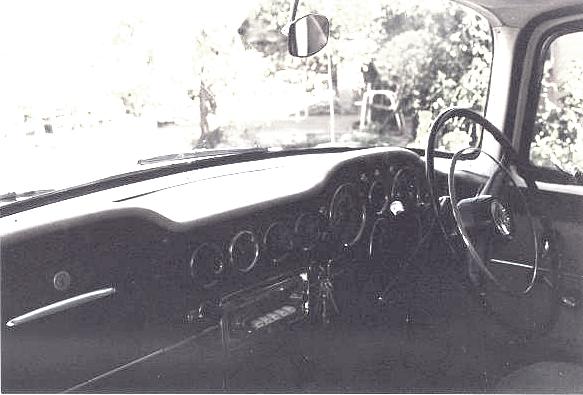
A View Of The Dash From The Driver's Side Front Door
An original invoice for the 1500 mile service from Mortlock Agencies in Port Augusta. Check out the price::)))

The cover of the original Service Manual

An Original A Bit The Worse For Wear Rootes Badge. Does Anyone Have A Better One?

I have some other snaps which may be viewed by visiting
This one is a long story.........well ......is there a short story when you come to restoring a vehicle????? Nope. I heard just yesterday about the fella who put his 1950's Holden ....this is an Australian car::))) into the people who do the full restore and after 12 months nothing had happened despite the fact that money had changed hands. Do it yourself and have the satisfaction of owning a vehicle which is truly yours. I will be adding heaps to this section as time progresses but the second car for bits is the best start. In Australia you can still buy such things as points and distributor caps and rotors but you will need to know what to ask for in order to save time at the counter. I will add this information as I continue to develop this page. For my Snipe I managed to get the water pump refurbished in Victoria which is 3000 km away. The electrical parts were easily fixed using the local electrician and bits from collected parts. Once again having a spare even if it doesn't work is often the solution to the problem. If you have any information at all on availablity of parts please let me know straight away so that this may be recorded for others to see. Below you will see a picture of the engine bay prior to the retoration. It now looks much neater and I will get some pics soon to let you see the diference. I have replaced heaps of parts but the motor is still going well....touch wood....
The Engine Bay Prior To Restoration

The Restored Humber Super Snipe Series 111 and The Snipe Prior To Restoration


Well the name of the game here is Acrylic paint... the cellulose stuff that dries before all those nasty bugs and things can get into it...well ...if you are lucky. Unless you have a big garage with all the works and a container in which to paint with air blowers etc this is really the only way to go. For heavens sake make sure that you DO NOT use that Enamel. It is cheaper but takes ages to dry and runs all over the place unless you really know what you are doing.
WHAT EQUIPMENT DO I NEED:
You will have to buy a decent spray gun but one from Taiwan or whatever will do the job fine and set you back AU$80 to $100 dollars. The touch up one is smaller and helpful but you can get by with just the one large gun which must be looked after and cleaned regularly. Always screw off the bit at the front and put it inside the bowl with some clean thinner and reseal the lid. This will keep all the air channels free for next time. You must also make sure that the breather tube connecting the inside of the bowl to the outside air is clear. A match will make sure it is at both ends. Blow through it to be sure. It tends to block gradually and will affect air pressure so that you don't get an even flow as you spray. This even flow is absolutely essential for the home handyperson who has so many other problems like dust from the wind etc.
A compressor is needed of course and there really is no way around this expense. The old vacuum cleaner paint gun just hasn't a high enough pressure to do a good job although having said this I did spray an FB Holden using this method. With acrylic paint it is possible but I don't recommend it. When buying thinners I have found that purchsing a 20 litre drum is the way to go. You always use more than you think and it is good for cleaning afterwards. Once a coat has become stable after several days used with care it may be assist as a rubbing agent on a rag to smooth paintwork even more. Take care here however or you will damage the paintwork.
PREPARATION IS THE KEY
I cannot emphasise this too much. I have taken lots of "short cuts" and they have always been so costly. Even now I am tempted and it always results in more work in the long run. If you change the paint colour like I did it is more work straight away. If you go for dark colours it costs more. The list goes on. Put simply, if you are doing it all yourself, the lighter the colour the better and of course the cheaper it is. When it comes to "touch up" it is easier. if you make a mistake....we all do... it is easier to hide.
RUBBING BACK: I read ages ago about the significance of this in an English book on restoration. They were so correct. It means heaps of work between coats. I know we all like to do 2 or 3 and think that it is not necessary...wrong. You will need heaps of wet and dry sandpaper... the black stuff and you rub down the whole lot. Where you have a "run of paint" where you stayed too long in one place do some more rubbing and get it right back to the same level as the original. The whole body needs to have the rust removed, the holes filled with fibreglas filler and a rub back which gets it to the stage where it as smooth as a baby's bottom. Once again there are no short cuts that I know of. It is just hard work.


The actual seats need to be done by a professional unless you have serious expertise in this area. The rest can be done at home ...and I did....but be prepared for lots of hours. Given this is the case you will save heaps and with care end up with a better job than they do in the shop. Time is the key and the resolve to do it again if necessary. There are no short cuts. Everything has to be taken out of the car and care taken to keep all the old stuff so that you have templates from which to work. This is the hard part if you are taking awhile to do the job because you have all this mess around. Be assured that the bit you throw out will be the bit that you need later....so don't until the car is finished.
The doors linings are interesting. You take out the whole lot and buy a big sheet of masonite from which you can cut the outside shape. A coping saw will help. It is then a matter of cutting all the holes where they should be and this is where the old one is used as a template. They old one has usually shrunk a bit so be careful. You will need to use the "wool" packing from the old door and get new vinyl from the friendly upholstery person or from a wholesaler direct. You will need lots so be prepared for the mistake or two::)) You stick the edges down straight onto the masonite with some "Bear" yellow contact cement. In actual fact you will use heaps of it even when used correctly and I stopped counting the tins after three or so.

This is a relatively easy task if you get on well with your friendly upholstery man or woman. The trick is to carefully take out the existing headlining and mark all pieces carefully so that you know which way it fits. You may then buy the headlining cloth and get it stitched to size with lots left over at the edges. Leaving plenty of spare is very important on all the edges as you can always cut off the surplus material but it is difficult to add it::)) The use of "dog clips" and clamps will assist and the material will need to be stretched well and glued into place carefully so that excess glue does not cause a problem. A heat gun will also help particularly if you are working in cold weather but be careful not to burn a hole in the cloth. Take your time and don't be afraid to stretch ths cloth if it is vinyl.The glue you use is applied to both surfaces separately and allowed to dry so that when you fit the headlining it sticks into place. You can still move it about and indeed you will need to put the door seals back in place or the whole lot may fall off if it gets too hot. This may happen easily if you leave the vehicle out in the open on a warm sunny day as I well know. Until you get both screens back in place be very careful. By the way, both windscreens front and rear have to come out so this is the time to make sure that all is well in this area and rust has been removed and the fresh screen with new rubber surrounds will fit well. I have to admit of all the tasks on the Humber restoration the refitting of the widscreens front and rear was the most difficult. The chrome surround had to be tied back and numerous attempts were needed to achieve success. Even the professional have problems and the key factor once again is having the time to keep at it. You can buy a rubber adhesive which is very suitable for the task and to this day my screens show no signs of leaking. Sikaflex-255FC is the way to go and may be used for touch up jobs if necessary. If you remove both front and rear windscreens however and clean down before refitting the job will last for ages.
I have done heaps here on my own car and suffice to say this section must be in tip top order for a reliable vehicle. You also need one "big" battery as in the size usually reserved for trucks and tractors. Again no short cuts here. All connections need to be cleaned of course and the main parts stipped and taken to the auto electrician for checking. It took me two generators to make one good one for example. I also have a radio with an amplifier would you believe which came as standard equipment and it needed some work too. I took out all the electrical connections including the dash and refitted them. Not a small task I can assure you but well worth it in the long run. The latest news as at JJuly 16 1999 is that the Starter Motor needs major surgery. Just been phoned to pick it up. Cost $121 AU which isnt too bad. The good news is that all the bits brushes etc are still readily available. Late August 1999: You wouldn't believe iit...well maybe you would:::))) The generator stopped charging...mmmmm...and iit's been fully restored. Turns out that it had to be re-magnetised. I had this problem when it was first reconditioned. Well the answer of course is that I haven't been driving it enough because of an issue I had...have with the bbrakes sticking. So I parted with the money and decided I just had to sort out tthe brakes.
I will be adding to this as I go and any help would be appreciated.
10.1 When I did the original restore I did everything possible to the brakes to ensure they were pretty much as per the original. This included a the power booster unit which cost heaps. As the months unfolded I noticed that occasionally the brakes would stick. That is to say they would lock for a second or two. At first I thought it was just the hand brake cable and indeed once this had some lubricant added the issue seemed to go away for some time. Then the front disks started to lock up occasionally. Pumping on the brake pedal seemed to stop it and if I drove the car fairly regularly there was no more to worry about. However the problem did not go away. Because I had all the power booster unit fully reconditioned it did not at first occur to me that this may be the problem. Finally when the brakes locked I jacked up the car and went around with a hammer knocking parts of the hydraulic system. The master cylinder was fine but when I got to the Power Booster and gave the casing a gentle knock or two the brakes released their hold and all was as it should be. Well my mate Bert is a mechanic who really knows his stuff so off I went with the Power Booster under one arm for some help. Well it had been fully repaired alright and the new leather gasket which does all the "plunging" was so good it was not returning when it should have been and bingo I had locked brakes. There was a piece of rubber tubing used to retain the leather gasket in place. We have removed it and so far no more problems. It may have to be replaced later as the everything wears.
10.2 Fuel additive to replace leaded or super petrol is a must to stop burning out your valves etc. It lubricates the upper cylinder areas. The product I am currently using is called Flash Lube and is made in Australia.You get a litre for around $15 AU and u add 50 ml to 50 litres of fuel. I have found that it is best to use the ordinary fuel you would use in any other late model vehicle and put in the 50 ml of additive per tank. The engine runs much better than if you use the lead replacement fuel out of the bowser. Well at least thats been my experience.
10.3 I have also started using a product called Nulon for Old Engines. You add it to the oil when you do an oil change. I am not usually a fan of additives but in this case a teflon coating is added to all the surfaces thus reducing friction and prolonging the life of the motor. Believe it or not I could hear the difference after I did the oil change and started the motor. With the passage of time it continued to get better for about three weeks. Simply less noises and smoother running. I will be adding it at each oil change from now on. Changing your oil and the filter regularly has always been the cheapest maintenance procedure of all. Unfortunately when you get a Humber these days it is very rare for this to have been done and it takes ages to flush out all the rubbish.
I have been emailed a quite a few so far and I am looking forward to receiving more which may be added to links from this page. I have been pleased to note that some people have started their own Humber Web Sites thus reducing the need for me to publish here. However I have a growing collection and it will give me something to do in my retirement maybe.
Well as the heading suggests I need to hear from you so drop in as soon as you can.I have access to a bit of material here and will add it as I go.
SOME INTERESTING MATERIAL EMAILED TO ME RECENTLY
"On the subject of transmissions,
Australian assembled Super Snipes were
available with automatic ONLY,
The venerable Borg Warner DG250 for the
Series 1-4 (1959-1964) and the lighter,
smoother, 'true' 3-speed Borg Warner
Type 35 for the Series V and Va
(1965-1968). If you see any Snipes with
manual transmission, be assured it is a
private import from the UK or elsewhere
in the British Commonwealth. (In their
day, the Snipe was moderately popular in
Canada, Southern Africa and there are
still plenty of cars kicking around the
Indian Sub-Continent in various states
of disrepair !) The manual transmission
was a four speed column shift unit with
Laycock deNormanville electric overdrive
available as a factory option. Recently
I saw a 1958 Hawk at a motor show on the
NSW Central Coast and it had manual
transmission fitted. The owner told me
that even the 4 - cylinder Hawk was
rarely ordered with manual transmission.
Pity though, I'm sure that you could
appreciate just how well the big Snipe
would go out on the open highway at
100km/h plus, In overdrive top that
smooth straight six would be whisper
quite, ticking over at about 2800rpm !
There were a number of significant
differences between Australian assembled
Snipes and ones assembled elsewhere. The
Australian Snipes were not quite so well
equipped or luxurious as there English
counterparts :
The main differences were :
- Auto transmission only for Australiann
Cars - British cars had a fully carpeted
and lined boot. - Power Steering was not
available, even as an option until the
Series IV of 1963-1964
- The Australian Snipes could not be
ordered with individual Front Seats with
separate fold down armrests.
- The Australian Snipes were available
in more colour combinations. The British
Snipes all came in fairly sombre,
conservative colours like Black, Dark
Green, Navy Blue etc., but Aussie Snipes
could also come in things like Light
Olive Green, Pale Blue, Lemon Yellow
etc.
The Snipe was a popular car in the late
50's - early 60's in Australia, part of
its popularity was the fact that it was
such outstanding value for money. In
endeavouring to keep the price down
Rootes Australia obviously 'de-equipped'
the local model to keep it price
competitive.
I honestly think that if there had been
such a thing as a 'Car of the Year'
award in 1960 the Snipe would have won
it convincingly. No other car offered
such performance and equipment in such a
stylish and value for money package. The
new straight six of 2.6 litres (later
taken out to 3 litres) was an absolute
gem, smooth, very efficient and solid as
rock (I have lots of funny stories about
people actually trying to wear these out
and what they did - but that's maybe the
subject of another email). At the time
plenty of people in Australia had been
running around in big American
side-valve cars from the 30's and 40's.
In 1960 when these cars started to wear
out, plenty of them were traded in on
the new Super Snipe by owners who felt
that the latest American cars were far
too big and expensive, and the local
Holden and Ford products far too mundane
!?
And who can blame them ? With styling
that looked like a '55 Chevrolet minus
the bulk, a luxurious interior that
boasted Walnut and lots of gauges and a
smooth efficient straight six, the Snipe
enjoyed a period (albeit briefly) of
strong sales and a formidable
reputation.
Alas it did not last long, by the time
my own car left the Rootes Australia
factory in Clayton, Victoria in
September of 1963 the Snipes days were
numbered. The Holden Premier, Ford
Falcon Futura and most importantly the
new Chrysler Valiant steadily ate into
the Snipes sales and when the all new
Australian designed and built Ford
Fairlane came in 1966, that signalled
the Snipes deathknell. By then of course
Rootes had been taken over by Chrysler
and the new parent showed little
enthusiasm for continuing the model -
what a shame !"
THIS IS GOOD STUFF. IF YOU HAVE SOMETHING YOU WOULD LIKE TO ADD HERE LET ME KNOW
Please email me at kev6@hotmail.com if you have any comments or would simply like to chat on the subject of Humbers or car restoration in general.I get heaps of great stuff and it will help if you tell me I may publish material you send on this page.
kev6@hotmail.com