| HÖRGE's Coral Reef Page |
| Reef Ecology |
| Ligpo Reef |
| Tank System |
| Collecting |
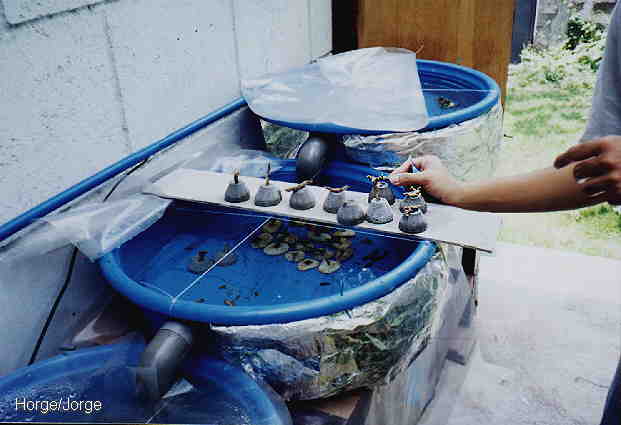
| Anchoring |
| Care |
| Gallery |
| e-mail me |
| Home |
h
d
fb
| The Palanggana System (palanggana: Filipino term for washbasin) |
| My reef system is simple, cheap, and
stands up to the very considerable effects of
Philippine weather and climate. The grow-out tanks are basins. These provide a large surface area with respect to water surface and bottom, for better stocking capacity and lighting. These basins are equipped with a surface-skimming overflow, and are arranged in descending height.Water moves by gravity downflow from one basin to another and into the lowest basin, which is filled with live rock. Thence it drains
into the sump which contains a foam fractionator
(protein skimmer) which is technically in-line,
and a powerhead pump to return the processed
water back via pipe to the topmost basin in a
fairly straightforward cycle. |
 Lighting is natural, as my geographic location is ideal regarding light. It is farthest from ideal regarding temperature. The sump is shaded, and the basin sides are protected with opaque insulation. An overhead sunscreen/rainshield reduces the effects of the intense Philippine sunshine and the robust Philippine rainfall. |
The System at a Glance
|

| Materials Used | Location and Assembly Notes | |
| The grow-out basins are ordinary
plastic washbasins, cheap and durable. They hold
about 25 litres each, which isn't a lot and
therefore doesn't cost a lot saltmix-wise -and I
DON'T scrimp on the quality of the salt. The
overflows are PVC elbows with a very short piece
of pipe in one end. The basins are protected by covers of plain clear PE plastic sheeting. These rest on a crosshairs of nylon fishing line tied into holes drilled or melted into the basin rim. The cover sheet is held in place by nylon or wire-tie 'pegs' also tied into basin-rim holes, and through holes in the cover sheet. The cover sheets are cut to allow for overflows into their basins. The sump is similarly covered. The sump is just a plastic bucket
with a plastic handle. It holds about 25 litres
of water. It sits on the ground, shaded by the
table-frame on which the basins rest. (We'll get
to the table in a minute). The table is of 2x2 wooden construction, and fairly simple to make if you have any carpentry skills. It has to be well-braced and well-sealed (with paint if you like). On the table, small platforms of sealed 2x2 wood and plywood allow for gradations in the height of the basins.Overhead, a rainscreen of clear heavy-duty plastic (if you're rich you can spring for polycarbonate) coupled with a sunscreen of blue plastic netting tempers the elements. Likewise any appropriate thermal and optical shielding around the basin-sides and sump. |
As this system is so bare and openly
reliant on natural sulight, location is terribly
key. I'm an architect, so I had it easy: I built the damned location. Hard by the firewall on one side of our home, I installed a high, decorative trellis. This supported the sunscreen and rainscreen. Under it, I had a concrete slab poured. Electrical outlets were installed, and a water faucet tapped in. I took into account solar angle and pathway, so that the house would not shade the basins too much or too little --throughout the year. Assembling PVC plumbing is easy as long as you measure everything out with exactitude. Once a coupling is glued in, it's fairly permanent. the glue emits toxic fumes, so take precautions. Drilling anchorage holes into the basin rim is easy if you DON'T drill: just melt them. With a pair of pliers, hold a 1" common wire nail over a candleflame, and then melt holes. If the nail cools, then reheat. This of course works with PE basins and buckets. With certain other thermoset plastics, you're better off using a drill. Melting plastic can give off fumes, so take precautions. The overflows are
trickier. The hot-nail technique can be used to
trace out the hole in the side of the basin, or
you can use a soldering iron to trace and melt
the hole outright. It IS tricky. And melted
plastic gives off fumes, so ...you know the
drill. Don't forget the other peripheral equipment you'll need to maintain and monitor the system: a hyfrometer to roughly gauge the salinity of the water; an extra bucket for mixing saltwater; a thermometer to tell you when to start panicking. A flexible plastic hose (pretty large-bore!) or open gutter that can fit onto the outlet of the return pipe is a big help if/when you have to bypass one basin or another. I have never had to, but a leak is always a possibility. |
| Support Livestock |
| Apart
from the myriad lifeforms that come part and
parcel of the live rock, there are a number of
useful creatures you can stock the basins with. I deem most herbivorous snails (except maybe Trochus sp.) too fragile and too clumsy to enlist in the war against unwanted algae. Sacoglossan slugs are even worse against the heat. Young sea urchins of the Genus Diadema have given me the least trouble: they are too light to knock most anything over, and are deadly efficient at removing ALL surface algae. When they grow too large, I either give them away or can return them to their original home: Ligpo's reefs. A lot of friends have suggested inclusion of fish, but I feel the basins are too open to give most fish any feeling of security. I HAVE hosted fishes from time to time, for weeks (often due to emergencies with friends' tanks) and the system can handle the load fine. The fish just get real jumpy (literally) with me leaning over the basins. |
 |