
CONTENTS
Step Zero - What's This All About ?
PART ONE : THE BASICS OF COMPRESSION
Step Three - Audio Compression
PART TWO : MORE POSSIBILITIES AND METHODS
+ Cropping
+ Resizing
+ Smoothness
+ Brightness & Contrast
+ Deinterlacing
+ Splitting A Movie Up Manually
+ Loading In Damaged Video Files
+ Removing Video And Audio Artifacts
PART THREE : ADDITIONAL INFORMATION
+ Removing Encryption
+ Encoding Video
+ Extracting Audio
+ Interleaving Video & Audio
STEP ZERO - WHAT'S THIS ALL ABOUT ?
Say you have a 100 MByte file - you want to compress it to around 60
Mb or even less
You hear through the grape-vine that DivX and VirtualDub are the way
to go
Here's how.
First off make sure you have installed the DivX codec and VirtualDub
on your system
By the way... in case you don't already have a copy of either of these...
take a look at the "Finding Software" section below
..or to find those programs (and just about anything else) just type
in the phrase in a search engine....
...of course this is how all kinds of other stuff can be found too......
Once you have them, and you've installed, and you've rebooted your computer
Now run VirtualDub
There are several things you can do to make the original file smaller while not sacrificing quality
* Video Compression
* Frame Rate
* Audio Compression
From there you can make the picture quality better and possibly diminish file-size even more
* Video Filters
Finally you can remove excess scenes and frames,
and divide the final file up if its too large as a single file,
and maybe even polish up the final file by removing artifacts
* Scene Editing
Let's take a look at each of these in turn.
NOTE : Most sections of this manual have been reordered, rewritten,
and redone.
Even if you have read the previous version of this manual, PLEASE
READ through the entire manual in order again.
Load in the file you want to edit into VirtualDub
by choosing OPEN or by clicking-and-dragging the file icon onto the
VirtualDub window
NOTE : Load a small file into VirtualDub right now, and try this out while reading it.
Choose COMPRESSION under the VIDEO menu, as shown here
When Compression is selected this menu comes up

Choose the type of codec (compressor/decompressor) you want to use - generally that will be DivX
NOTE:
Low-Motion is best for most movies
Fast-Motion is only good when almost the entire movie is very fast
paced (action movies..)
Typically, use the highest numbered DivX available (divx-4), and use the Low-Motion setting.
REMEMBER
What you are aiming for is MAXIMUM compression with MINIMUM quality
loss
So just choosing the compressor is NOT ENOUGH
Now you have to configure it and fiddle around with the settings
Start off by clicking the "CONFIGURE" button (as shown above)
and this window pops up

Generally keep the smoothness/crispness settings as it is
The Keyframe Setting
There are abundant reasons to change the keyframe setting to every
"1" second,
rather than keeping the default setting of "10" seconds.
One reason is that this allows for LESS LAG TIME when searching through
the file during playback.
Another reason is that the video quality will be better if the file
is ever edited later.
Still another reason is that splitting up a file later on will be much
easier to do.
Suffice it to say for now, simply change this value from "10" to "1",
unless file-size is an
absolutely critical issue (which in 99.9999% cases it will NOT be).
The filesize will be slightly larger with a 1 setting than with a 10
setting.
The increase will be so small, however, that it will be insignificant
in most cases.
NOTE : Experiments on a 10-Mbyte .avi file resulted in a size increase of only 4-Kbytes by adding the convenience of extra keyframes. That is less than one percent size increase. It's really worth it.
NOTE : For a more detailed explanation of what "key" frames versus
"delta" frames are,
choose "Contents" in the HELP menu of VirtualDub itself, then double-click
"Introduction to digital video".
The Data Rate
The main value to mess around with is the Data Rate
910 seems to be the standard, and it generally results in REALLY BIG
files
You will probably find that less than half usually results in little
or no quality loss,
but the target file will be MUCH SMALLER than the original file
(some numbers to experiment with initially : 500 kbps, 400 kbps, 350 kbps, 300 kbps..)
Choose the Data Rate value you want (much lower than 910!!), and click the OK button
NOTE : You may have to create a number of test files before finding just the right values..
STEP ONE STEP-BY-STEP
* Choose COMPRESSION under the VIDEO menu
* Choose DivX ;) MPEG-4 Version 4 (or 3, or whatever version you happen
to have...) as the compressor
* Click the CONFIGURE button
* Change the KEYFRAME rate from every "10" seconds to every "1" second
* Choose the DATA RATE (try starting with 400.. then see if you can
make it lower or if you need to go higher..)
The second important consideration in diminishing filesize is the frame rate
NOTE : Typically, video captures from an American DVD or videotape
will be 29.97 frames per second (fps)
This is because of the NTSC (television) standard for color frames
(black-and-white is shown at 30-fps)
There are also different frame-sizes and frame-rates for PAL, SECAM,
and other video formats.
For the typical video clip shown on a computer screen,
the frames-per-second rate can usually be made MUCH LOWER than the
original capture speed
24 fps usually is fine - for slower or more dramatic sequences even 15 fps might turn out to be ok
NOTE : simply changing from 30 fps to 24 fps could result in as much as 20 percent file size reduction!
NOTE about NOTE : but probably not exactly 20 percent, because of the way video frames are actually stored.....
Changing the frame rate is easy using VirtualDub:
Choose FRAME RATE from the VIDEO menu (as seen in the first picture
above...)
and the following menu appears
In the top box there is a "Frame Rate Conversion" option - the standard is "No change"
In the example shown the file was captured at 30 frames per second (30
fps)
Is that too much ? - Yes it is.
NOTE : Not only is 29.970 frames-per-second 'too much' for most videos,
it will make some aspects of Scene Editing (one of the Steps below)
much more complicated.
It's better to choose a slightly lower, 'round-number' frame-rate
in most cases, such as 24.0, or 25.0.
To change the frame-rate simply click the radio button reading "Change
to", and type in the value you want
Typically 24 fps lowers file size significantly, without sacrificing
overall video quality
NOTE : In the case of frame rates, file quality does NOT mean the
picture quality of a frame,
but rather it means the 'smoothness' frame-by-frame, when playing
back.
If the frame rate is too low, the picture tends to become "jerky"
- this is often due to the divx codec
'computing' the in-between frames which are now missing...
Another compression possibility is "decimating" every 2nd or every 3rd
frame
Experiment with this setting if you wish, and test the resulting file
to check if it plays back nicely
STEP TWO STEP-BY-STEP
* Choose FRAME RATE under the VIDEO menu
* If the frame rate is rather high (29.97 or 30-fps)
Choose one of these two alternatives
- Alternative 1 : Choose CHANGE TO and type in "24" or "25" or "15"
or whatever frame-per-second rate you wish
- Alternative 2 : Choose PROCESS EVERY THIRD FRAME or SECOND FRAME
or whichever value you wish
NOTE : Remember to test the playback by saving the file under
a NEW FILENAME at this point
If there is no 'jerkiness' yet the filesize is smaller, go to the
next step keeping the changes you just made;
if however there IS unacceptably jerky playback, you probably chose
TOO LOW of a frame-rate
STEP THREE - AUDIO COMPRESSION
Numerous possibilities are available for audio compression and quality
Observe the menu options under Audio

Sometimes the original file does not even have audio
Sometimes the audio in the original file is ANNOYING or UNNECESSARY
If you choose for no audio to be added to the target file,
simply choose NO AUDIO from the AUDIO menu and none will be added
NOTE : this is of course the minimum file size possible for audio (zero!!)
If you DO choose to add audio, choose the type of audio that is used
first
- IF you are using the audio ALREADY IN the original video file, leave
the default of "AVI audio" checked
(whether the original file is AVI or MPEG)
- ONLY use WAV AUDIO if you have a specific .wav file to be inserted
into the video,
then select the audio file you want to include inside the target video
file
Generally, you will keep the AVI AUDIO setting, which is the default setting.
If the original file already has compressed audio (and many .mpeg and
divx files already do have this...)
you may wish to keep the audio how it was originally
To keep the original audio EXACTLY how it is stored in the original
file
leave the default checked value of "Direct stream copy" alone....
**** HOWEVER ****
you can't go wrong re-compressing the audio
so go ahead and choose "Full processing mode" (as shown in the picture
directly above)
and then notice that this window appears

For good audio quality with incredible compression rate
AND almost universal acceptance and compatability
you just can't do much better than MPEG Layer-3 (as shown above)
8 kbps is the lowest setting, but it is REALLY LOW QUALITY!!!
It is "tinny" with extreme warbling and voices are generally muddy
By bumping up just one more kilo-BYTE per second, to 16 kbps
the sound becomes FAR better
and the file size increase is, relatively speaking, extremely SMALL
(you may notice only 100-Kbytes or less added to a 10-Mbyte file..)
Unless the file-size is at the very brink of going over some limit (servers,
etc.),
16 kbps is a good overall setting.
In some cases with more complex audio 18 is a better choice because
of a
tendency for 16 to still have "swirly" sounding artifacts.
So after choosing your audio compressor (mp3 generally),
and its data rate (16 or 18 kbps recommended),
Click the OK button to finalize your selections
STEP THREE STEP-BY-STEP
* Choose "FULL PROCESSING MODE" under the AUDIO menu
* Choose "COMPRESSION" under the AUDIO menu
* Choose the "MPEG-3" compressor
* Choose 16 or 18 kbps (for files to be delivered over the Internet)
That finishes the recompression of the file.
Both the audio and the video are now the minimal size, with maximum
quality.
NOTE : You can test how good the compression is so far, by .ZIP'ping
the resulting video file.
If there is less than 5% compression, the compression is
probably about as good as it will get.
If there is more than 5% compression, the audio and/or video
can probably be compressed even further.
But wait -- there's still more !
The individual frame quality might be able to be improved.
And there might be parts or scenes you want to take out, or isolate.
So, on to the next Step....
NOTE : Consider writing down the final changes you made for each
step above. (on paper or a simple .txt file)
That way, if you ever need to re-edit the file later you'll have
your preferred settings "immediately" available.
This is particularly important because you might make changes later
to the file with video filters.
Filters process all of the frames of the video, in sequence,
one frame at a time.
They modify the video image, resulting in significant changes and improvements
to the overall picture quality.
NOTE : Filters can be made by third parties which perform all sorts of other functions as well, including titles and subtitling. They are included in VirtualDub as "plug-ins".
NOTE : Video filters may or may not decrease the file size
of your final file.
In some cases they might end up increasing file size, though
typically this would be by a very small amount.
It depends upon the filter, and what its effect on the picture is.
The standard filters are very useful for changing the quality of the individual frames of a movie.
NOTE : If you are just getting started trying to compress videos
with VirtualDub,
you might want to skip this step on filters initially.
They improve the picture quality, but typically do not 'shrink'
the size of the file significantly.
It also will probably take some time to become familiar with which
filter does what,
and what sequences are best for what purpose.
Eventually, however, you will want to get back to this section.
Not only can filters make the video look significantly better,
you might even be able to make the file a little smaller by using
the 'right' filter combinations.
And, they can also 'repair' seemingly damaged videos. The results
are sometimes surprising.
VirtualDub comes with a number of 'standard' or default video filters.
NOTE : As of version 1.4.7, there is no audio filter feature.
The video will be modified by filters in-the-order in which the
filters are added.
Of course, even once they are added the order of the filters can be
changed around.
Assuming you already have a video file loaded into VirtualDub...
Choose "Filters" in the VIDEO menu, and this window will appear

The OK and CANCEL buttons are obviously self-explanatory.
Clicking on ADD allows you to add filters which will be performed in
sequence upon the video you have loaded in.
Clicking on DELETE removes the single filter you have selected in the
filter list on the left.
Clicking on MOVE UP moves the selected filter up one position in the
list of filters.
Clicking on MOVE DOWN moves the selected filter down one position in
the list of filters.
NOTE : Remember, the order of the filters MATTERS.
The CROPPING feature is greyed-out by default. Once any filter has been
added to the list, it can be selected.
With it you can "crop off" the edges of a video. See the list below
for more info.
NOTE : Cropping is always performed first. It is done before any of the filters in the Add-List.
The CONFIGURE feature opens up a unique pop-up window for each filter.
When you first add a filter, this pop-up window comes up automatically.
To change the configuration settings of an added filter after it's
been added,
left-click on the filter in the Added-Filter-List once, then click
the "Configure" button.
Once you choose the "Add..." button, a dialogue box like this will come up
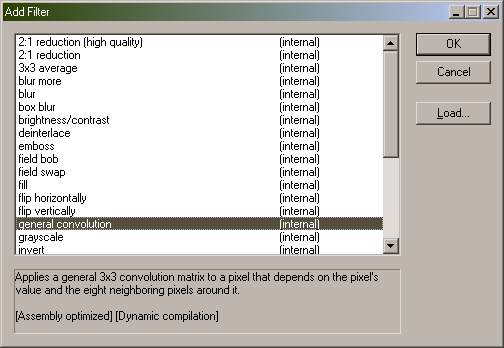
Notice that they are listed in alphabetical order, with a text-box at the bottom that prints out basic information about what a filter does when you click on it.
NOTE : Remember, every filter you add will be applied to the ENTIRE video.
NOTE : Each filter will add some extra time to the recompression process. Some a lot, some a little.
The filters included by default are very basic, but they process the frames very quickly, and get the job they are designed for done very well. Here's some more information about the ones which will be most useful when you first get started:
NOTE : Part of the following is descriptions of what the filters
actually do,
and part is observations of how they work best, based on
experiences.
NOTE : The best thing way to learn about filters is to open up a
few small 'test' files,
and experiment with an individual filter, and then with combinations
of filters.
It's easy once you get the hang of it.
Cropping : Removing Edges From The Four Sides Of The Video
One of the most basic filtering features, is being able to crop off
edges of a video.
This is most useful for captures from VHS tape, where the edges have
distracting "video noise" or "glitches".
By adding any filter to the list, the "Cropping" button is made selectable.
Select any filter from the ADD list, and then click the CROPPING button
to edit its values.
Simply click the UP and DOWN arrow buttons for whatever side of the picture you would like to remove.
NOTE : Cropping is NOT the same as resizing.
Cropping removes edges from the 'original' frame.
The resulting video WILL have a different frame size,
BUT it will NOT be proportional to the original video.
If you want to maintain a 'standard' frame size (such as 320x240 or
352x288)
after you have cropped an image, you'll have to think it through
a bit.
NOTE : See the section below on Resizing for more info on how to use that filter
To Restore A Cropped Video BACK To Its Original Frame Size:
* Add the resize filter
* Choose it and then click the CROPPING button
* Crop whatever edges you want and choose OK to finalize the changes
* Then choose the RESIZE filter and choose CONFIGURE
and make the frame size what it was originally (or, whatever new size
you want it to be)
There's a big problem though.
The problem is that the resized image might be DISTORTED,
if the cropping was not done in proportion to the original video.
NOTE : Some arithmetic is coming right up.
EXAMPLE ON MAINTAINING PROPORTION AFTER CROPPING AND RESIZING :
If you have a 320x240 video,
and you crop off 5 pixels from the right of the video,
and 9 from the top of it,
you will end up with a 315x231 video.
BE CAREFUL HOWEVER if you are going to resize it back to 320x240.
To keep the cropped video looking PROPORTIONAL to the original video
(of 320x240),
you will have to perform cropping 4 pixels horizontally AND 3 pixels
vertically "in steps"
(since 320 and 240 are in the proportion 4:3)
OTHERWISE the resulting cropped video image might look DISTORTED
because too much vertical or horizontal 'stretching' occurred
NOTE : You could also just crop the video to say 314x237,
or some other unusual size, and just keep it that way, WITHOUT
resizing.
Then you don't have to do any of this extra multiplication
or division.
But then it'll be a "funny" -- that is unusual -- frame size.
320:240 is a 4:3 proportion because 320/240 = 4/3. It's simple arithmetic.
For 352x288, do the math and it ends up being in proportion 11:9.
For ANY video frame size,
Just keep dividing both "sides" (the horizontal # and the vertical
#) by the same numbers,
until you end up with two numbers that can't be simplified anymore.
In the example above, TO KEEP THE VIDEO PROPORTIONAL AFTER CROPPING,
that would mean:
- changing the 5-pixel horizontal cropping to an 8-pixel cropping,
AND
- changing the 9-pixel vertical cropping to a 6-pixel cropping.
It's a compromise.
8:6 is a 4:3 proportion, just like how 320:240 is a 4:3 proportion.
("proportional" since multiplying 4:3 by the same number (2) results
in 4x2 = 8, and 3x2 = 6.....)
NOTE : This really is easy & straightforward. Look past the river of words. The basic idea is logical.
So if you're editing a video that was originally 352x288,
and you want to resize it to the original size after you crop it,
whenever you crop off 11 pixels horizontally, ALWAYS take off 9 pixels
vertically,
and vice versa.
NOTE : This is a lot of words saying something very simple:
if you are going to resize, make cropping changes in proportion
to the original.
So that when the 315x231 video is re-cropped to actually be 312x234,
then when that video is resized "back" to 320x240,
the picture will be EXACTLY proportional to the original video -- with
no distortion.
315x231 on the other hand would have introduced some distortion
to the resized picture.
And that ends the example.
So either crop and leave the frame size 'unusual', or
make sure the cropping occurs in proportion to the original
and then resize it back to a 'standard' frame size.
The choice is yours.
Resizing : Changing Frame Size For Picture Quality And/Or File Size
There are several standard resizing filters available with VirtualDub.
SHRINKING VIDEO
Two shrink the video image to exactly half of its original size.
They are listed at the very top of the list (2:1 resize).
One of those two filters simply works faster, by removing pixels from
the original image during the resizing.
It processes faster, however the resulting picture quality might not
be as good as it could be.
The other of these two filters performs a "high quality" shrinking, by having a slight overlap for each pixel and its neighboring pixels. In this way lines tend to be less jagged than with the 'faster' 2:1 resizing filter.
It's speed versus quality.
If you are going to shrink the video size, it is recommended to use
the "2:1 resize (high quality)" filter.
The time difference is very slight, but the picture quality
difference can be significant.
Why even shrink the image at all ?
* File Size considerations
If a video is larger than 320x240 or 352x288, shrinking the frame size
will probably significantly reduce the size of the resulting file, while
keeping the picture quality about the same.
NOTE : Always capture video at the largest frame size that
your processor and memory can handle.
This applies to TV video, VHS tapes, and DVD captures as well.
If a larger video is shrunk to 320x240 or similar size, the quality
will be MUCH HIGHER
than by simply capturing the same video at 320x240.
Shrinking the frame size from say 640x480 to say 320x240,
will often result in about the same picture quality as the original
640x480 video,
but the new 320x240 file will probably be much much smaller.
* Processing considerations
The larger each frame is, the more time is required to process each
frame. This is true even if both a 320x240, and an 'equivalent' 480x360
video file, are set to "full screen" mode with a video player.
In consideration of those who will be playing back the video, a smaller
frame size means smoother playback if the processor and/or hard drive speeds
are limited.
* Image Quality consideration
A video which looks jagged in its original larger frame-size, might
be significantly improved by simply shrinking the image. In some cases
additional filters, such as blurring, are no longer needed. It's worth
experimenting with.
NOTE : Although shrinking a 320x240 or 352x288 video to half size
will make the resulting file a lot smaller,
the picture quality will probably DEGRADE TREMENDOUSLY.
Make certain to test the shrunken video at full-screen, or
whatever size you are planning to play it back at.
There's no point in making a file smaller and smaller, if the quality
becomes unacceptable in the process!
NOTE ABOUT NOTE : You could of course experiment with 'in between'
frame sizes, such as shrinking 320x240
to 240x180. The picture-quality versus file-size changes might
be acceptable in some cases.
ENLARGING VIDEO
Enlarging video will almost certainly introduce video artifacts, including
'jagged' edges, and extrapolated inconsistencies in detailed areas (pixels
being drawn as a result of the filter, "guessing" what would have been
in an original larger picture).
So, when would this ever even be performed?
As it turns out, an enlarged video can then have additional video
filters in the filter sequence.
These will further process the frame images, and in some cases this
improves the overall picture quality.
Smoothing the image, or performing mild (gaussian) blurs, are particularly
effective at improving enlarged images.
The resulting video will often end up looking significantly better
in full-screen mode, than the original smaller video did.
If a video is around 320x240 or 352x288, leave it alone.
On the other hand, a 160x120 video can often be improved by enlarging
it.
In any case, enlarging video will almost certainly require additional
filters to be added in the sequence after it as well. Otherwise it
will tend to look too 'pixelated', or 'blocky'.
Enlarging the video requires the generic "Resize" filter from the standard VirtualDub filter list.
Calculate the new frame size dimensions (probably by multiplying by
a round number, like 2 or 3),
and then writing in those new values.
NOTE : Like with the shrinking video example above, you can also
use fractions, such as 1.5
This would enlarge a 320x240 video, to 480x360 -- that being the
result of (320x1.5)x(240x1.5)
For example, 160x120 will become (160x2)x(120x2) = (320)x(240) when doubled in size.
Again, the reason for keeping track of the numbers,
AND making sure to always multiply or divide by the same number on
both side,
is so that the picture remains proportional from the original.
Otherwise, it'll start looking 'stretched-out' or 'squashed'.
NOTE : For example, try resizing a 320x240 video, to 480x320. It'll look "squashed".
Smoothing : Softening The Borders Between Parts Of The Video Image
The DIVX compressor (in Step One above) has a smoothness/crispness setting. This can be used to make the frame picture quality smoother. The edges between objects in the picture will seem less harsh.
Higher levels of smoothing or blurring can also provide an 'emotional effect', making the video seem more like a 'day-dream'.
As you will recall, there is a "Smoothness / Crispness" setting in the DIVX compression window (see Step 1 above).
When first starting, however, just keep the divx-compressor crispness
setting to 100%, that is as sharp as possible.
Then, if the picture still looks "jagged" after compression, go to
the Filter menu and add a 'smoothing' filter.
NOTE : As with everything else in this section, experiment with this to discover your own preference.
There are actually a number of standard filters in VirtualDub which
perform smoothing of one kind or another.
These include smoothing, temporal smoothing, blurring, and matrix averaging.
Probably the best way to get started with smoothing or blurring video, is to choose the 'generic' "Smoothing" filter, enable the 'noise prefilter', enable the preview image, and set the smooth level to a low number (initially try around 8 to 12).
Then compress the file, and play it back at full-screen to see whether to increase or decrease the smoothing-effect.
- The "Box blur" filter has a lot of flexibility.
The standard "Blur" filter performs an effective Gaussian blur, but
does not have any options for the radius size.
- The "3x3 Matrix" interpolation filter takes an average of neighboring
pixels. There are no configuration options.
It can have an good effect on some videos.
- The "Temporal Smoother" can have a very noticeable effect on the picture, as opposed to most of the other filters in this section which are generally rather subtle. The 'ghost' images which tend to result might enhance the movie's playback, but it might also end up distracting more from the original video.
Experiment with the various other methods of blurring and smoothing
the image, by selecting different filters.
Try putting the smoothing filter in a different order in the sequence:
For example, there is a big difference between smoothing
first and then shrinking the video 2:1,
versus shrinking the video 2:1 first, and then smoothing.
Try it out!
NOTE : There is also a "Sharpen" filter included as a standard filter. This obviously does the 'opposite' of smoothing or blurring, and emphasizes lines or contrast between parts of the video's picture. Use this filter if the original movie already seems too blurry or hazy, to 'cancel' the original blurriness out.
NOTE ABOUT NOTE : As with smoothing filters, sharpening filters can introduce distortion to the picture if overused. Make sure you test the resulting changes in full-screen mode, or whatever conditions the video will probably be played back in.
Brightness And Contrast : Enhancing The Visibility Of The Picture
The title description is self-explanatory. There are a few filters included which adjust the brightness and contrast, as well as the 'luminosity' of the frames. This is useful if you notice :
- the foreground images (people, etc..) blend in too much with the background
scenery
- the picture looks too dark, too light, or too muddy
- you want to be able to emphasize the edges of the foreground images
The "Brightness & Contrast" filter is very straightforward to use. Unfortunately it does not offer a preview image in the configuration window.
As you would expect, brightness up and down makes the picture lighter
or darker respectively.
And contrast changes how much the images stand-out from one
another.
You really have to try it out for yourself, to know the difference.
Another useful way to alter the brightness and contrast of the video, is the "Levels" filter. It appears that this filter makes adjusts equivalent to the "gamma level" changes in still image editing programs.
It fine-tunes the luminosity of the image. Unlike the brightness/contrast filter, this one does have a preview image, so you can see immediately what the effect of changing the controls is going to be upon a typical frame of the movie. Very helpful.
NOTE : The brightness and contrast of a picture can typically be
adjusted later in the sequence of filters.
You should probably put these filters low in the filter-sequence
list.
Deinterlacing : Removing Scan-Lines From NTSC Captured Video
This can be very helpful for videos captured from VHS tapes or directly from NTSC (American) television.
A little background might be helpful in understanding when to use
this filter:
TV images are presented on screen in two "swipes", each taking 1/60th
of a second to perform.
There are historical reasons for this 'double-swipe', versus just doing
it all in one pass.
One swipe presents the odd scan-lines onto the screen, numbers
1, 3, 5, 7, 9, ...
the other swipe displays the even scan-lines, numbers 2, 4,
6, 8, 10, ...
It still seems like the images are being presented 'instantly', because
this is happening at such a high speed.
When capturing to a computer, the video is often captured with each
of these 'swipes' stored separately, with the even scans separate
from the odd scans. When they are shown onscreen, they are presented as
they were on TV.
What was 'invisible' on a television screen, however, is usually VERY
visible on the higher-quality computer screen.
The video tends to appear split-up, into 'jagged' horizontal
lines.
Deinterlacing combines the even and odd scan-line double-images, into single, combined full images.
NOTE : Deinterlacing may or may not improve the picture of video captured from PAL, SECAM, or other video standard sources. Try it out and find out.
The deinterlacing filter included with VirtualDub can work wonders for
a 'horizontal-jaggie' video.
Simply choose the "Deinterlace" filter, and keep the "Blend fields
together (best)" option.
NOTE : Typically only add the deinterlace filter to videos which
have been split-up as described above.
If added to other videos, it might end up making the picture MORE
jagged, rather than less.
NOTE : This filter should probably be high on the Filter-Add-List
-- maybe even before resizing.
Experiment with deinterlace versus blurring or smoothing.
Some videos might look better with blurring before or after.
Some might not need deinterlacing at all once blurring is added, even if
the video is interlaced.
Different video clips will yield different results.
NOTE : RGB Editing Is Missing As Of VirtualDub 1.4.7
Unfortunately, a standard "RGB editing" filter is missing from the present
version of VirtualDub.
RGB stands for "Red-Green-Blue", and editing this allows you to change
the actual color levels of the captured video.
This can be particularly useful for fine-tuning skin-color, which might be too red or too green as a result of the video capturing process. Small changes in the blue or red values, can significantly change the overall picture quality.
You can scour the 'Net and look for third-party plug-in filters, including
ones for RGB editing.
STEP FOUR STEP-BY-STEP
* Choose "FILTERS" in the VIDEO menu
* Click "ADD..." to add filters one at a time
* Configure the filter using the dialogue box that pops up when you
choose OK to add it;
If you need to modify it later, single-click the filter in the Filter
list, then click the "CONFIGURE" button
* Remember, the filters are processed in sequence from the top to the
bottom of the filter-add-list
ONCE YOU HAVE ALL THE SETTINGS AS YOU LIKE THEM
CHOOSE "SAVE AVI" UNDER THE FILE MENU
AND PICK A NEW FILENAME TO SAVE UNDER
AND THEN TEST OUT YOUR NEW CREATION
If the resulting file is too big - or too crummy - or too whatever
simply change some of the settings, and try again
THIS IS A GOOD PLACE TO SAVE THE FILE
IF YOU NEED TO EDIT THE FILE LATER AS DESCRIBED IN "SCENE EDITING"
BELOW
YOU CAN CHOOSE "DIRECT STREAM COPY" FOR BOTH VIDEO AND AUDIO
AND THE FILE WILL BE SAVED AS EDITED, WITHOUT RECOMPRESSING
NOTE : This step assumes that you have already completely COMPRESSED the file you are editing, using the methods in the sections above. The video and audio should be exactly the quality and size that you wish them to be. This step will simply make "Direct Stream Copies" of the audio and video, which performs NO compression whatsoever.
VirtualDub has basic editing capabilities, which can be used for several purposes.
Here's an indication of what is available

NOTE : For now VirtualDub only allows Selection and Deletion. There is NO cutting or copying, and therefore no pasting. So, scenes cannot be moved around.
The row of buttons along the bottom correspond to most of the options
available under the EDIT menu,
but you will probably feel more comfortable at the beginning simply
pulling-and-dragging the frame position
marker just above the row of buttons, or by using the keyboard to maneuver
around.
The frame position marker is the downward pointing prompt ![]() at the bottom
at the bottom
of the VirtualDub window (as shown in the VirtualDub window immediately
above).
It is always updated to indicate the exact frame VirtualDub
is 'on' at any given moment.
It can be moved by holding-and-dragging it with the mouse,
or through various keystrokes indicated in the picture above,
and as described in the table below.
Still, there are lots of possibilities and uses given these basic tools.
This is how to NAVIGATE during VirtualDub Editing :
|
|
moves 'manually' through the file
note: turning OFF the preview images makes it move faster |
|
|
move 1 frame at a time through the file
left moves back one frame, right moves forward one |
|
|
move 50 frames at a time through the file
similar to above except moves through much faster |
|
|
starts a selection for further editing |
|
|
ends the selection which was started by the <home> key |
|
|
if there IS a selection as described above, this deletes the entire
selection up to AND INCLUDING the last frame chosen
otherwise, if there IS NOT a selection,
|
NOTE : deleting frames from the video DOES NOT delete the frames
from the original file loaded in --
however do keep a backup copy, and also always save changes
under a new filename.
Now, with those basic keystrokes and mouse movements you know how to move around within a video file.
You can now navigate with up to frame-by-frame precision,
and make selections that you want to be deleted from the original movie.
EXAMPLE : Using VirtualDub Editing To Extract A Single Scene From A Bigger Movie
This is the scenario :
You've already captured the latest "Batman Beyond" episodes DVD onto
your hard drive.
You've already compressed it using the latest DivX compressor.
NOTE : There's a section later on how to rip a DVD onto your hard drive and encode it into a DIVX/MP3 file.
BUT, there's only ONE episode out of the five that you want to make available.
You want to isolate this one scene.
VirtualDub DOES NOT have "Copy and Paste" features yet,
so you cannot directly just copy the scene out of the movie,
and then paste that section and save it as a new and separate file.
But VirtualDub DOES have a "Cutting" feature, by being able to delete
frames and frame-selections.
As it turns out, this is enough to accomplish the task.
It's called trimming. Here's how to do it.
First Move : EDITING FRAMES AFTER THE SCENE ENDS
First you move to the end of the scene you want to keep.
Use the mouse, clicking-and-dragging the frame position pointer to
the 'general area' of the scene,
then use the left-and-right arrow keys for frame-by-frame precision
to get to the EXACT ENDING.
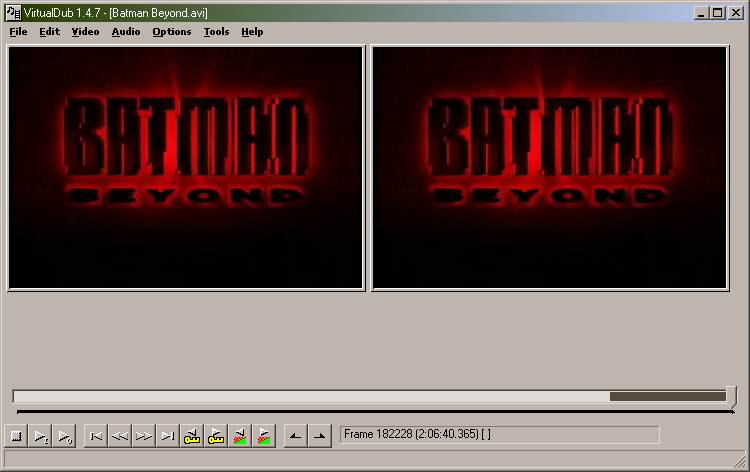
It turns out the scene ends on frame 154113. The entire movie ends on
frame 182228.
You chose this spot as the ending, of course, because the episode FADES-TO-BLACK.
NOTE : The precise frame numbers are indicated in this example,
to emphasize
how much control you really have over editing your movie
using VirtualDub.
As it turns out, for this example you don't really need to
keep track of exact frame numbers.
You press the HOME key on that frame #154113 to start the selection.
Then you move to the end of the entire movie -- the very last frame
--
(using the mouse on the frame pointer)
and you click the END key once you reach that final frame.
This is what the selection looks like

NOTE : In VirtualDub, selections are made to be deleted....
You simply press the DELETE key once, and the frames in the selection
DISAPPEAR without a trace..
NOTE : A little technical note that will help you later....
When you delete a selection, VirtualDub deletes ALL frames from
the starting frame,
through all frames in the selection INCLUDING the final frame of
the selection.
So, if you press the HOME key on frame 400, and the END key on frame
850,
when you press the DELETE key VirtualDub will delete frame 400,
AND will delete the frames 401 up to
and including 850. Frames
400-850 will be removed.
Frames 399 and 851 will now be adjacent, and frame 851 will be 'renumbered'
400.
Second Move : EDITING FRAMES BEFORE THE SCENE BEGINS
Now that you removed all the frames after the scene ends,
it's time to get rid of the parts of the movie before the scene starts.
FIRST move the to Frame #0, the very start of the entire movie,
by moving the frame position pointer to the furthest left,
and click the HOME key. That starts the next selection.
Then navigate using the mouse and the arrow keys,
looking for the beginning of the scene you are going to keep.
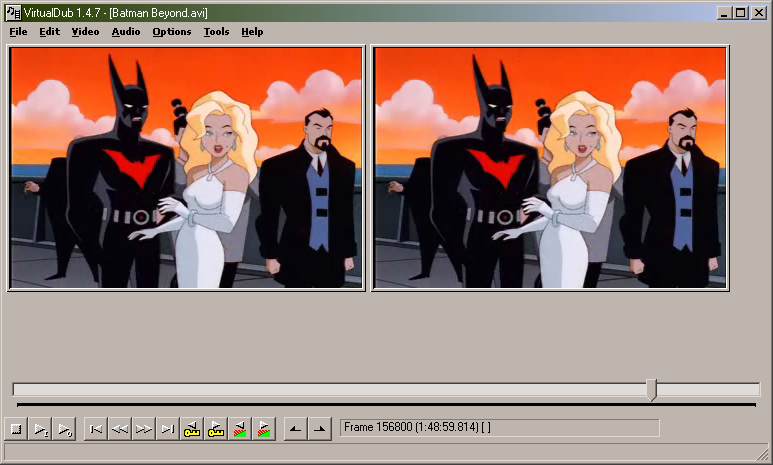
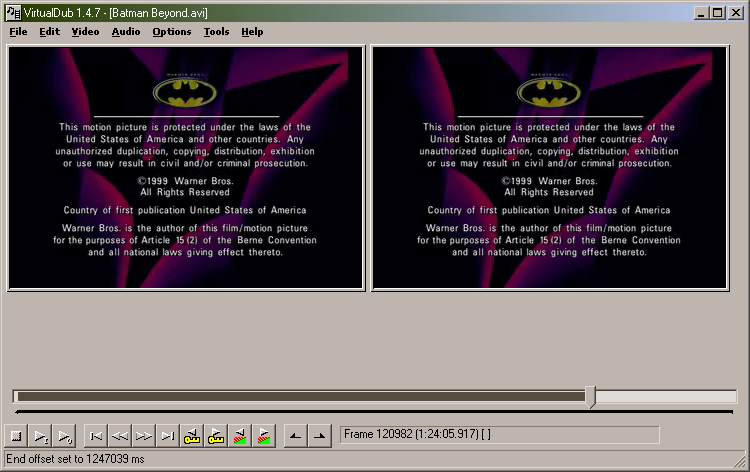
You decide that frame 120982 is where the scene should start,
mainly because the screen is ALL BLACK there, right before the FADE-IN.
So you press the END key, and another selection is made.
That selection now looks something like this :
You simply press the DELETE key once again, and the frames which have
been selected
also VANISH from the set of frames comprising this video.
All that remain, are the 33131 (that being 154113 - 120982) frames of the scene you wanted.
NOTE : There might be some 'extra' frames included in your final
video, once saved to disk.
See the discussion on the importance of keyframes, in the
section on 'splitting files manually' below.
That's really all there is to it ? ?
You scroll around the finished video,
just to convince your disbelieving eyes

Yup, it worked.
The video clip that remains starts with a FADE-IN,
has only the scene you wanted to isolate,
and ends immediately after the credits and the FADE-TO-BLACK.
Third Move : SAVING THE ISOLATED SCENE AS ITS OWN SEPARATE FILE
Since you have already compressed the file using DIVX video and MP3
audio,
AND saved that original file to your hard-drive and/or to a CD-R[W]
disc,
you now simply choose "Direct stream copy" for BOTH VIDEO AND AUDIO
settings,
and then choose "Save As.." using a NEW FILENAME under the FILE menu.
This file saves to disk VERY QUICKLY, since there is no new compression to perform. It's a direct stream copy.
The resulting file is compact, high-quality, and contains only and exactly what you want it to.
And that's the way you like it !
THIS ENDS THE EXAMPLE ON VIDEO EDITING. THE SECTIONS WHICH FOLLOW
ARE "TRICKS" YOU
CAN USE, NOW THAT YOU KNOW HOW TO EDIT VIDEO WITH FRAME-BY-FRAME
PRECISION.
Splitting A Movie Up "Manually"
Any AVI movie can be split using the built-in VirtualDub feature "Save Segmented AVI..." in the FILE menu. This introduces artifacts however, most noticeably green and pink coloring at the start and possibly the end of each segment of the movie.
Segmenting the movie "manually" will take a bit longer than the automated method (since it has to be done manually....), however the resulting files can be made completely free of additional video artifacts.
You will also have greater control over the cutting process, and can
divide file segments
according to scenes, or by time or by frames -- whatever standard you
wish to use.
If you are already familiar with video editing as described above, this splitting method will be simple to learn.
It involves deleting all frames other than the particular file segment you are working on at the moment.
All you need to do, is making sure a file ALWAYS starts on a
keyframe,
and always ends just before a keyframe.
An example is probably the best way of demonstrating this.
NOTE: There are obviously numerous avi-chopping programs available.
Try them out and see what they're like.
This section is just describing how to accomplish movie-splitting
in VirtualDub, with no 'side-effects'.
Example:
Another Batman episode you decided to extract later on, and to share
across a network,
is simply too big to deliver as a single file.
It turns out this episode is exactly 29681 frames long.
You recompressed it through the steps above,
so that now it plays at 24.0 frames-per-second,
with a keyframe every 1 second.
BUT even after some serious compression, it's over 100-Mbytes long.
It's time to split it up, into numerous smaller file segments.
NOTE : Keep your trusty pocket calculator handy. And a small piece of blank paper.
The video is about 1236 seconds long (29681 / 24.0 = 1236.708333).
You decide to partition it into sections of 90 seconds each,
plus an additional file of whatever remains at the very end.
Each section therefore needs to have 90 x 24 = 2160 frames.
(90 seconds x 24 frames-per-second)
You try out the "automated segmenting" feature of VirtualDub,
(choosing the number of frames option and writing in '2160' in the
frames per section text-field),
but the "greenie-artifacts" at the start of each section are just too
distracting.
So you decide to split it up manually.
Here's what you do.
NOTE : You have to be REALLY precise about the keyframes here. It's not hard. You just have to do it.
You hand-write in what frame each segment should start on.
It's pretty easy. Just keep multiplying 2160 by 0, 1, 2, 3, ...,
NOTE : If you are using the Calculator program built-in to
Windows,
just type in "2160", then type in "+", "+" (that is press the "+"
key two times).
Then just keep pressing "=", and it will keep showing the new frame
to end on:
2160, 4320, 6480, .......
--------
File Segment #01: Starts on Frame #0000. Ends right
before Frame #2160.
File Segment #02: Starts on Frame #2160. Ends right
before Frame #4320.
File Segment #03: Starts on Frame #4320. Ends right
before Frame #6480.
..
..
File Segment #12: Starts on Frame #23760. Ends right
before Frame #25920.
File Segment #13: Starts on Frame #25920. Ends right
before Frame #28080.
and finally
File Segment #14: Starts on Frame #28080. Ends on Frame
#29681, the end of the movie.
(This 14th segment is the 'leftover' segment, and will be smaller than
the other files.)
--------
That's really all there is to it.
NOTE : You can simply write down the frame number to end each file
segment on,
"2160, 4320, 6480, ....", on a small piece of paper,
and then cross off each one once you finish a file segment
and save to disk.
OR, you could simply look at the display of the calculator you are
using.
Either way will help "keep track" of what the last frame of the
segment should be.
The "trick" now is, to make sure that
* every segment starts on a keyframe (so the remaining video
includes it), and
* every segment ends immediately before a keyframe
(so the next video segment
includes it and starts on it).
NOTE ABOUT NOTE : This all looks really time-consuming on paper.
By your third video, you'll be splitting manually without even giving
it any real thought.
How can you know exactly where the keyframes are?
Easy: VirtualDub tells you !
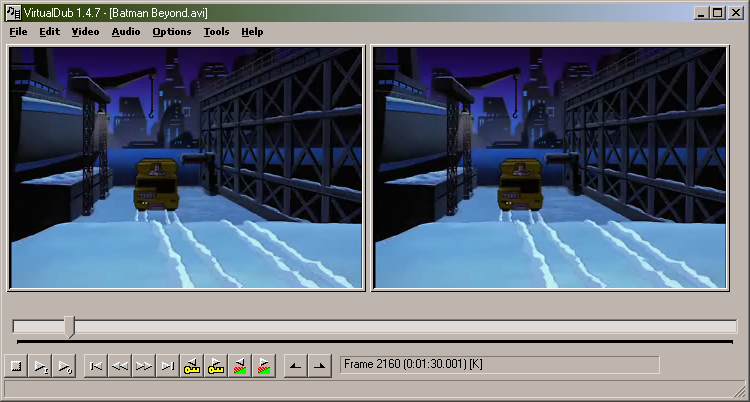
Notice (in the image immediately above) that at the bottom of the VirtualDub
window,
it displays "Frame 23760", followed by the video time,
followed in brackets with "[K]".
The frames which have this [K] when you move the frame-pointer on them,
are keyframes.
Every new video segment MUST START ON A KEYFRAME.
This means to make every file segment END JUST BEFORE the next keyframe.
That next keyframe will then become THE FIRST FRAME of the next
file segment.
NOTE : READ that last paragraph OVER AGAIN. It's REALLY IMPORTANT.
By following these directions EXACTLY,
you will end up with file segments with the following VERY DESIRABLE
attributes:
* when rejoined with Peck's Power Join or some other avi joiner, there
will be
NO overlapping or repeating frames where the file segments connect
with each other
-- the files will join together perfectly and smoothly
* there will be NO green or pink artifacts at the start of any file
segment
(that is, assuming they weren't there to begin with...)
* the file segments will now be able to be of different sizes,
ending for example at the end of a scene;
OR they can be split according to time;
OR they can be split according to the number of frames;
the choice is now within YOUR CONTROL...
NOTE : If there is a selection made, the DELETE key deletes the starting frame and all frames up to and including the last selected frame. In other words, every frame within the selection is deleted.
Let's go through the first few file segments carefully, just to get the hang of it.
Always start your splitting by turning off "Preview input video" and
"Preview output video"
in the OPTIONS menu, by unchecking them.
Seeing the video images is not going to be important for this
section.
but TURNING OFF the preview feature lets you navigate through the file
A LOT FASTER.
NOTE : If you made the frame-rate a nice even number while compressing,
like 24 or 25, rather than keeping it the NTSC standard of 29.970, doing
file splitting manually is actually pretty easy.
If you do have a fractional frame rate like 29.970, you might
want to consider just using the automated splitter, and tolerate the 'green
moss' at the start of each segment.........
File Segment #1 : Will contain frames #0000-2159 of the original video.
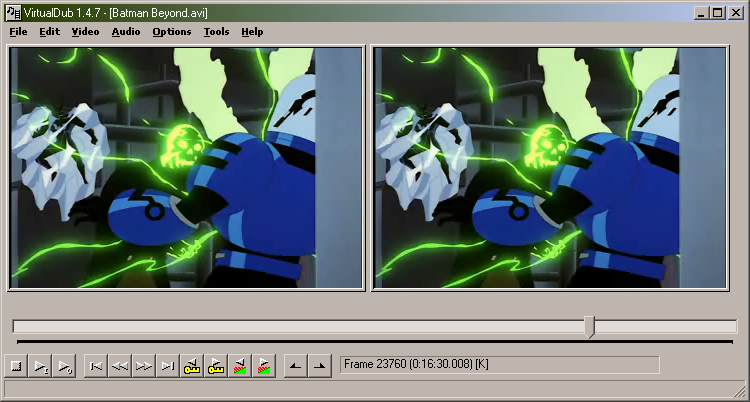
Just to drill the point home, notice the differences between Frame#2159, and Frame#2160

NOTE : The preview images were kept on purely for dramatic effect.
Ordinarily they would be turned off before split-editing.
They basically look EXACTLY the same, except look at the bottom line of each window:
Frame #2159 ends with merely [], whereas Frame #2160 ends with [K]
This means that the first file segment should only include Frames #0000-2159.
So, you have to delete Frames #2160-29681 (29681 being, of course,
the end of the entire movie).
Therefore, you move the frame pointer to #2160, and press the HOME key.
NOTE : This will select AND DELETE Frame #2160, which is a keyframe.
This is what you want to do, because it will be the first frame
of the next file segment.
Then you move the frame pointer all the way to the right (Frame #29681), and press the END key.
The screen now looks something like this

You simply press the DELETE key once, and the selection disappears.
All that remains, are the Frames #0000-2159.
You choose "Direct Stream Copy" for BOTH video and audio,
and choose "Save As" under the FILE menu.
Call this file "Bat.01.avi".
File Segment #2 : Will contain frames #2160-4319 of the original video.
By now it should be pretty straightforward how to make the cuts and what to look for.
Just remember to always make the FIRST frame of a selection to be deleted
actually on a keyframe,
and the LAST frame of a selection to be deleted immediately before
a keyframe.
NOTE : You can "GO TO" an exact frame, that is jump directly and
precisely to it,
by either pressing the <CTRL> <G> keys, or by pulling down
the EDIT menu and selecting "Go To".
Then simply type in the frame you want the frame pointer to jump
to, for example "2160".
It's a real time-saver when you're doing manual splitting.
These are the actual commands you need to perform to create the next
file segment, Bat.02.AVI.
They are given here without any further explanations.
Fill in the blanks yourself, and make certain that you
understand how to do this yourself for later.
Once you get the hang of it, there's really nothing to it.
----
Restoring The Original File And All The Original Frames
Pull-drag the "Batman Beyond" file icon back into VirtualDub.
(or choose "Open File" in the FILE menu).
NOTE : Remember to do this every time you make a new segment.
You'll need to restore the original file, to get the new set of
frames.
Removing All Frames AFTER Frames #2160-#4319
Press CTRL-G, and type in the number "4320".
Press the HOME key & start a selection.
Move the frame pointer to the very last frame, #29681.
Press the END key.
Press the DELETE key.
Removing All Frames BEFORE Frames #2160-#4319
Using the mouse, move the frame-pointer back to Frame #0000.
Press the HOME key.
Press CTRL-G, and Move to Frame #2159.
Press the END key.
Press DELETE.
Saving The Second File Segment To Disk
Press the F7 key, or pull down "Save As" in the FILE menu.
Type in "Bat.02"
Press ENTER.
----
That's all there is to it.
You repeat the process for all of the remaining segments,
and put the files in a folder called "Batman Split Files".
And now the ripped-from-DVD, high-quality video is split up, and ready to be shared.
And that's how you make these perfectly split AVI files manually.
NOTE : If there's another AVI chopping program that does this splitting
as precisely and flawlessly as the "manual" method described here, by all
means use it!
But realize, a lot of these choppers result in overlapping or missing
frames, as well as visible artifacts in the individual file segments...
It's all a matter of whether you want convenience, or quality.
NOTE : As you probably understand by now, you will want to use a
'round' number for a video you are going to split up.
30.0 fps is okay. 24 fps is good too.
But 25 fps might turn out to be 'the best' setting of all,
because you can then make file segments according to 'even' jumps of 50
or 100 frames!
There will be a keyframe every 50 and 100 frames -- No calculator
would even be needed!!
For example, Segment #1 frames 0000-999, Segment #2 1000-1999, Segment
#3 2000-2999, and so on.
You could even use the <left> and <right> arrow keys along
with the <ALT> key, and simply jump 50 frames at a time,
and you will ALWAYS land DIRECTLY on a keyframe...
It's a real time saver!
Loading In An Incomplete Or Damaged Video File
Frequently there is an MPEG-1 or AVI movie, which was either uploaded or downloaded with errors in it. This video oftentimes plays perfectly well using Media Player or another application, but whenever you try to load it into VirtualDub it "rejects" the file and does not allow it to be loaded in and edited.
NOTE : This "trick" works equally well on both AVI and MPEG-1 standard files.
One solution to this problem is actually incredibly simple and straightforward.
It takes advantage of a side-effect of the program HJ-Split.
NOTE : Learning how to use HJ-Split is outside the scope of this little manual. It is easy to learn to use even if you are new to it. Experiment with "Splitting" a large file, and then "Joining" it back together into the identical original file before continuing.
EXAMPLE Of "Recovering" Part Of A Damaged File
Say for example there's a 5430-Kbyte MPEG-1 file, named LousyCopy.MPG.
It is damaged in some way, and so it 'refuses' to load into VirtualDub.
Whenever you try, VirtualDub gives the error:
"MPEG Import Filter: unexpected end of file"
What used to make you cringe (that error message), now is not that big of a deal...
Why?
Because you can cut the problem off of the file. LITERALLY:
You open up HJ-Split

Now, you simply need to calculate 90% of the file.
Since the original file is 5430-Kbytes,
you get out your trusty pocket calculator and type in
5430 x .9 =.
You end up with the answer 4887.
So, try that out with HJ-Split:
You click on the "Split" button on the main window
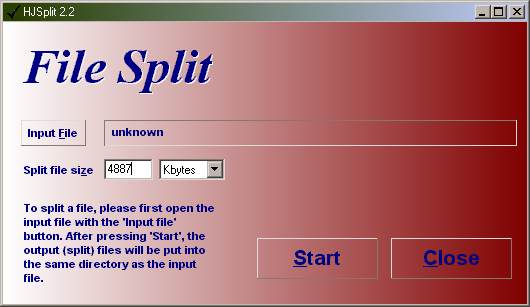
and then click on the "Input File" button and choose that file you are
trying to edit with VirtualDub
(in this example, it's called "LousyCopy.MPG").
Once it's loaded into HJ-Split,
you type in "4887" in the "Split file size" text field.
Then you can simply press the "START" button, and start the file splitting.
Two files should result:
- LousyCopy.MPG.001
- LousyCopy.MPG.002
The first .001 file will have ALMOST ALL of the original file, as well
as
the 'header' video-file information which is needed in order to load
it into VirtualDub.
The .002 is really small, and is not recognized as being a video file.
You can pretty much delete it, and never look back.
Now you can simply open the .001 file with VirtualDub.
Either click-and-drag the icon, or choose "Open" in the FILE menu,
and change the file type to "All Files".
NOTE : You might get a warning about the keyframes. If you are recompressing anyway, that problem will probably be fixed with the resulting file.
NOTE : You can experiment with the 'chopping' number "90%". You might
be able to make it 95%, or maybe even 99%. The higher the number, the more
of the original file you will be retain.
On the other hand, if you have a really damaged file, you
might have to make it 85%, or whatever. It all depends.
90 is as good a number as any to start with.
RESTORING DAMAGED VIDEO FILES STEP-BY-STEP
* Run HJ-Split
* Choose "Split File"
* Open the file of your choice
* Calculate 90% of the file size and write that into the "Split File
Size" text field
* Click the "Start" button, and load the resulting file FILENAME.[AVI/MPG].001
into VirtualDub
(you can just delete the .002 file)
* Start working on the 'new' file in VirtualDub as normal
NOTE : If the damaged file is of type .AVI, the 'cut' file WILL NOT load into Media Player or another program designed to PLAY videos. It will load into VirtualDub however, allowing it to be EDITED. Then the file that is recompressed and saved with VirtualDub WILL BE able to be played with a video player.
Removing Video And Audio Artifacts From Files
There are many possible reasons why there could be video artifacts, audio artifacts, or other 'blemishes' in any given video file. A partial list of these include:
* Errors occurring during the original capturing process
* Errors accumulated during uploading and/or downloading across a network
* Artifacts resulting from the compression method ("Lossy" compression
such as MPEG and DIVX)
* Artifacts due to splitting the file using an automated splitter (including
the one in VirtualDub)
* Overlapping frames due to re-joining a number of smaller independent
video files into a single larger one
(such as Peck's Power Join for AVI files, or Camel's MPEG Join for
MPEG-1 standard files)
Whatever the cause, once you have a video file on your hard-drive, you
can 'tweak' it to your liking.
This includes of course deinterlacing or changing the video or audio
quality, as described in previous steps.
However there are times when you just want to remove certain frames,
because of how they detract
from the quality of the movie itself.
Here are some frequent problems, and their quick solutions using VirtualDub:
NOTE : This section assumes you are already familiar with frame-by-frame editing and selection editing, as described at the top of this step.
NOTE : You can load MPEG-1 standard files into VirtualDub, and you can load ASF files into VirtualDub Version 1.3c, however saving changes to files of either of these formats in VirtualDub will require recompressing AND converting to the AVI file type.
PROBLEM : Greenie-artifacts at the start of a video
SOLUTION :
Frequently the video looks better skipping these frames and it's better
for the movie to look a little 'jerky', than to keep that annoying coloring.
Load in the file with those artifacts, start at Frame 0000, and press
the DELETE key, deleting the starting frames of the movie, up to BUT NOT
INCLUDING the first keyframe.
You can tell it's a keyframe, because it will say "[K]" at the bottom-right
of the window, like this:
Frame 0 (0:00:00.000) [K]
Save the resulting file -- using "Direct Stream Copy" for both video
and audio
NOTE : If the original file is MPEG-1 standard, you will have
to recompress the video
PROBLEM : Joined movie overlaps and "jerks back" whereever two
of the files were joined
SOLUTION :
Though a very slight problem, it is distracting to see the movie overlapping
and repeating for a half-a-second or a second.
You can use the VirtualDub editing features to remove the 'redundant'
frames,
by positioning the frame pointer (using the mouse AND the left-and-right
arrow keys)
precisely (to the frame) where the "overlap" starts,
and then pressing the DELETE key successively,
until there is a smooth transition between frames.
Keep going back (<-leftarrow) then forward (->rightarrow) one frame
every once in a while, to make sure you don't delete too much. When you
have it how you like it, choose "Direct Stream Copy" for both audio and
video if it's an AVI file, and the identical movie without the overlap
will be saved. If it's an MPEG-1 movie, you will have to recompress.
PROBLEM : Sudden video or audio "glitches" in the midst of an
otherwise good video
SOLUTION :
Of course at this point the solution is now simplicity itself.
You simply load the file into VirtualDub, move to the offending frames,
delete them one frame at a time, and then save the resulting file either
as "Direct Stream Copy" for AVI files, or recompress it (with DIVX) if
it's an MPEG
NOTE : If you're going to use a video file strictly for your own
personal use, and have the hard drive space for it, go ahead and use a
lower compression rate when recompressing the original file. You might
even keep it somewhere around the default 910-kbps setting..! The resulting
file will lose as little due to recompression as possible.
This section covers the method of ripping DVD's briefly, and understand that this is only one of numerous possible ways. There are different programs available for each step of this process, including those for ripping the original DVD, for encoding .vob files, and for extracting editing and compressing audio from a DVD source.
If you have already gone through the previous sections of this manual, you can experiment with the applications mentioned here, and end up with a DIVX version of a DVD movie. Other websites listed in the "Finding Software" section below provide other programs and instructions on how to rip DVD's. In the meantime this will probably be a good start on the subject.
NOTE : Ripping and encoding a typical 2-hour movie using the method below could take upwards of 7 Gigabytes of hard disk storage, or even more. Make sure you have that much free space available.
NOTE : DVD ripping and encoding can also take a great deal of time, particularly when first starting, because you may have to redo some of the most time-consuming steps.
PROGRAM #1 : SmartRipper to unencrypt the DVD
SmartRipper removes encryption from a DVD, and saves that unencrypted version, all 5 or more Gigabytes of it, onto your hard-drive. This will be in .vob file format.
Typically the ripped files will include the original movie's full video
and sound.
The unencrypted files, however, might not keep subtitles, special features,
and so on.
NOTE : This is the most space-consuming step of the process. Make sure you have all of the empty Gigabytes which the DVD movie consists of, available on your hard drive, before performing this step.
This program is really easy to use. Simply put the DVD of choice into the drive, run SmartRipper, and after it unencrypts the disc, it will show a screen where it is going to save the 'target' .vob files, and how much space it will consume.

Ordinarily it will be in a single folder, called for example "DVDMovie",
and will be located directly on the C Drive.
In other words, that folder will probably by default be located at
C:\DVDMovie.
You pretty much just have to click the Start Button in the window, and
it will start ripping.
The time it takes depends upon the speed of your DVD player. Expect
less than an hour for most new players.
NOTE : You might have to run the DVD for several seconds using your standard DVD playing program for SmartRipper to work correctly. There are technical reasons for this. Try SmartRipper first, and if it doesn't work, play the movie for half-a-minute first using a DVD player, then try SmartRipper again.
----------------
PROGRAM #2 : FlaskMPEG to convert the VOB video files
This is the most time-consuming step.
The program FlaskMPEG will take the .vob DVD files,
join them together "logically" (not physically) into a single file,
and then compress them into a single complete .avi file, using the
codec of your choice.
NOTE : This manual shows examples using FlaskMPEG version 0.594.
There is a BETA version of .60, but still has potential bugs in
it.
There are added features, like making scene selections.
For the sake of stability, the released and finalized 0.594 version
is used.
Experiment with 0.6 if you wish.

NOTE : If you have a new Pentium IV allow 3 to 8 hours of compression time using FlaskMPEG. Fast Pentium III's might take 8 hours up to 15 hours or more, depending upon the video quality desired. If you have a Pentium II or older, consider completing this step only when you are going to be away for a long weekend, and won't be using the computer for anything else.
NOTE : This program compresses the entire DVD. If you know you only want a small part of the movie, you will still have to compress all of the .vob files using this program. Then you can edit out the extra scenes later using VirtualDub.
Once you have opened the first .vob file in the sequence (using Open
under the FILE menu),
choose "Output Format Options" under the OPTIONS menu.
A window like this will come up
You will ONLY be choosing a VIDEO CODEC.
FlaskMPEG WILL NOT be used to extract audio.
That will be handled in a later step.
When you click the "Select Codec" button under VIDEO,
a new window will come up where you can choose the video codec you
are going to compress with.

Scroll down and choose the DIVX-4 Low Motion one,
as was chosen in Step One of this manual (above).
Then click on the "Configure" button, and a very familiar window should
pop-up.
Make the compression settings that you would like
NOTE : You may want to use a bit calculator to estimate what bitrate
you should use for compression.
BUT you will probably find that they are over-rated.
For a 2 hour DVD :
if you are going for really high quality, make it at least 900 kbps.
If you are going to isolate a high-quality scene and present it
on a network, go for around 600-900 kbps.
If you are going to put the DVD onto a CD-R, try around 425-500
kbps.
If you need to absolutely minimize the filesize, you can always
recompress later using VirtualDub.
Once you have chosen the compressor and picked the compression rate
click the three OK buttons to come back to the beginning Flask menu.
Then choose "Global Project Options" in the OPTIONS menu
This window should now appear

There are features for resizing the screen, for changing the frame rate, and all sorts of other options.
It is HIGHLY RECOMMENDED that you make the settings according to how
you want the FINAL video to look.
In other words, avoid recompressing later with VirtualDub, if at all
possible.
This includes setting the *frame-rate, *frame-size, and *video-compression-rate.
NOTE : There are additional settings which might increase the overall
picture-quality of the video.
However, they will probably also significantly increase the time
required to finish the compression.
When you first get started, just keep the default settings, no fancy
stuff, and measure how long it takes.
If your machine is fast enough, and if you want the higher quality,
recompress after
tweaking the additional settings to your liking.
NOTE : For some reason FlaskMPEG seems to require restarting the system EVERY TIME you are going to use it again. If you quit a compression early, or even if a compression is fully completed, and you then want to make further changes, it is HIGHLY RECOMMENDED that you quit the program, reboot, and then run it again.
Before changing any settings, make sure the movie's frame-size is reset to its default value:
Click the "Show Output Pad" button at the bottom right of the screen.
It displays EXACTLY what the frames look like right now.
But that might not be the default.
Click on the "Reset Settings" button in the new pop-up window to restore
the default frame size.
Then click on the "HIDE" button to close the Output Pad preview window.
NOTE : The Output Pad can be used to remove black borders as well,
by CROPPING.
For your first attempts at compression, probably just leave the
settings alone.
Later, experiment by enabling the "Crop" checkbox, and adjusting
the "Height" and "Top Offset" settings.
FURTHER NOTE : The width and height of the movie can also be adjusted
'manually' in this window.
Or, they can be changed more precisely by typing in the values in
the Global Options Window.
Here's a recommendation on how to make the settings initially:
- If the frame size is around 640x480 or larger,
divide the frame-size values in half, and make those the new
frame dimensions.
(for example, the width & height above would be changed to 360x240)
NOTE :If the frame size is already 320x240, or 352x288, or somewhere around there, just leave it alone.
- Make the frame rate 24 or 25 frames-per-second if it isn't already.
(25 fps is probably better, for reasons described in sections above.)
NOTE : Some movies will look noticeably better at 29.970 fps,
however this will make scene editing more difficult later.
Choose according to convenience versus filesize and playback quality.
Most of the time however 24 or 25 will be perfectly fine.
- Click the AUDIO tab, and choose the "Don't Process Audio" radio button.
Audio extraction and encoding will be covered in a LATER SECTION.
FlaskMPEG will not be used to do ANYTHING with the movie's audio.
- Just to keep the file visible on the desktop,
click on the "Files" tab and change the "Output Video File"
location to C:\Windows\Desktop\<Filename>.
So, for a Batman movie, make the filename "C:\Windows\Desktop\BatmanPicture"
(the program will add the .AVI extension automatically)
Now with all of that set, make sure the Output Format under the OPTIONS
menu is set to "AVI Output",
and then choose "Start Conversion" in the RUN... menu.
NOTE : It is highly recommended to turn the preview output picture
OFF,
and to have as little running in the background as possible.
Also, set the processing speed to "High" if you still intend to
use the machine a little,
or "Highest" if it's fully dedicated to processing the movie.
About a day or less later, depending on the processing speed, you will have a single AVI file on the desktop.
----------------
PROGRAM #3 : AC3DEC to extract audio
The audio of most DVD's is in AC3 format, which allows for Surround Sound (5.1 digital) and other formats. There are also probably multiple languages, and other audio formats (such as commentaries) on the DVD.
The application AC3DEC (meaning AC3 file format DECoded) converts the AC3 audio in the .vob files, into Windows .wav file format. It almost always works perfectly, and is remarkably easy to use, too.
NOTE : This step will require about 1 Gigabyte to create a single
.WAV file.
This is in addition to the .VOB files already created with Program
#1.
Those .VOB files are used to create the .WAV file.
Make sure you have the hard drive space for all of this before continuing.
IMPORTANT NOTE : THERE IS NOW A GRAPHICAL-USER INTERFACE FOR AC3DEC
It looks like this

and can be used INSTEAD OF the description which follows.
Use whatever method you prefer.
(Both the program and the GUI can be found as described in the "Finding Software" section below.)
NOTE : If you choose to use the GUI, copy it into the folder where AC3DEC has been unzipped, and put that folder somewhere 'permanent', for example drag it into the Programs Folder. Create a shortcut of the GUI program, so that you can simply double-click the icon to run the GUI version of AC3DEC afterwards.
--
What Follows Is The MS-DOS Method Of Using AC3DEC --
SKIP This Section If You Are Using The AC3DEC GUI Program
Since it is such a small file, copy the AC3DEC.exe file into the folder
containing the .vob files. There is probably another system file along
with the executable, which also should be copied in. Copy both files in
using the Extract command of WinZip.
After making the copy, run MS-DOS and enter the folder which contains
the .vob files (using the cd command).
Then (using the dir command) find out what the name of the FIRST .vob
file is.
For example, say the folder is called BATMAN, and the first .vob file
is called vts_01_1.vob.
Then you would type in the following at the prompts (what you type
in is in bold):
C:\WINDOWS> cd..
C:\> cd BATMAN
C:\BATMAN> dir
Volume in drive C is ......
.
..
vts_01_1.vob
vts_01_2.vob
vts_01_3.vob
vts_01_4.vob
vts_01_5.vob
vts_01_6.vob
ac3dec.exe
C:\BATMAN> _
Notice that ac3dec.exe is already in the BATMAN folder
At that point you type in the following line -- it looks complicated
at first:
ac3dec [FILENAME1.VOB] -allvobs -out [filename2.WAV]
NOTE : The parts inside [BRACKETS] mean you go by the particular filename
* ac3dec is the name of the application being run -- you
can also write "ac3dec.exe", with the identical effect
* FILENAME1 is the name of the first .vob file --
in this case 'vts_01_1'
* FILENAME2 is the name of the .wav file you are
going to create -- you chose 'BatmanSound'
* -allvobs means to include all .vob files in the folder
sequentially (as a single logical file)
* -out means you want to specify the name and path of the
output file
Using the example above you will simply type in the following line
(where the blinking prompt was above) :
C:\BATMAN> ac3dec vts_01_1.vob -allvobs -out c:\windows\desktop\BatmanSound.wav
A complicated-looking prompt-window appears, saying things like "PCM",
"44,100" or "48,000", and other stuff
simply press the <ENTER> key, and the saving process will begin.
When it finishes saving, about half-an-hour or more later, you can
type in
C:\BATMAN> exit
to quit the MS-DOS prompt. You won't need it for the DVD ripping anymore.
And now, on your desktop, there should be a file called BatmanSound.wav,
which is about 1 Gigabyte for a 2-hour movie.
----------------
PROGRAM #4 : VirtualDub to encode audio interleave and finalize
By now and old and familiar friend.
The process is almost the same as that listed in Steps 1 through 3 above.
This time, you will simply use the "Direct Stream Copy" of the video
(since it was already compressed using FlaskMPEG),
and then load in the .WAV file created with ac3dec,
and compress that .wav file into an mp3 file while the new file is
being saved.
Open the video file which was created using FlaskMPEG.
Make sure under the VIDEO menu, that "Direct Stream Copy" is chosen.
NOTE : This is assuming you have already sufficiently compressed
the video portion.
If you have to recompress, use FlaskMPEG directly on the DVD .vob
files again, to ensure maximum quality.
Open the audio WAV file which was created
(in the example above, it is called BatmanSound.wav).
This is done by going to the AUDIO menu, and choosing "Use WAV file". Select the .wav file.
Make sure under the AUDIO menu, that "Full Processing Mode" is chosen.
Then choose "Compressor", choose the MP3 codec,
and then select whatever quality compression rate you would like.
NOTE : if you are ripping a complete DVD movie for personal use,
or if the network version will have higher quality, consider using
a higher bitrate;
128 is a minimum for high-quality audio, and perhaps go even higher,
to 160, 192, or even higher.
The difference in sound quality can be significant..
Otherwise, if you are trying to really minimize file size,
use the settings of 16 or 18 kbps,
as described in the Audio Compression Step earlier.
NOTE : You might find that the Audio Volume Level has to be
raised when saving the final version.
Choose Volume under the AUDIO menu to change it.
Just to make certain, go under the "Frame Rate" option in the VIDEO
menu.
Make certain it is EXACTLY the value you used when compressing the
.vob files in FlaskMPEG.
If you compressed at 24.0 frames-per-second, and it reads "24.001",
CHANGE it to read 24.000.
If you compressed at 29.970 fps, and the frame rate reads "29.90",
CHANGE it to read 29.970.
NOTE : VERY SLIGHT changes in the frame rate here can make BIG differences
in audio-video synchronization
in the final video file.
Make sure the value is the same as the original value while compressing.
Since you are only compressing audio during this step, and using the
Direct Stream Copy of video,
the time required to save the final file will be MUCH less than required
for FlaskMPEG.
Expect anywhere from 25 to 50 minutes, given good processor and hard
drive speeds.
By the end of this last step, you will have an entire 2 hour DVD, ripped and encoded, as a single AVI file on your hard drive.
From there, you can use VirtualDub still further,
to edit out extra scenes,
or to isolate a single scene you are interested.
This was described in the "Scene Editing" section above.
VirtualDub can be gotten at
www.virtualdub.org/index
[the author site]
DivX-4 compressor and player bundle can be gotten at www.download.com
[search for "divx" in the Search text field]
[the latest version as of this writing is DivX(tm) Player and DivX
Codec 4.11]
HJ-Split can be gotten at
www.freebyte.com/hjsplit
[the author site]
WinZip can be gotten at
www.winzip.com
[the author site]
Peck's Power Join can be gotten at www.divx-digest.com
[an author site is mysteriously missing]
DVD-Ripping software of all kinds can be gotten at www.divx-digest.com
use "Search" at the top of the page to find the latest version of AC3DEC,
FlaskMPEG, and other programs
[there are too many possible application and variations to list separately
here]
www.download.com
is a great site for all different kinds of programs
as well as an occasional codec
it also usually lists the author site of a featured program
www.divx-digest.com
is a great site for codecs programs and manuals
most or all of the programs listed above can be found there
Thanks to DaveUK for pointing out that MPEG-3 audio compression is the
way to go
Thanks to rafael for reminding how simple and useful keyframe rate
changes are
Thanks to Rene for providing results of VirtualDub-DivX compression
in posts
Thanks to Stanky for coaxing this version into being completed in less
than a month
Thanks to fellow posters for thanks on this manual and providing questions
and feedback
.jb [jelli belli]