Hi, my name is Ed Seymour, Welcome to my Brewery.
The Beginning
First off, I started brewing in April,1999. Having finished my degree in Business, my thoughtful wife surprised me with a startup kit as a graduation present (actually, I told her what I wanted, where to buy it and how much it cost. I even drove her to the brew store).
Before I started, I read "The New Complete Joy of Home Brewing" from cover to cover and thought that if this idiot could brew beer, anyone could. I almost gave up after reading "Relax, don’t worry have a homebrew" more times than I care to remember.
My first batch came out excellent. After my second batch of extract with specialty grains I wanted to move on to all grain and my darling wife wanted me to move out of her kitchen. And so the search began.
The Search
As an avid web surfer I found several sites on home brewing. Some folks use their canning pots and two plastic pails to make excellent beer in their kitchen. Others use three converted kegs and have three separate burners, one to heat their water, another to heat their mashing vessels, and a third to heat their boilers. I’ve found people who have computer controlled systems that turn their systems on, control the mash and boil times, and even prints out nice colorful process charts. Some have dedicated brew houses to make barrels of beer in one session. For a good site, see
Jean Sebastien and Melanie’s home breweryThrough all of these searches I found two incredible web pages. They are owned by
Ken Schwartz's, and CD Pritchard's. Both have made simple dedicated brewing equipment out of a trip to Home Depot. Mr. Pritchard took his a step further and made a RIMS (Recirculating Infusion Mash System). With a printout of their pages, I was able to construct my own personal brewery.
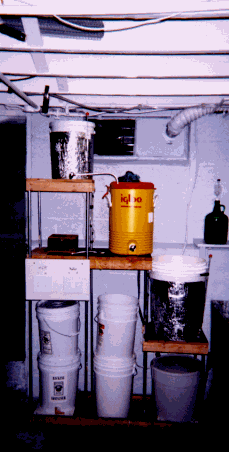
My System
As you can see the system is not rocket science. It consists of two buckets and a 5-gallon circular cooler. It sits in the back of the basement, on its own stand and occupies about 5 square feet of floor space. It’s an extremely cost enhanced (cheap) method of brewing beer. If you visit
Mr. Schwartz or Mr. Pritchard’s home pages you will find detailed drawings on how to make one of these. I will give some explanations and pictures of how I made my system.On top sits the HLT (Hot Liquor Tank). There really isn’t liquor in the tank, it’s a name that brewers use for water treated to emulate water in classic brewing areas around the world. In this tank sits heated water. It is either preheated and transferred into the tank, or is heated in the tank (as in mine).

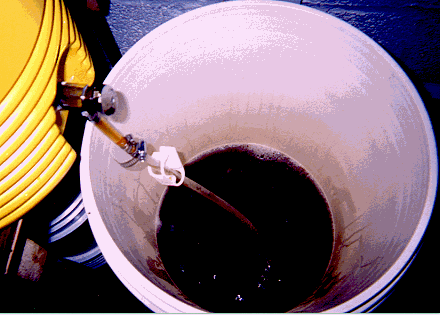
The picture above shows what is inside my HLT. It’s just a five-gallon bucket that was donated by a local hot dog stand. I have found that home depot sells them for about $4.00, but the ones in my area were made from thin .070 wall thickness. I did find some in my local Wall-Mart that were .090 thickness that would be adequate. It has two 115 volt hot water heaters ($5.67 each) installed into it. Miscellaneous plumbing supplies include ½ inch male connector (.79), water closet valve (1.50 on clearance) compression elbow (1.65) and plastic tube cut from an extra bottle filler for a water gage. Total price for my HLT was $15.28

The mashing vessel is just a 5 gallon Gott style round cooler. I installed a home made copper manifold made from one foot of ½ inch tubing that I had on hand, 3 tee’s (.25 each), eight 45 degree elbows (.15 each), ½ inch male connector (.79), and one water closet valve (1.50 on clearance). I purchased the cooler for $19.95 from a local discount member store (BJ’s). Total price for the mashing vessel was $24.19

The boiling vessel is a 12 gallon bucket that held 90# of granular chlorine for the family pool. I made sure that I cleaned the bucket before use, and let it sit outside in the sun for a while, filled and boiled 12 times for 2 hours each with water before using. I reasoned that bleach is used for sanitizing, and chlorine is a sanitizing agent, so it couldn’t hurt. Inside is the same as the HLT with the exception of a manifold made from three feet of 5/8 inch stainless steel wire mesh I found at Home Depot on clearance for .50 cents per foot. Total price for the Boiling vessel is $16.78
Other equipment includes 2 GFI plugs (14.75 for three), 2 regular plugs (.50 each) four switches (.50 each), 6 plastic boxes (1.50 each) covers for each (.15 each) four extension cords, one for each heating element (1.29 each), some washers (2.00 gestimate), a dryer plug (6.35) and four ¾ x 10 foot electrical tubing( 2.00 each) for the stand. The immersion chiller cost about $20.00 to make. Other wood products (2x3 lumber, and 1x12 boards) were scrounged for free. Total $47.16
Now I have a dedicated system for brewing beer for a grand total of $125.00
How does it work?

In the picture above I have a hose attached to the faucet. I turn the water on and watch the water level in the sight gauge. When there is enough water in the HLT, I turn the faucet off and flip the 2 switches for the heating units.

I add the amount of hot water according to the recipe and slowly doe in the grain.

When the grain water mixture is at the correct temperature, it’s time to rest.

This picture shows the grain-water mixture resting. The Beanie Baby (a gift from my wife to the brewery) resting on top is optional.

Its sparge time. As the water is slowly added to the top of the grain bed, the wort (a brewing term for the water seeped in grain) is slowly poured out the bottom. This process takes about 45 minutes to accomplish.

This is a picture of the wort boiling. As you can tell, the two heating elements are enough to heat 8 gallons to a rolling boil. The green stuff in the bucket are hops.

In this picture the wort has boiled for it’s time and is now being cooled. The immersion cooler is added into the bucket 15 minutes before the elements are shut off. The cooler is hooked up to the faucet and cold water is turned on. Stirring the wort increases the efficiency of the cooler.

After the wort is cooled and has time to settle, it is poured into the bucket below. Notice the nice two inch layer of foam in the bucket. A small piece of plastic tube was attached to the end of the hose. I melted some holes on a 45-degree angle into the tube. These holes act like a jet and suck in air into the wort as it flows thru the tube.
I use this bucket as a settling tank for the wort. It rests in this bucket for about 2 hours before going into the glass carboy and yeast is added.

This picture shows the brewery in it’s resting state. All cleaned up and waiting for the next batch to be brewed. Some people worry about the 1500 watt heating elements scorching the beer, leaving it darker than desired, and having a bad taste. I have made light pilsners and dark brown lagers with this system with no after taste or discoloration noticed. The highest SG that I have brewed is 1.064 for 5 gallons. I brew 5-6 gallons of finished beer at one time others brew up to 15 gallons of beer with their systems. I stay with my limit of 5 gallons, that's enough of one style for me.
Next steps
I know that Santa is bringing me a MALTMILL for Christmas. I will be able to purchase my malts in larger lots this way.
I will be experimenting making a SHMS (Soft Heat Mash System) by converting an old ice-cream maker into a stirrer and some copper tubing connected to the HLT for step heating.
Thank you for visiting.