|
|
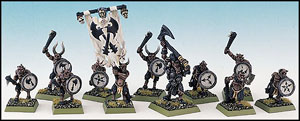
HOW TO PAINT UNGORS
By Adam 'Gorthor'
Houser
Over the last year or two, it has come to my attention that many people have problems
painting Ungors, for their beastman armies. I personally believe Ungors are the easiest
models to paint in the warhammer world. With me being a proven veteran painter, I have
finally decided to sit down and write an article dealing with just the painting of Ungors.
As always I'd appreciate any feed back possible. You can reach me at Gorthor10@Hotmail.com or my ICQ number is
27549367. Please excuse any spelling or grammar errors, as I didn't have time to check
them over.
STEP 1 Removing model lines
In my personal opinion this is the most important step in painting a model. Ok, at this
point your probably saying to yourself "He's crazy, how can removing model
lines be the most important part in painting a model". Well, I'll tell you, without
doing this the model will always turn out awful, no matter how good of a painter you are.
In removing the marks your model will look crisp, clean and will have no unsightly lines
all over it. I find the best way to remove these lines is with a sharp modeling knife or
with a small needle file. After I have removed the lines I will them proceed to glue the
base into the slot. I find it is a good idea to always glue the model into the slotbase,
if you take the tag off and just glue the model on, it tends to break off in time.
Step 2 Undercoating Ungors
After the model is glue down to the base and dry, it is now time to undercoat the Ungor. I
always use BLACK citadel primer to do the job. When you undercoat the model make sure you
don't put too much primer on, as it will fill in the detail. If you missed some spots,
just go over them with chaos black. You always want a nice smooth coat of black to work
with. Just as a side note here, ALWAYS spray the model outside (yes I want you to pollute
the air), as I once accidentally sprayed my couch, ddddoooohhhh, that was a smelly mess.
Step 3 Base Coating
Base Coating the Ungor is VERY easy. All I do is completely cover the model with about 90%
dark flesh, 10% water. You want a smooth coat, but you don't want a lot of paint on the
model, that is why you ad a little water. Once this is dry I then hi-light FLESH AREAS
ONLY with a mix of 50% dark flesh and 50% bestial brown.
Step 4 Adding Detail
Right now your ungor's skin (which is most of the model) should be complete. Once this is
dry I move on to the small details. The horns get a layer of bleached bone. You must make
sure it is thick so no black/brown shows up underneath. After I apply the bleached bone, I
then dry-brush onto the horns bubonic brown. Only go half way up the horns with bubonic
brown. I like the model to have horns with bleached bone painted on the tips of the horns.
Once the horns are complete I move on to the fur (if there is any). I paint ALL fur or
hair with a light dry-brush of vermin brown. Next I paint the thighs and the wood on the
weapons with scorched brown. All that is left on the model I the face. For the eyes I
paint a very small dot of white in the socket with a VERY small brush, then once this drys
I apply a small dot of blood red over the white (this makes a red glowing affect). For the
teeth, I usually lightly brush bleached bone over them.
Step 5 Basing the model
To base the model, I paint the base with a smooth coat of goblin green. Once this is dry I
apply some glue on the top surface of the base and then dip the model in a small dish that
contains store bought green flock. When this is dry the model will need to be varnish (if
you desire) or you can take it straight to the battlefield! Good luck and I hope the Lord
Goat Man is with you!
Adam "Gorthor" H |