Memory-Meditation Stones
"And even if you found yourself in some prison, whose walls let in none of the world's sounds--wouldn't you still have your childhood, that jewel beyond all price, that treasure house of memories? Turn your attention to it. Try to raise up the sunken feelings of this enormous past; your personality will grow stronger, your solitude will expand and become a place where you can live in the twilight, where the noise of other people passes by, far in the distance. And if out of this turning-within, out of this immersion in your own world, poems come, then you will not think of asking anyone whether they are good or not." --Rainer Maria Rilke
 My grandfather died in January, 1997, in California. He was 90-years old, and lived an incredibly full life. He was an aeronautical engineer, bonsai enthusiast, and world traveller. I wish I had known him, he died never really knowing that I existed. I quickly flew to his home in San Diego but missed meeting him face to face by one day. So, my stay in his home was my only real experience of him and his interests. I collected several of the large smooth river stones that lined the perimeter of his garden path and packed them in my luggage. I knew when I saw them that I would cover them with images related to the journey and his memory.
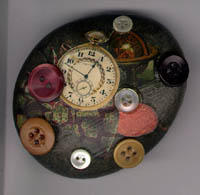
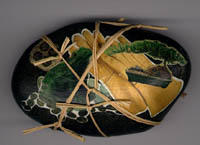
The three stones I show here contain images and objects inspired by this journey: "Grandpa's Collection" which has background images of a globe, a bow-tie, a pocketwatch, a rock, and some of the buttons from his sewing basket; "Grandpa's Garden" is wrapped with tied raffia and accented with a small piece of rice paper, it reminds me of the wonderful garden and all the bonsai trees displayed there, surrounded by the river stones, ceramic frogs and figurines; and "Grandpa's Sky" which has a piece of sheer black lace laid down on a portion of the stone becasue it just wasn't dark enough to reflect the darkness of the sky over the Pacific Ocean with all the glistening stars. Grandpa arranged to have his ashes scattered in the ocean by an airplane, so I have a golden plane flying among the stars which are rhinestones and findings, again taken from his sewing basket. When I completed these stones I felt closer to him and I resolved some personal issues in the process.
I have many more ideas for commemorating the other important people and events in my life on individual stones, and I envision displaying this "rock garden," little groupings of related stones, on a bed of dark sand.
 Supplies: You will need a smooth river stone (preferably one that just fits inside your hand as this is a somewhat tactile experience), or choose another object that has meaning for you--there are no "rules" here; a source of images such as old magazines, personal photos, catalogs, etc; some crafting glue (try to find a glue that also acts as a sealer like Aleene's Instant Decoupage); some heavy-duty glue for attaching objects (I used "Aleene's Jewel-It" Glue); a bristle or foam brush for applying glue; acrylic paints (optional); fabric scraps (optional); a marking pen; a small paper scissors; and, finally you will also need small glue-able objects that correspond with the theme of your stone. (It's really difficult to know in advance what additional objects you will need until you are in the process of creating--don't worry about it as you need to complete the first steps before attaching objects anyway.)
 Step 1: Choose a Subject / Theme
 Decide what person, place, or event you wish to commemorate. Glance through your sources for images, bits of fabric that have special meaning or just a color or texture you like. Gather more than you will need, you can always pick out the "best" stuff at the end of this step. Try to be as free in your association as you can during this step. I think you'll be surprised the memories that will occur to you as you look at different pictures and decide whether they are connected to your subject or not. Of course, you need to keep scale in mind, pick images that will fit on your stone, or take an image to a photocopier and reduce it if it is too good to pass up.
Step2: Assemble Images on the Stone First, decide which side of the stone will face up. Lay the stone in different postions to see which is the most stable one.
Trim the edges of your images and arrange them on your stone, then re-arrange them if necessary until you feel they look right to you. If your rock is very curvy, press the paper lightly around any curves, if you need to, make small little clips aound the edge of the image so that it will gather more smoothly when pasted down. Lightly brush the back of each image and element with glue and firmly press in place.
Step 3: Seal Seal all the images with a coat of varnish, glue, or other sealer. Let dry fully, then apply another coat if necessary. I used a matte finish for my stones but a gloss is a nice effect too. The important thing is to let the sealer dry before embellishing the piece.
 Step 4: Embellish
This might be a good time to sign, date, and name your piece as after embellishing the piece will need to sit for a day or two to fully dry and "cure". Choose a good permanent marking pen and inscribe your name and any other comments on the bottom of the stone.
Select elements, trims, and objects that coordinate or accent your chosen theme. Attach them to the stone with strong glue. If your rock is very round you may have to apply elements in stages so that they do not roll off before the glue is set.
Back to:
Past Projects
Visual Arts & Crafting
Homepage
This page hosted by GeoCities Get your own Free Home Page