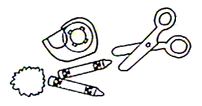
You Need: A. Crayons or markers B. Scissors C. Glue D. 3-liter plastic bottles E. Tape F. Pompoms G. Pipe cleaners
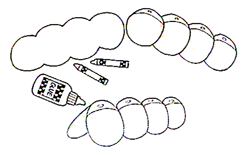
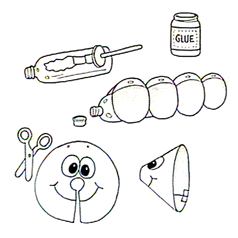
1. Reproduce the caterpillar head pattern once and the body pattern twice for each child. Have each child color the head and one printed side of the body and cut out. Then tell each child to turn the other body around, color the back of it, and cut out as shown. 2. Help each child glue the top edges of the bodies together as shown so the colored sides face out. 3. Tell each child to brush glue along the middle of the body and fit around a 3-liter plastic bottle as shown. Make sure the bottom edge of the caterpillar is not glued to the bottle, and comes down to the surface on which each child is working. This will act as a stand for the bank. 4. Have each child unscrew the cap from the bottle and put aside. Then help each child cut a slit up from the base of the caterpillar’s head to the nose as shown. 5. Have each child cut out the nose. Overlap the two cut edges until they form a cone with a hole in the center large enough for the opening of the bottle as shown and tape together. 6. Tell each child to brush glue on the back of the head, fit it onto the bottle opening, and press onto the sloping side of the bottle as shown. 7. Give children pompoms to glue onto the tops of the bottle caps, and pipe cleaners to attach to make antennae. 8. Children can unscrew the caps to put money in or to take money out of the caterpillar banks.